1
\$\begingroup\$

I originally asked this question on DIY StackExchange. So far no answers and a suggestion to try on Electronnics, so here goes:

I have an IKEA lamp with dimmer switch which took a knock and immediately started outputting full brightness. I've read a little about how dimmer switches work and that this is likely caused by the triac breaking.

I would like to repair this by replacing the triac (/diac combination?) but want to make sure that I have the right idea and check if there are any risks in doing so.

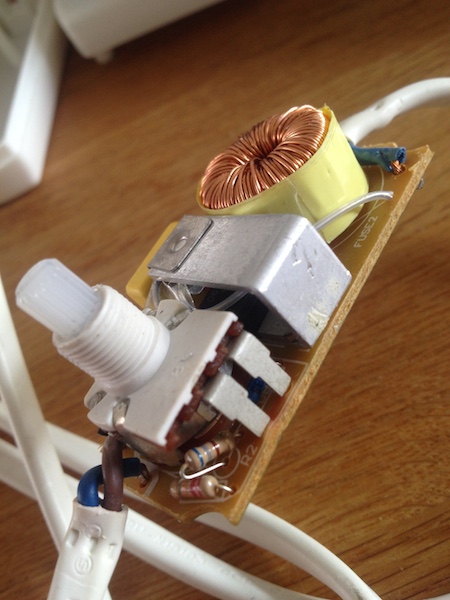
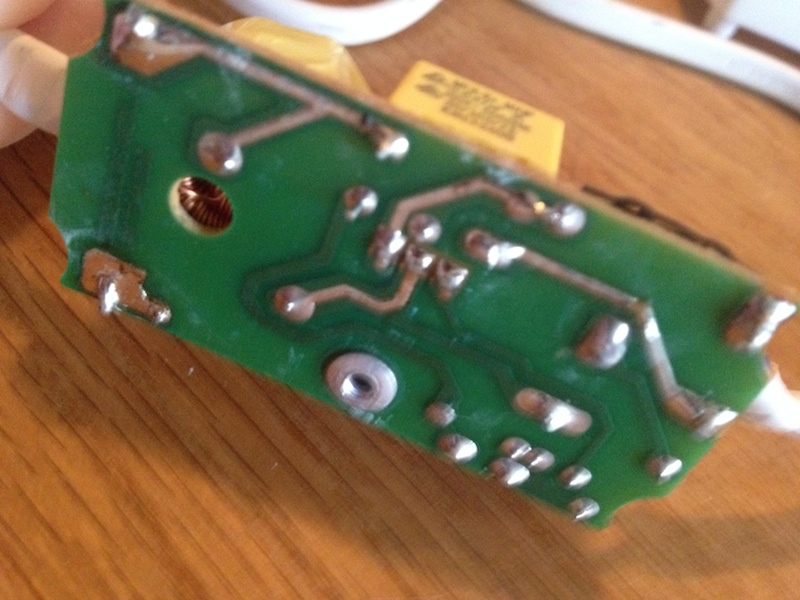
Photos:

Top front Top back Bottom

As I understand it the block in the middle with the metal cover is the triac, possible also a unit containing a diac. Then the obvious variable resistor connected to the outside, a fuse (looks like a second fuse attached under the metal hood -- and labelled on the board -- but can't see it properly until disassembly), some resistors (baseline resistance? "taper"?) and finally the inductor and capacitor smooth out the voltage cut, reducing stress/noise on/from the load.

I plan to desolder the triac unit and replace it with an equivalent part (if I can find one). Is there a good way to confirm the triac is broken in advance? Are there any safety concerns?

UPDATE: I have since confirmed that the metal cover in the middle contains a triac (including make/model) and a thermal cutoff.

\$\endgroup\$
2
  • \$\begingroup\$ It is unlikely a physical shock would damage the triac, more likely to damage the pot or connections. I would start by reheating the joints - particularly the bottom left corner as seen on the underside of the board. There is a safety concern, don't touch any part of this when powered up and not in its box - it will all be dangerously live. \$\endgroup\$
    – Martin
    Commented May 21, 2015 at 12:51
  • \$\begingroup\$ Naturally I would not want to power it uncovered but thanks for making sure. I've already tested connectivity between solder points. \$\endgroup\$ Commented May 21, 2015 at 13:00

1 Answer 1

2
\$\begingroup\$

To test the triac out-of-circuit you can use an ohmmeter on the lowest range. You need to find the datasheet. If it's the type with a built-in diac you won't be able to easily test the gate with low voltage.

Test for continuity between MT1 and MT2, in both directions.

enter image description here

If you find continuity in either (or both) direction(s) then the triac is knackered, end of story. This is the most likely failure mode. It is typically caused by an overcurrent surge even such as arcing during the failure of an incandescent bulb.

Another test that can be done is to hold the meter terminals (using the lowest ohms range) on MT1 and MT2 and momentarily touch MT2 to gate without breaking either of the connections. The meter should show continuity as long as the gate is touching, and may continue to show continuity after the the gate connection is broken. You can test it both ways.

A more functional test that is a bit more trouble to set up is to get a 12VAC transformer and a 12V few-watt light bulb (maybe an automotive bulb) and connect the triac in series with the bulb to the transformer secondary. Use a 100 ohm resistor to momentarily connect gate to MT2. The light should go on as long as the gate is connected. If the light does not turn on or the resistor gets really hot the triac is bad. If the light goes on without the resistor (full or partial brightness) then the triac is dead.

Personally, I would order the triac immediately without testing. There is no other plausible failure that will cause the light to remain on at full brightness, and the triac failure is likely the only failure.

\$\endgroup\$
2
  • \$\begingroup\$ In the end I am unable to remove the triac, it is riveted to the metal enclosure and board. If I've identified the pins correctly (MT1/MT2/GATE left to right as it faces me rivet up and top), I get no resistance between MT1/2 and about 700 ohms between each and gate. Either way, I cannot find a combination with infinite resistance. \$\endgroup\$ Commented Dec 5, 2016 at 15:19
  • 1
    \$\begingroup\$ Just drill the rivet out and replace it with a machine screw and nut. \$\endgroup\$ Commented Dec 5, 2016 at 18:37

Your Answer

By clicking “Post Your Answer”, you agree to our terms of service and acknowledge you have read our privacy policy.

Not the answer you're looking for? Browse other questions tagged or ask your own question.