0
\$\begingroup\$

Please note: although this question involves a Raspberry Pi (hereafter RPi), it is really a pure electronics question at heart!


I am trying to connect my RPi 1 Model A to a breadboard with a single, simple on-off-on-off switch on it. The kicker here is that although I'm using an on-off-on-off switch, I really just want it to function like a normal (on-off) switch. That is: push it once, the circuit is closed and sending an input signal on to my RPi. Push it again, and the circuit open. Rinse and repeat.

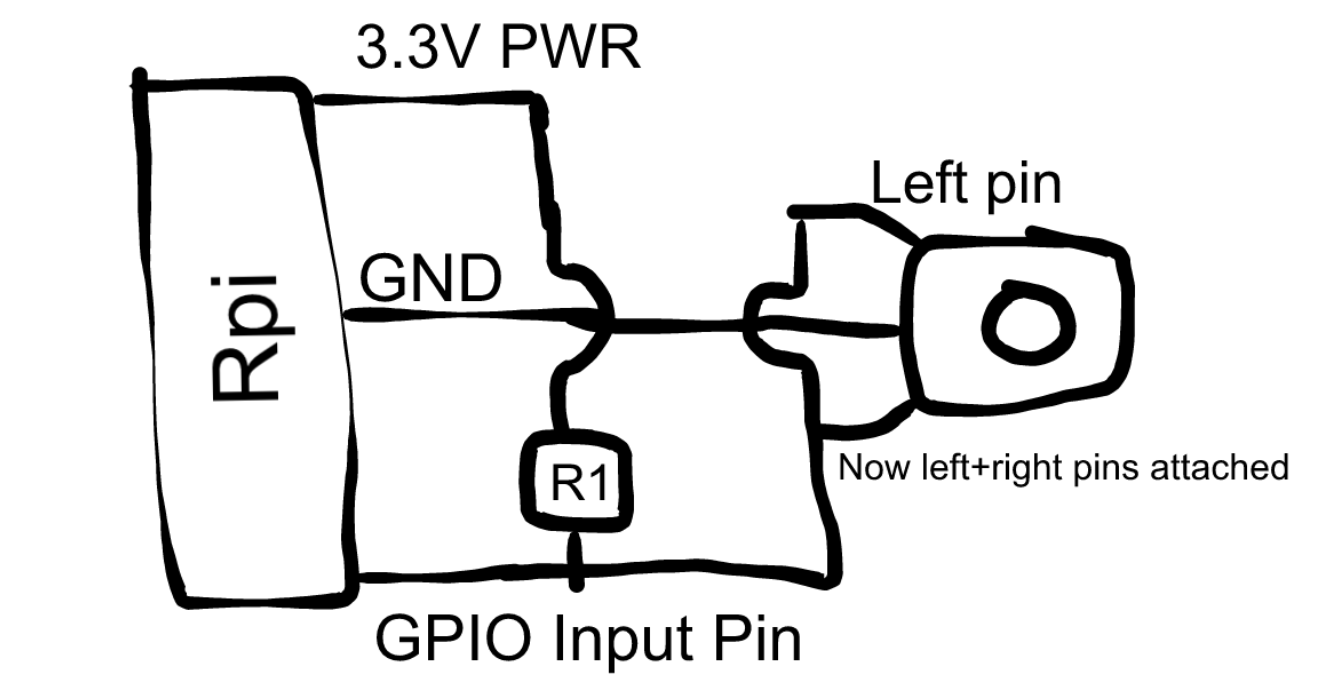
I was given this diagram to follow for wiring things up:

enter image description here

I then subsequently inferred my own rendition of this, which more clearly shows the joining of the switch's left and right pins together (giving it the desired on-off behavior) as well as how to wire the 3.3V power on the RPi to the GPIO input pin:

enter image description here

So to behin with if anything above looks incorrect or awry to you, please begin by correcting me!

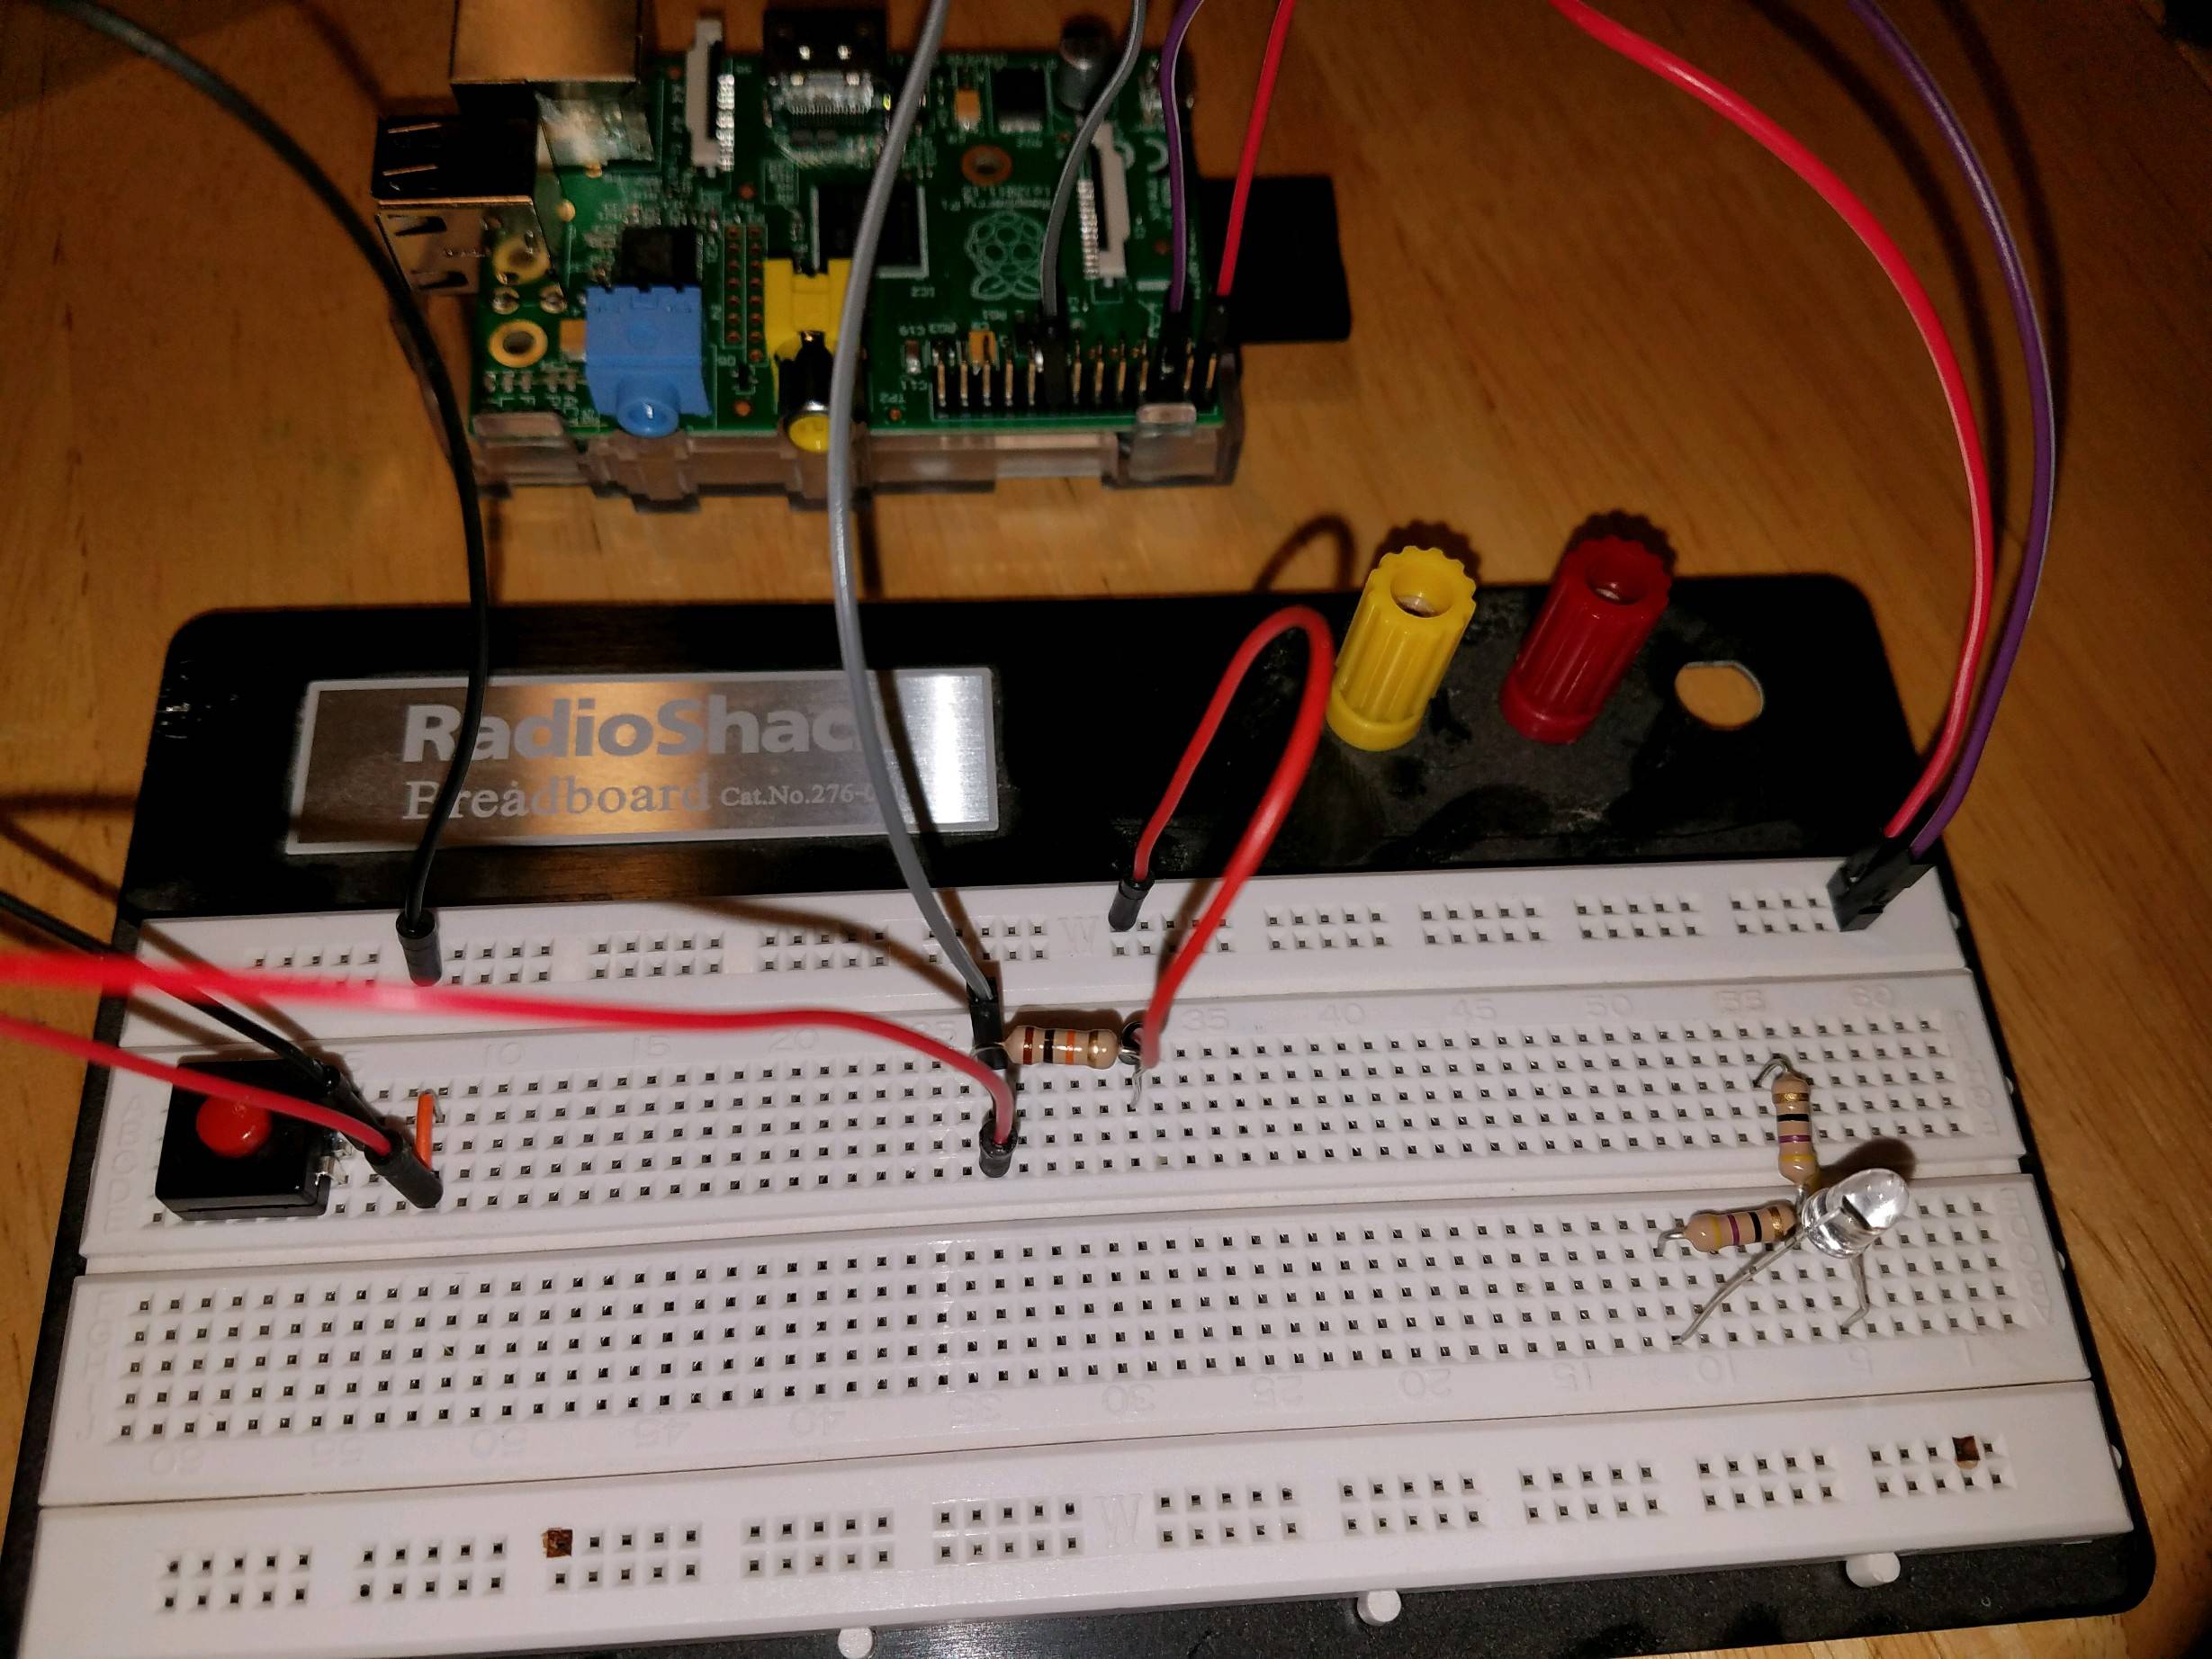
Assuming I'm on track, I'm now trying to actually wire this up in real life, between my RPi and my breadboard. Here's my best attempt:

enter image description here

Nevermind the LED and resistors in the bottom right corner of the breadboard, they're leftover from another experiment and aren't connected to anything else.

  • So at the top-left we have the 3.3V power source from the RPi connected to the top-most rail on the breadboard via a red jumper; then
  • A smaller red jumper wire forwards the power onto a column that is then connected to a 10-kOhm resistor; more on this in a second

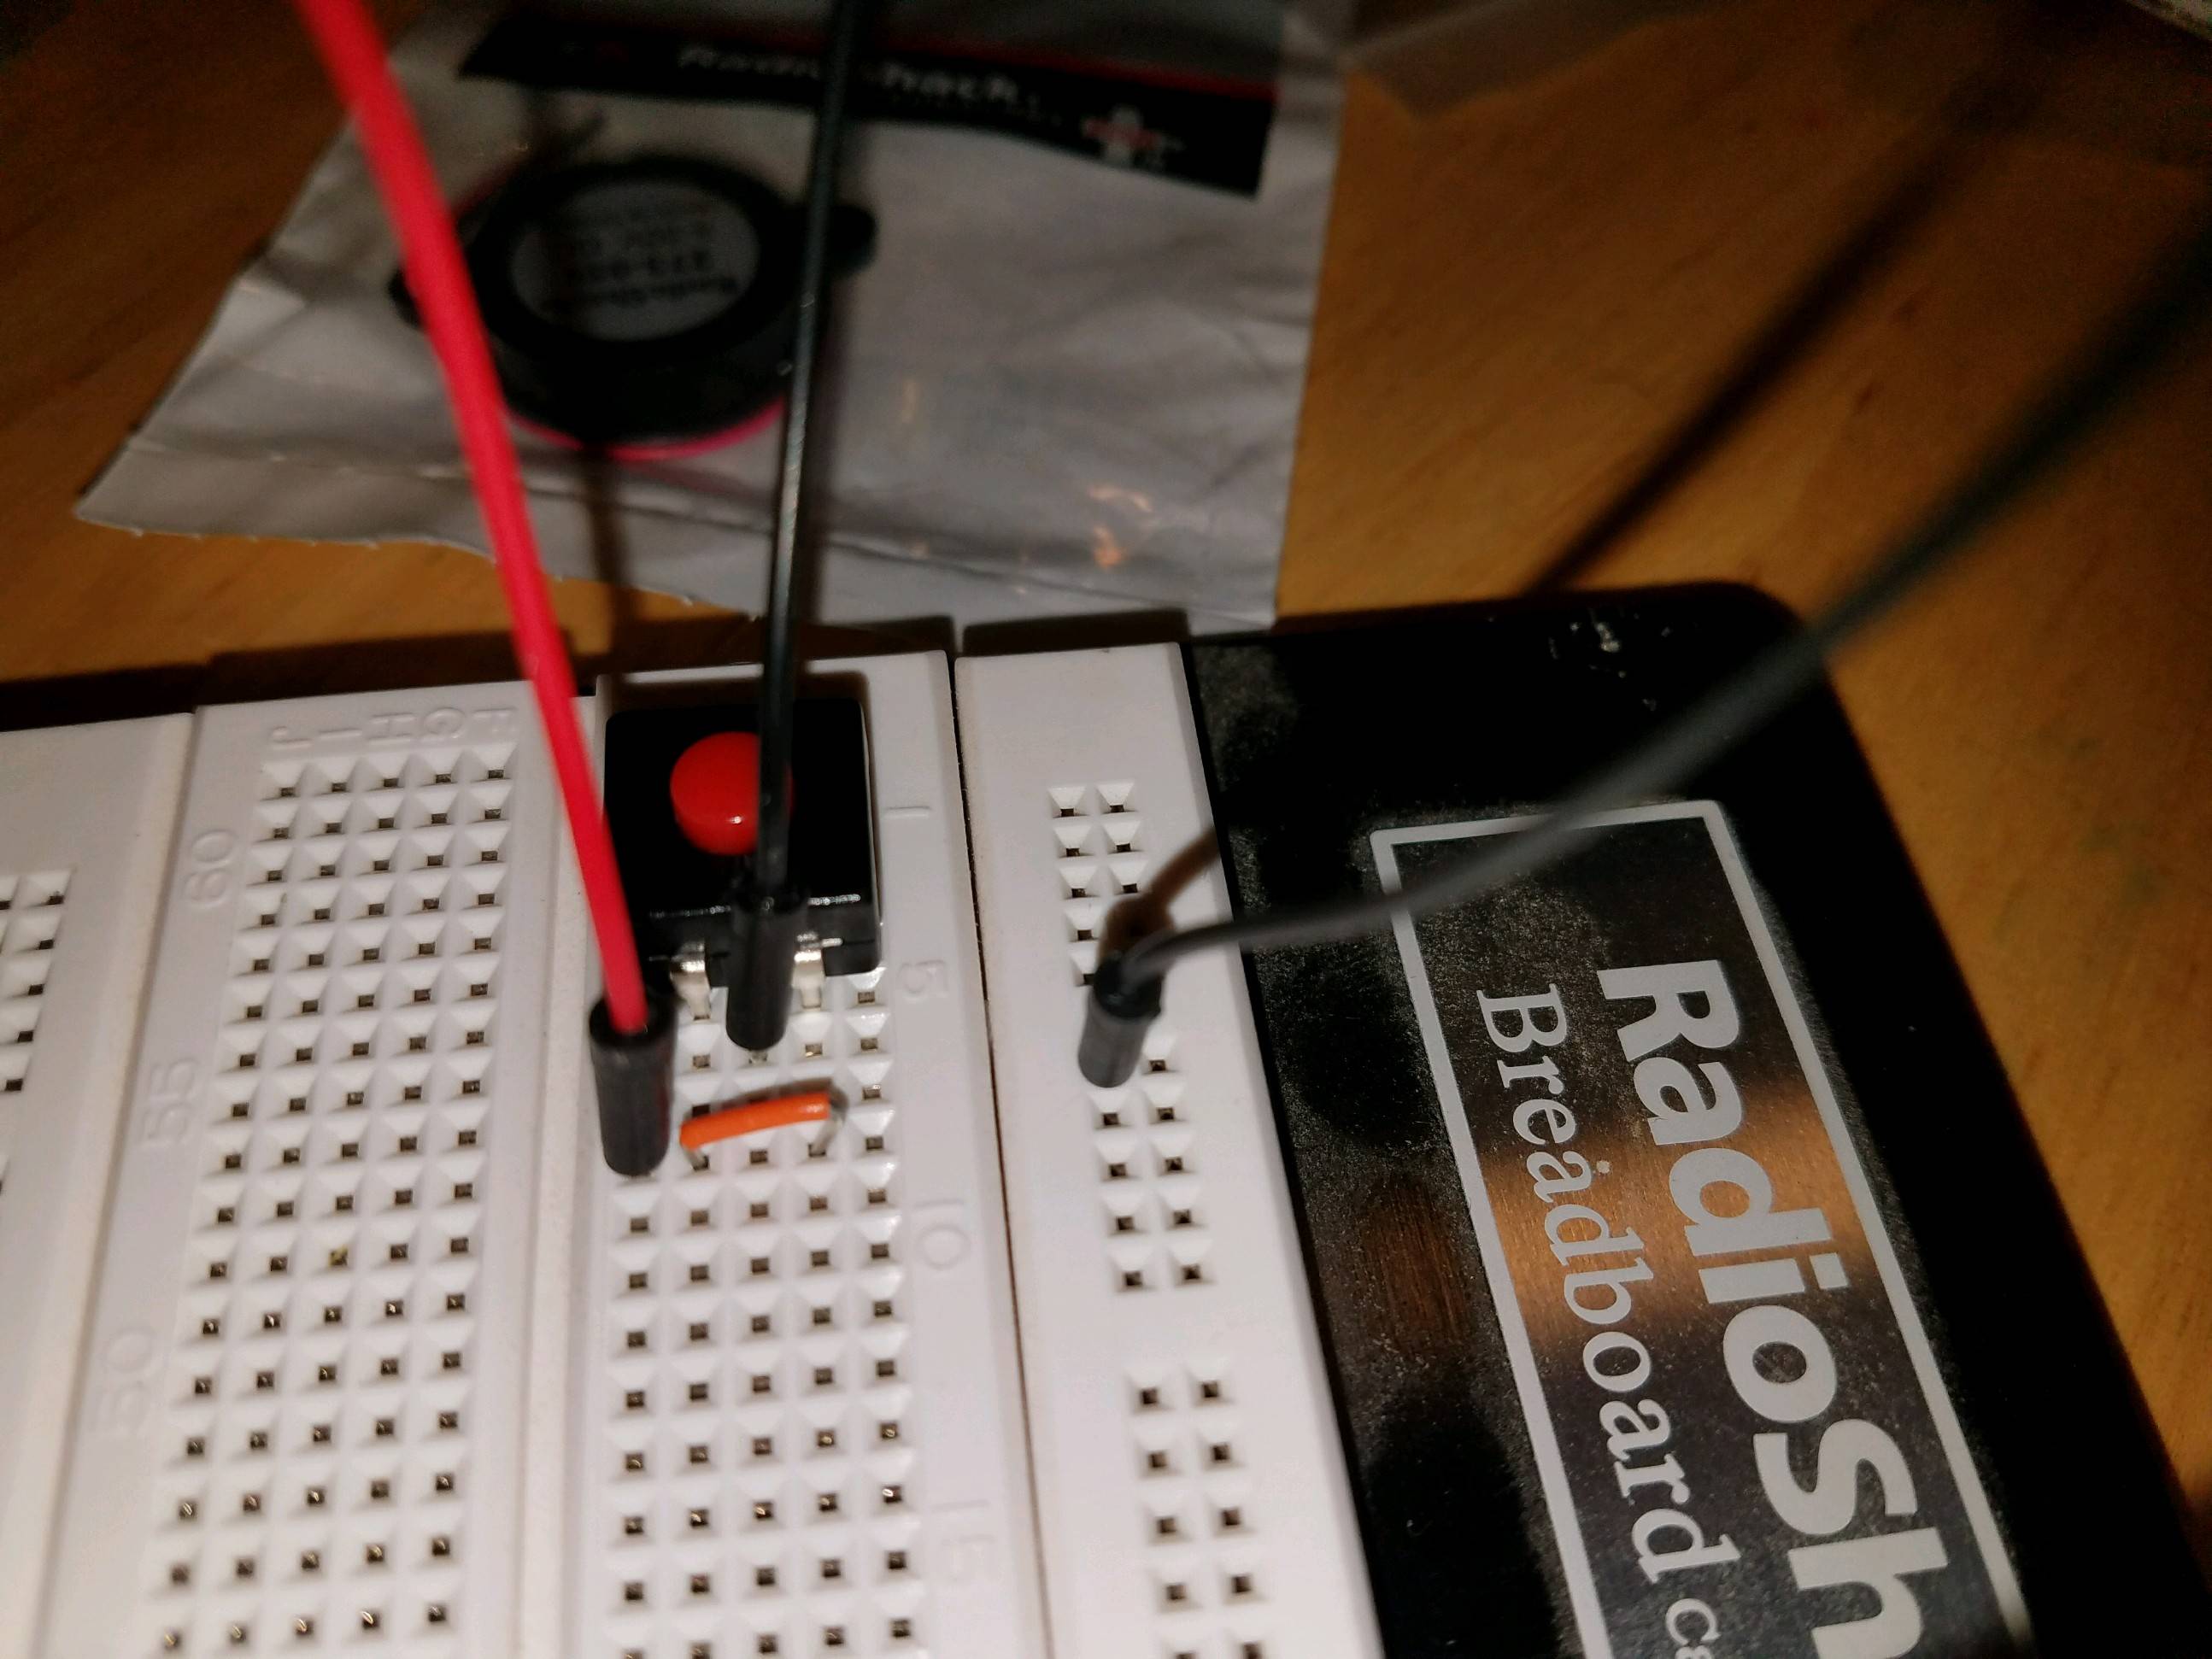
On the left-side of the above photo we have the switch, here's a better look at the wiring/setup:

enter image description here

  • Notice the small orange jumper connecting the left and right switch pins; I believe this is what accomplishes the on-off-on-off -> on-off behavior I'm looking for
  • The same column that joins left and right pins (via orange jumper) is also connected to a red jumper which is also connected to the same 10-kOhm resistor we talked about up above
  • Finally, the switch's middle pin is connected to the GND rail via a black jumper

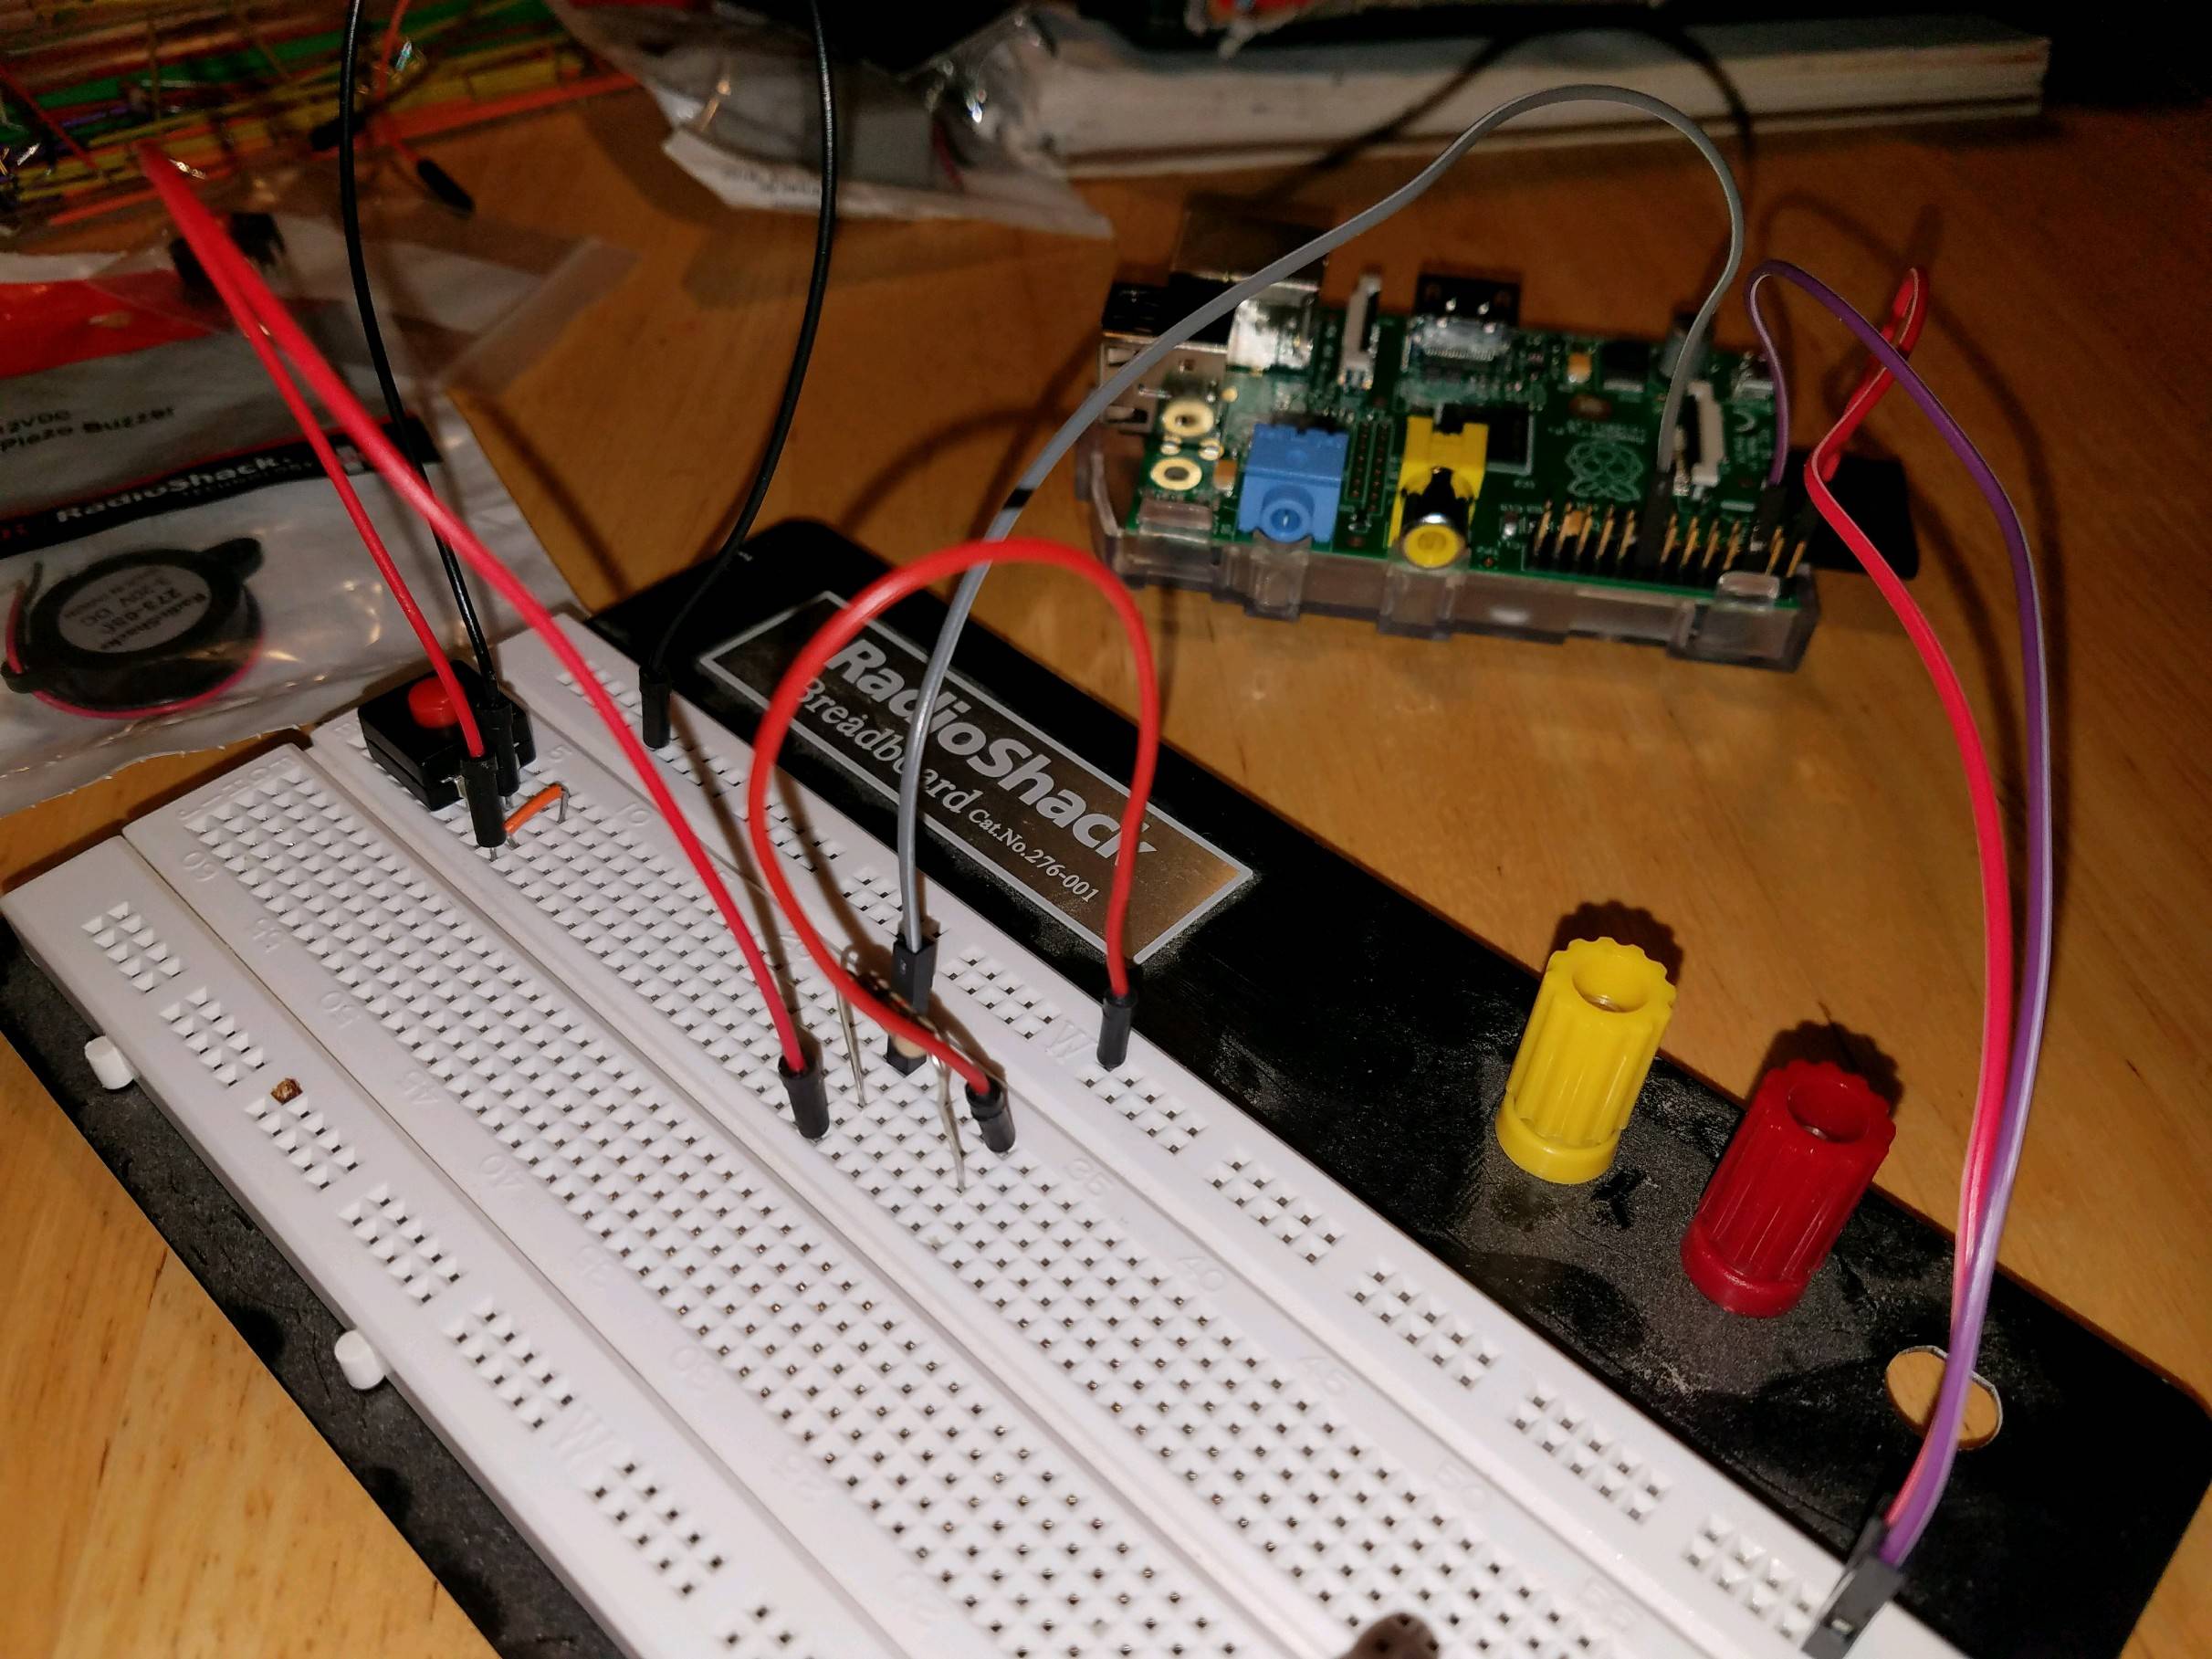
This brings us to the center of the beadboard, where that big fat 10-kOhm resistor is hanging out:

enter image description here

  • The resistor is connecting the RPi's power to the switch (both pins at the same time)
  • The resistor is also connecting back to the GPIO's input pin via gray jumper wire

Finally, my question!

Remember, at the end of the day, all I want to do is:

  • Convert this on-off-on-off switch to a on-off switch
  • When the user presses the switch (closing it), an appropriate signal is sent on to the GPIO input pin, which is then handled at the software layer

So I ask: will my circuit accomplish the following behavior? Is it wired correctly (correct junctions of wires, correct usage of resistor, etc.)? Or will it "fry my pi"?! If anything is incorrect, what's the fix/solution?

Update

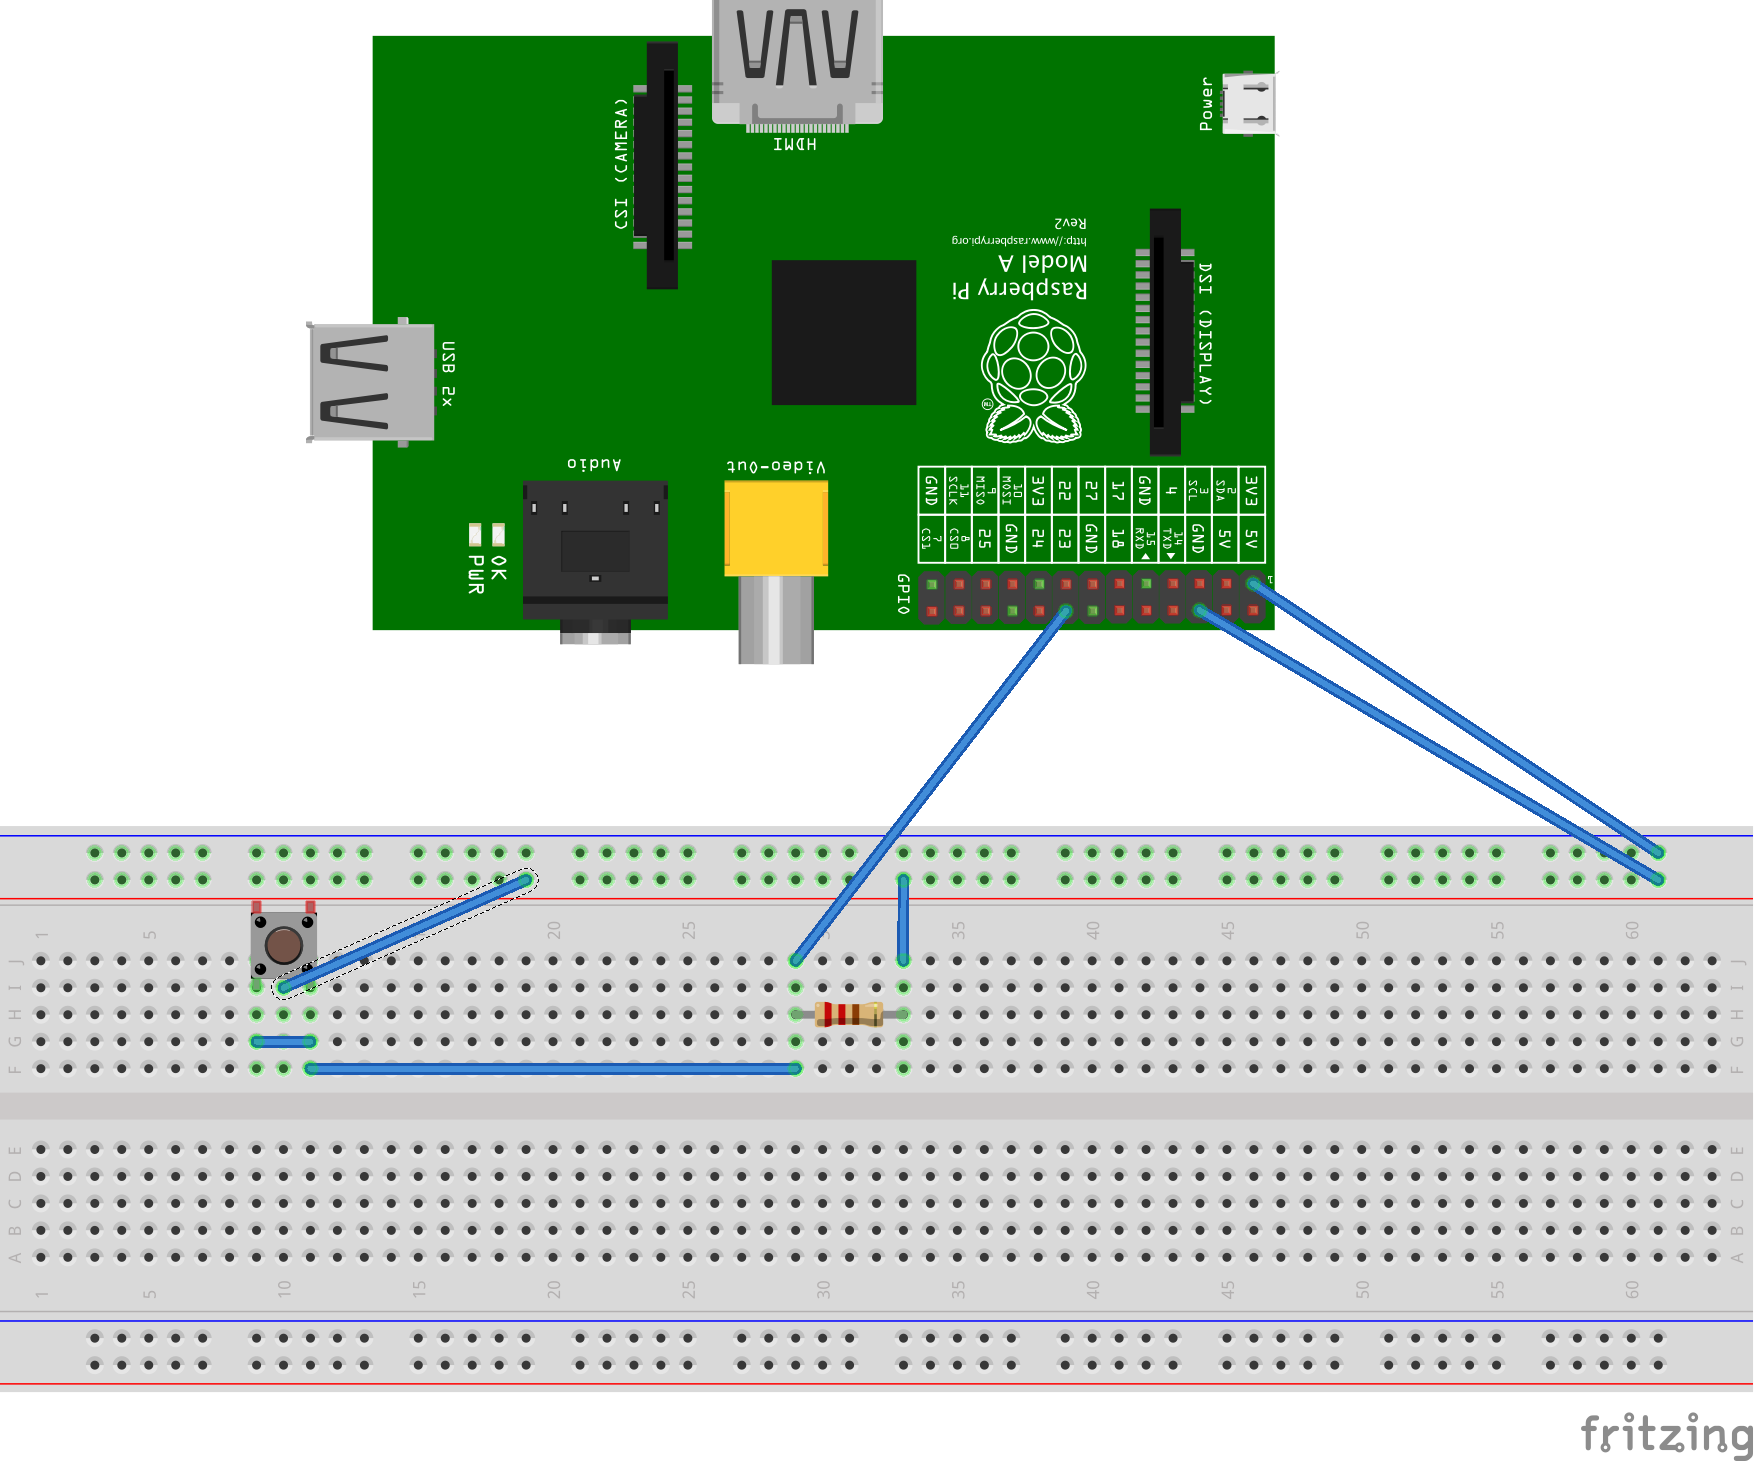
Several users have pointed out to me that my wiring around the switch is incorrect, here's a Fritzing diagram of what I think the solution is:

enter image description here

Final update

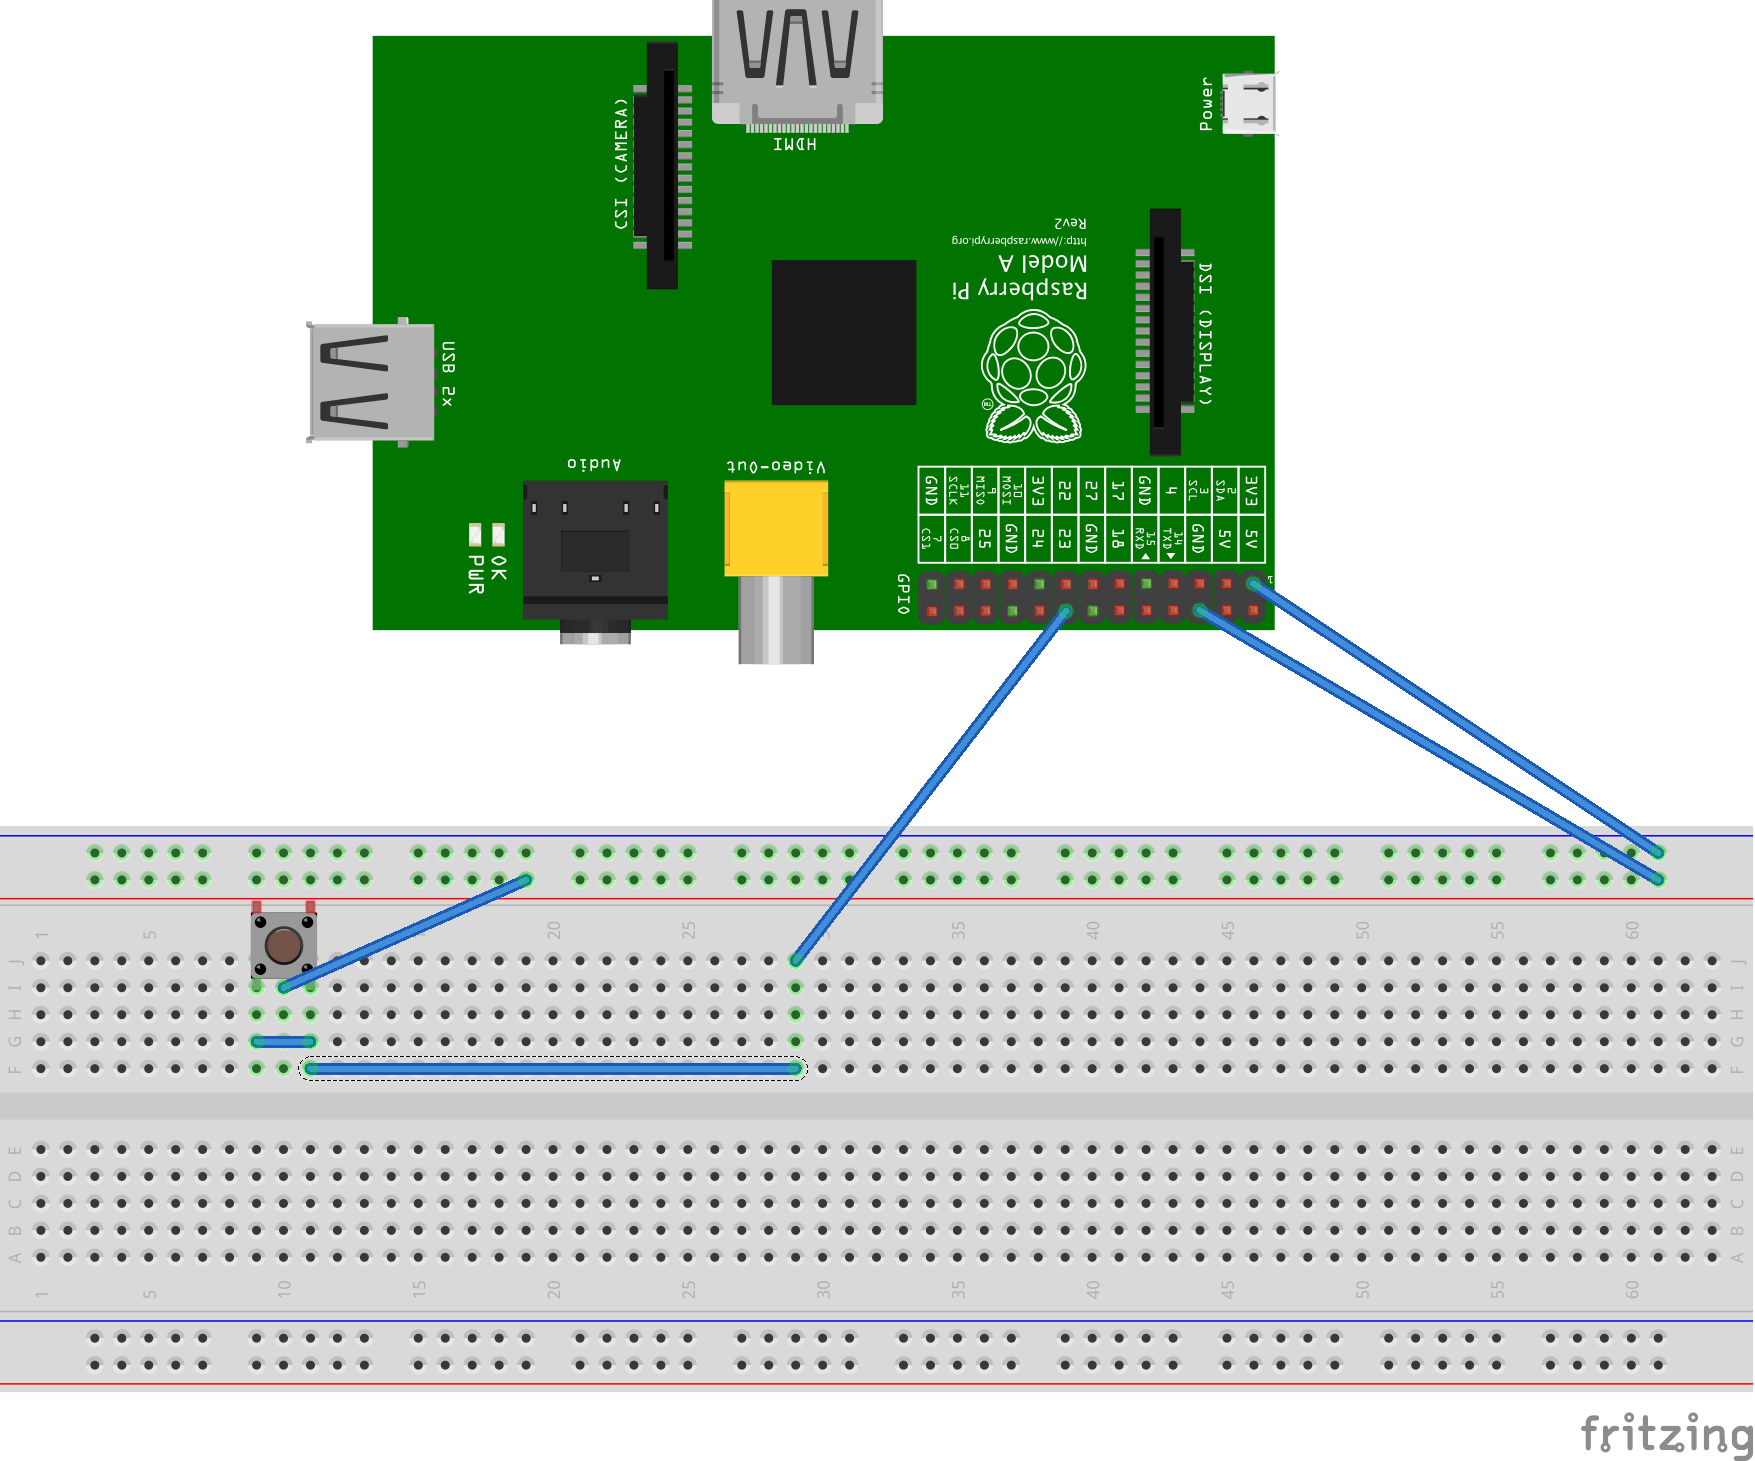
Wiring when I set the internal pin resistor at the software layer, and omit the breadboard resistor:

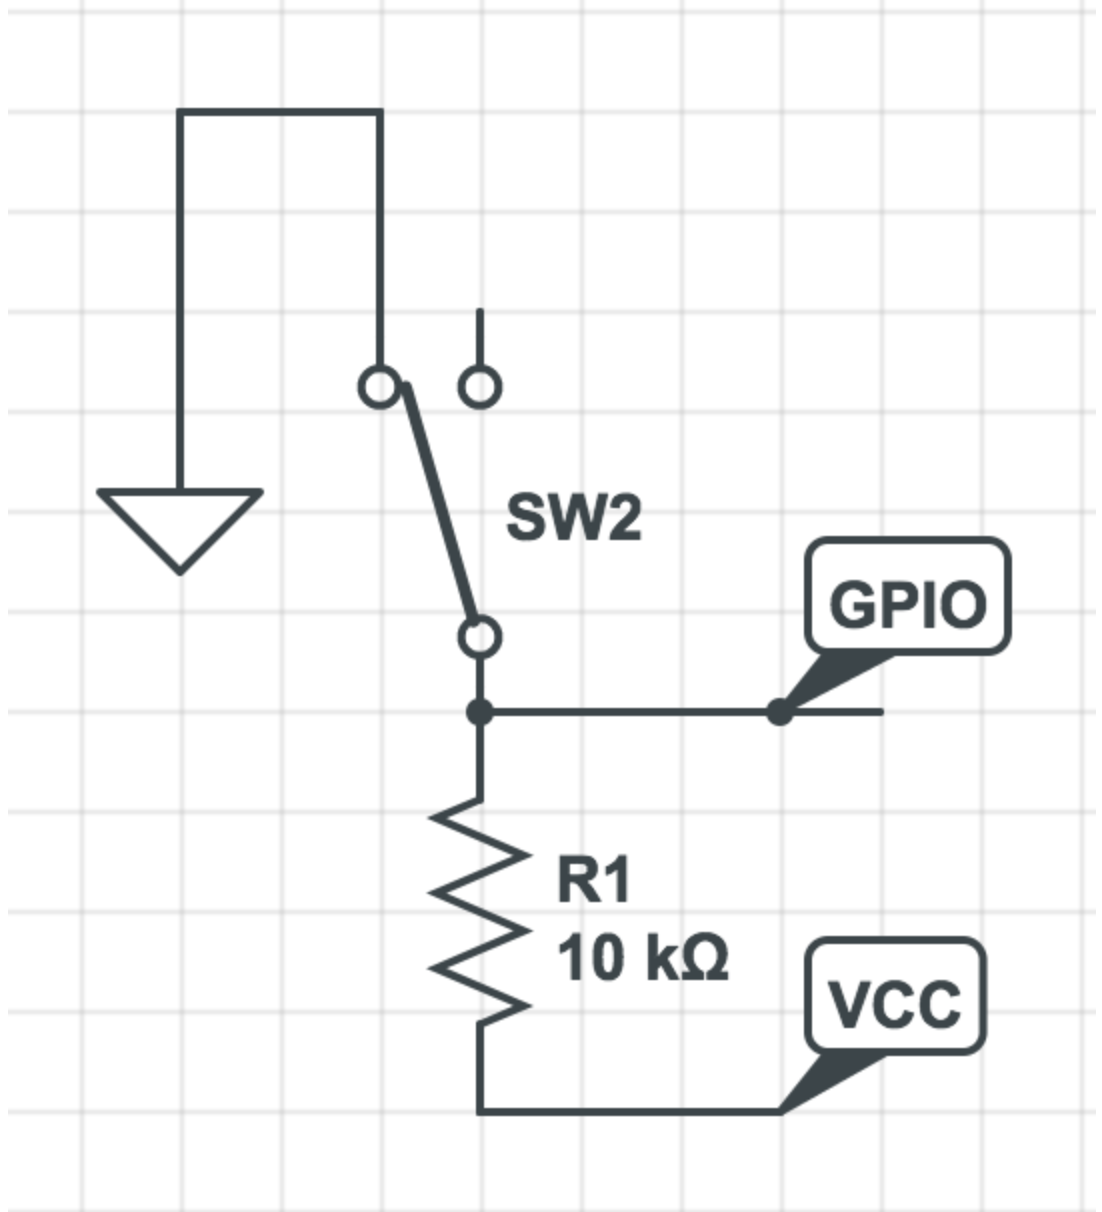
enter image description here

\$\endgroup\$
10
  • 4
    \$\begingroup\$ The connections in the middle of a breadboard run in the other direction. To/from the center, not parallel to the sides. \$\endgroup\$ Commented Sep 20, 2017 at 14:37
  • 3
    \$\begingroup\$ It appears that you don't understand how the holes in the breadboard are connected. By the switch, you seem to assume that the connections in the center portion of the board run the length of the board, to get from the switch terminals to the orange jumper, but you also want the connections across the board to connect the orange jumper to the red wire. The wiring around the resistor looks OK. Beware that on some boards, the strips along the edges have a break in the middle. \$\endgroup\$ Commented Sep 20, 2017 at 14:58
  • 1
    \$\begingroup\$ Looks like you connected ground to both "ends" of the circuit. It should be VCC to one part and ground to the other. \$\endgroup\$ Commented Sep 21, 2017 at 0:32
  • 1
    \$\begingroup\$ @smeeb Yes it is but there's nothing else connected to the top rail, both connections are to the bottom rail (out of the top 2 rails). \$\endgroup\$ Commented Sep 21, 2017 at 1:05
  • 4
    \$\begingroup\$ @jalalipop: Downvotes are probably mostly due to Fritzing diagrams. Usually these completely fail to show the schema of the circuit and are regarded here as childish wiring diagrams or "cartoons". In this case they were useful as the circuit was trivial and it was obvious that the OP had failed to translate his correct, if mostly upside-down, schematic clip into correct wiring. See my answer below. \$\endgroup\$
    – Transistor
    Commented Sep 27, 2017 at 17:52

1 Answer 1

6
+350
\$\begingroup\$

enter image description here

Figure 1. Incorrect pull-up.

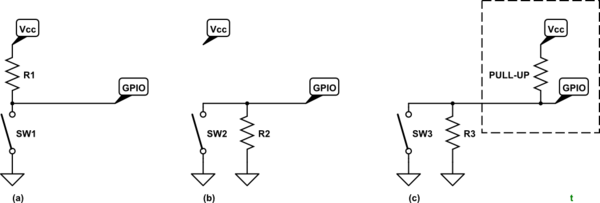
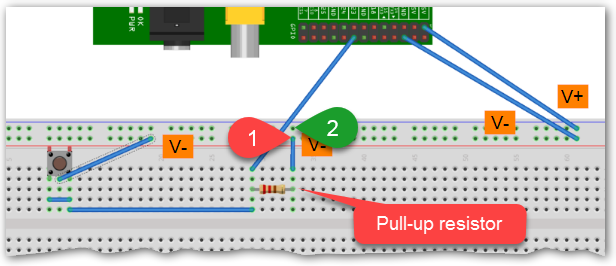
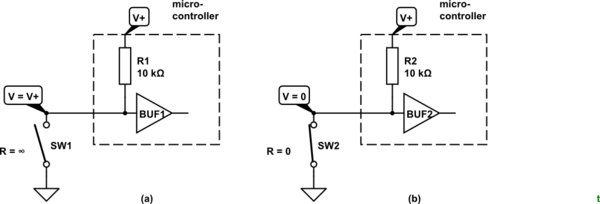
Your pull-up resistor is connected to the wrong rail. It is pulling down. Your button just pulls it down better.

schematic

simulate this circuit – Schematic created using CircuitLab

Figure 2. (a) What you intended. (b) The way you wired it. (c) With internal pull-up enabled.

The wire link on the right end of your resistor is wired to GND instead of V+.

If you can program the GPIO with internal pull-up then omit the resistor. It is not required. In the present configuration it is competing with the pull-up and the input voltage can never rise above that set by the potential divider created by the pull-up and pull-down.


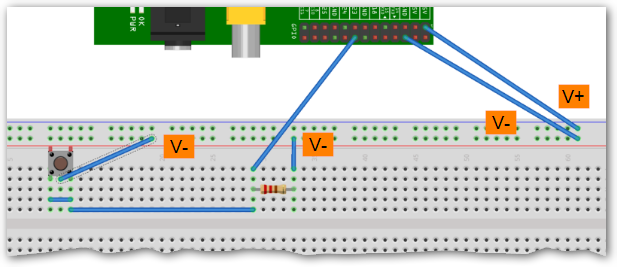
Extreme clarification:

enter image description here

Figure 2. The pull-up resistor jumper wire needs to be moved to terminate in position 2 - not position 1.


From the comments:

OK, so I will initialize my pin at the software layer via gpioController.provisionDigitalOutputPin(RaspiPin.GPIO_23, 'RunningLed', PinState.HIGH), which will cause the GPIO pin #23's internal resistor to "pull up" (PinState.HIGH), so that when someone pushes the switch (which in turn closes the circuit) the internal resistor will kick in, yes?

That will work correctly but your description of the action is incorrect.

schematic

simulate this circuit

Figure 3. Internal pull-up with external pull-down switch.

  • Once enabled the pull-up resistor will be in-circuit as though it is wired in place. It doesn't "kick-in" at any point but it will be effective under certain conditions.
  • Fig. 3a: With SW1 open the pull-up, R1, connects the internal buffer to V+. The input is now "pulled-up" to Vcc. It will be read as "high" by your program.
  • Fig. 3b: With SW2 closed the pull-up is still trying to pull but is overcome by the much, much lower resistance of the switch. The input voltage will drop to 0 V. The input will be read as "low" by your program.

Note that earlier in the discussion you were going to have an external pull-down and an internal pull-up. This would not work as the voltage (with the switch open) would be neither fully high nor fully low and would probably be in an undefined state alternating between the two when read by your program.

\$\endgroup\$
12
  • \$\begingroup\$ Thanks @Transistor, any chance you could include a Fritzing diagram (or any wiring diagram really) that explains what you're talking about? It sounds like my resistor needs to be connected to the power (V+) rail? And then am I setting the GPIO input pin to be a pullup resistor, or pulldown? Thanks again! \$\endgroup\$
    – smeeb
    Commented Sep 21, 2017 at 1:42
  • 1
    \$\begingroup\$ @smeeb: See Figure 2, etc. Generally we don't use Fritzing on this site as they only show wiring whereas we are interested in the schema and so use schematic diagrams. \$\endgroup\$
    – Transistor
    Commented Sep 21, 2017 at 2:02
  • 3
    \$\begingroup\$ @smeeb fritzing diagrams aren't really accepted here, they are frowned upon in questions and requesting one be added to an answer is far out of bounds. Engineers use schematics because they are clear, while fritzing diagrams are horribly unclear. \$\endgroup\$ Commented Sep 21, 2017 at 2:07
  • 1
    \$\begingroup\$ @smeeb: See the update. \$\endgroup\$
    – Transistor
    Commented Sep 25, 2017 at 13:55
  • 1
    \$\begingroup\$ Nooooooooo! You have missed the whole point of my answer. If the switch pulls down then the resistor (internal or external) must pull up. Your wiring is OK but you must program internal pull-up. \$\endgroup\$
    – Transistor
    Commented Sep 27, 2017 at 17:47

Your Answer

By clicking “Post Your Answer”, you agree to our terms of service and acknowledge you have read our privacy policy.

Not the answer you're looking for? Browse other questions tagged or ask your own question.