Overview
PUJTs (aka PUTs) have rather wide variations between parts. They were suddenly popular in the 1960s, but I think they had different names back then. Today, they've been renamed as the 2n6027 and 2n6028. (There may be other versions today, but I'm not aware of them.) I have bunches of both here, but I don't use them that often.
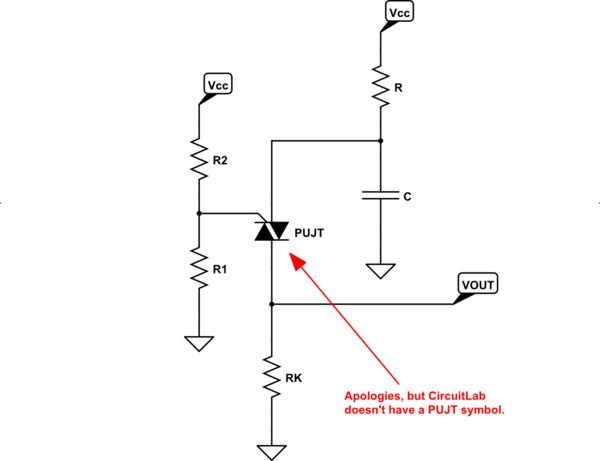
They are thyristors (SCR-like) and can be "programmed" easily with a resistor divider. There is a parameter called \$\eta\$ that was specified for the UJT (not the same device.) The resistor divider for the PUJT essentially allows you to set the value of \$\eta\$ (which you cannot do with the UJT.)
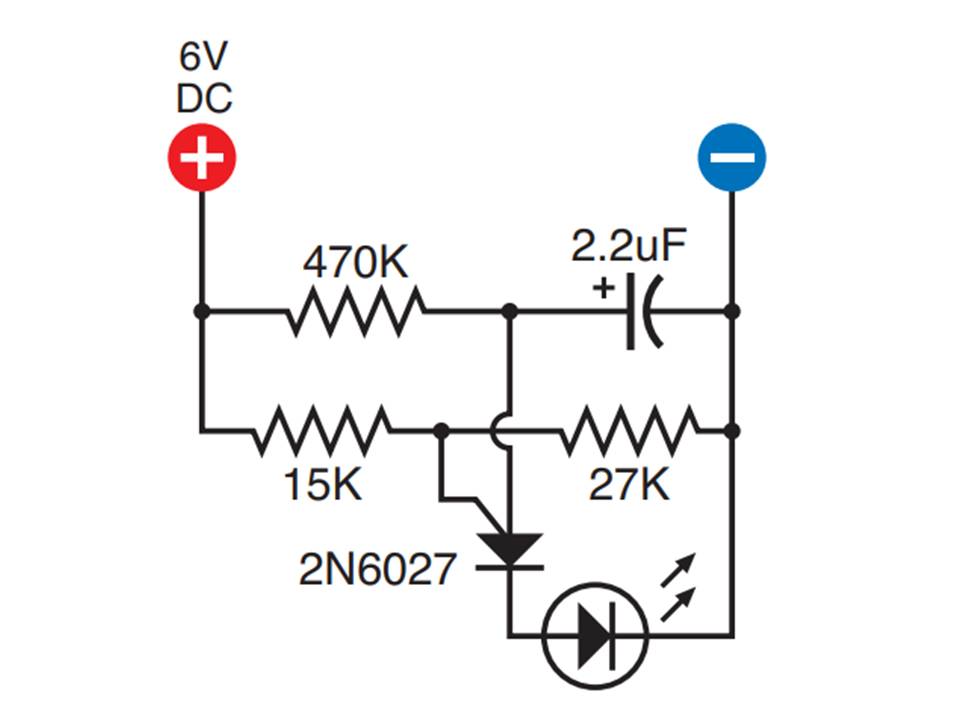
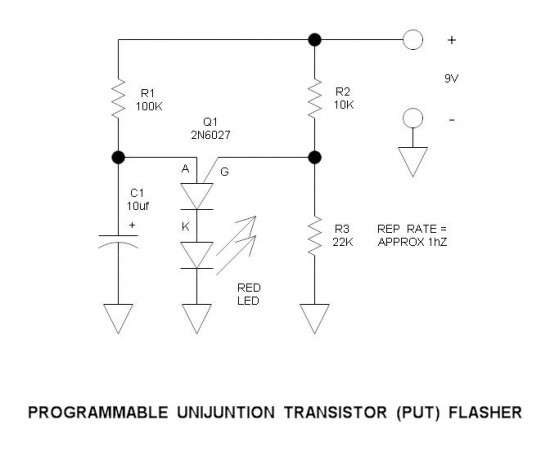
The basic canonical circuit looks like this:
simulate this circuit – Schematic created using CircuitLab
(Please forgive the weird PUJT symbol, as CircuitLab doesn't seem to include a PUJT.)
Grab up the OnSemi 2N6027/2N6028 datasheet. Note that, if your resistor divider is made up of \$R_1\$ and \$R_2\$ that they define \$R_\text{G}=\frac{R_1\cdot R_2}{R_1+R_2}\$ (the Thevenin resistance, of course) and \$V_\text{S}=V_\text{B}\cdot\frac{R_1}{R_1+R_2}\$ (the Thevenin voltage.) These will determine the valley current you need to allow the device to go below before the device can reset itself for another oscillation. Smaller values of \$R_\text{G}\$ provide for higher valley currents and larger values of \$R_\text{G}\$ provide for lower valley currents.
If resistor \$R\$, supplying both capacitor charging current and once triggered then also the anode current, is too small then \$R\$ will supply too much current after triggering and the device will have sufficient forward voltage to "sit" over the at far right of the following curve. Note that the forward current allowed by \$R\$ is higher than the valley current and so the system sits where the red dot is located. The result is that it won't oscillate.
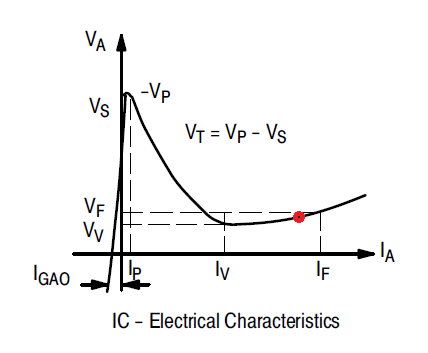
On the other hand, if you arrange things so that the circuit must go below the valley current for the device, then the device will reset itself and return to the point on the curve shown below:
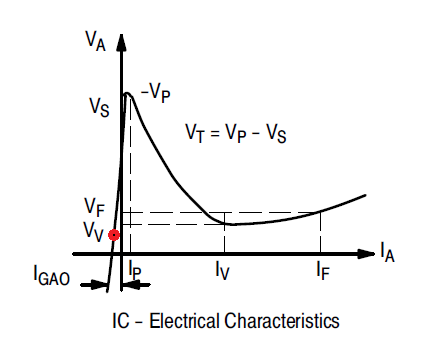
So, now the capacitor can begin to recharge and the cycle repeats. So you have an oscillator.
Design for pulsing an LED
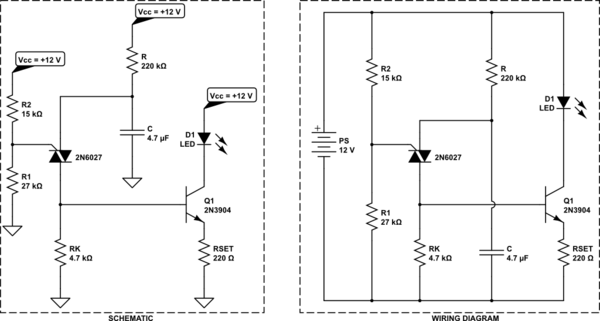
Here's a suggestion for driving a small LED. I've arranged it so that there is a current limiter action due to using \$Q_1\$ as an emitter-follower. The values of \$R_\text{SET}\$ and \$R_\text{K}\$ and \$V_\text{S}\$ will determine what happens with the LED.
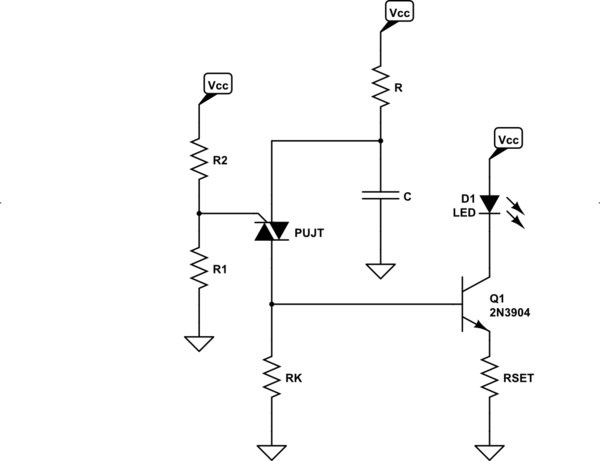
simulate this circuit
Looking at the datasheet, we see:

So we know that it will trigger at a range somewhat above \$V_\text{S}\$. Since \$V_\text{CC}=12\:\text{V}\$ in this case, let's set \$R_1=27\:\text{k}\Omega\$ and \$R_2=15\:\text{k}\Omega\$. (This results in \$R_\text{G}\approx 9.6\:\text{k}\Omega\$, which is close to one of the datasheet's offerings.) Therefore, \$V_\text{S}\approx 7.7\:\text{V}\$. We can expect things to trigger over a range of from \$7.9\:\text{V}\$ to \$8.3\:\text{V}\$, with a typical expectation of \$8.05\:\text{V}\$. Let's just call it about \$8\:\text{V}\$.
The valley current can be found here:

We will want to make sure it goes below \$70\:\mu\text{A}\$. This can be achieved by making sure that \$R\ge\frac{V_\text{CC}=12\:\text{V}}{70\:\mu\text{A}}\approx 172\:\text{k}\Omega\$. Let's go with \$R=220\:\text{k}\Omega\$.
For a blinking frequency on the order of one second, \$R\cdot C\approx 1\:\text{s}\$. So \$C=\frac{1\:\text{s}}{220\:\text{k}\Omega}\approx 4.6\:\mu\text{F}\$. We could go up or down from there, but let's go with the closest standard value of \$C=4.7\:\mu\text{F}\$.
The forward voltage during discharge is:

The LED current will follow an exponential decay curve (it won't be at some fixed value for the entire pulse.) Let's say we've decided on a peak LED current of \$30\:\text{mA}\$ as acceptable. We can expect that the maximum voltage across \$R_\text{K}\$ will be \$V_\text{MAX}\approx 8\:\text{V}-800\:\text{mV}=7.2\:\text{V}\$. If we assume that \$Q_1\$'s \$V_\text{BE}\$ will be, say, also \$800\:\text{mV}\$, then this means we have about \$7.2\:\text{V}-800\:\text{mV}=6.4\:\text{V}\$ across \$R_\text{SET}\$. So \$R_\text{SET}=\frac{6.4\:\text{V}}{30\:\text{mA}}\approx 213\:\Omega\$. Use the standard value of \$R_\text{SET}=220\:\Omega\$.
During discharge, a number of things happen. The gate voltage will pretty closely follow the cathode voltage on the way down. However, the anode voltage will be around a diode drop above the cathode. The equivalent circuit looks something like this for finding the minimum cathode voltage prior to reset:
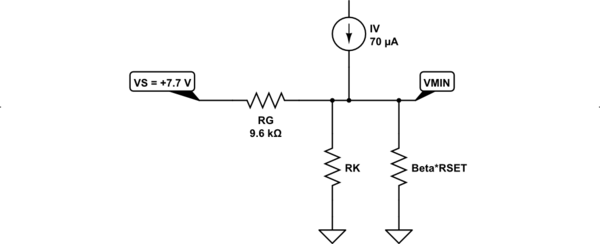
simulate this circuit
This solves out to about:
$$\begin{align*}
\frac{V_\text{MIN}}{R_\text{G}}+\frac{V_\text{MIN}}{R_\text{K}}+\frac{V_\text{MIN}}{\beta\cdot R_\text{SET}}&=\frac{V_\text{S}}{R_\text{G}}+I_\text{V}\\\\
&\therefore\\\\
V_\text{MIN} &=\frac{V_\text{S}+I_\text{V}\cdot R_\text{G}}{1+R_\text{G}\cdot\left(\frac{1}{R_\text{K}}+\frac{1}{\beta\cdot R_\text{SET}}\right)}
\end{align*}$$
At this point, we can either choose the value of \$V_\text{MIN}\$ or else \$R_\text{K}\$. I'm going to suggest that the minimum LED current should be about \$10\:\text{mA}\$ during discharge (going from a peak of \$30\:\text{mA}\$ to a valley of \$10\:\text{mA}\$ for a very rough average of \$20\:\text{mA}\$ [discounting the exponential decay aspect of this.])
So I add \$10\:\text{mA}\cdot 220\:\Omega=2.2\:\text{V}\$ to the \$V_\text{BE}\$ of \$Q_1\$ or \$V_\text{MIN}=2.2\:\text{V}+800\:\text{mV}=3.0\:\text{V}\$. Solving for \$R_\text{K}\$ is an exercise in math (involves LambertW function, which I'll avoid here.) But if you play around, you'll find that for \$70\:\mu\text{A}\le I_\text{V}\le 150\:\mu\text{A}\$ then \$R_\text{K}\approx 5\:\text{k}\Omega\$. So I've selected \$R_\text{K}=4.7\:\text{k}\Omega\$.
Discounting the small current provided by \$R\$ during discharge and the small base current required by \$Q_1\$, this leads to \$\tau=R_\text{K}\cdot C\approx 22\:\text{ms}\$. The discharge time is complicated by the current supplied into \$R_\text{K}\$ by \$V_\text{S}\$ through \$R_\text{G}\$. In this case, using an average current through \$R_\text{G}\$ of about \$600\:\mu\text{A}\$ for the period I get an equation for the capacitor voltage of about \$V_t=2.8\:\text{V}+5.2\:\text{V}\cdot e^{-\frac{t}{R\cdot C}}\$. (The value of \$2.8\:\text{V}\$ comes from \$R_\text{K}\cdot 600\:\mu\text{A}\approx 2.8\:\text{V}\$.) So the number of \$\tau\$'s required will be about: \$\operatorname{ln}\left(\frac{8\:\text{V}-2.8\:\text{V}}{3.6\:\text{V}-2.8\:\text{V}}\right)\approx 1.87\$. So the pulse period I'd predict is about \$1.87\cdot 22\:\text{ms}\approx 40\:\text{ms}\$.
The final circuit is:
simulate this circuit
Added in Response to OP's Test Results
As I mentioned in a comment I made to your answer here on your attempts to use the PUJT as an oscillator, I will attempt to build one and see if my results are similar to yours, or different. (I'll use dead-bug construction, myself, as I pretty much don't like solderless breadboards.)
In the meantime, I went out and secured some PUJT Spice models and have set up a circuit that replicates the results of the above analysis I did to see if Spice would agree (at least, in theory, so to speak.) Hopefully, this will provide some confidence in the theoretical approach, if nothing else.
The models I found for the two PUJTs I can simulate using Spice are:
.SUBCKT 2N6028 1 2 3
*Programable Unijunction Transistor
*MODEL FORMAT: PSpice
*       anode  gate  cathode
*node:    1      2      3
Q1 2 4 3 NMOD
Q2 4 2 1 PMOD
.MODEL NMOD NPN(IS=2E-15 VAF=100 IKF=0.3 ISE=2.5E-12 NE=1.6 RE=0.15 RC=0.15 CJE=7E-10 TF=0.6E-8 CJC=2.2E-10 TR=4.76E-8 XTB=3)
.MODEL PMOD PNP(IS=22E-15 VAF=100 IKF=0.3 ISE=1E-12 NE=1.7 RE=0.15 RC=0.15 CJE=7E-10 TF=1.6E-8 CJC=2.2E-10 TR=5.1E-8 XTB=3)
.ENDS
*
.SUBCKT 2N6027 1 2 3
*Programable Unijunction Transistor
*MODEL FORMAT: PSpice
*       anode  gate  cathode
*node:    1      2      3
Q1 2 4 3 NMOD
Q2 4 2 1 PMOD
.MODEL NMOD NPN(IS=5E-15 VAF=100 IKF=0.3 ISE=1.85E-12 NE=1.45 RE=0.15 RC=0.15 CJE=7E-10 TF=0.6E-8 CJC=2.2E-10 TR=4.76E-8 XTB=3)
.MODEL PMOD PNP(IS=2E-15 VAF=100 IKF=0.3 ISE=1.90E-12 NE=1.5 RE=0.15 RC=0.15 CJE=7E-10 TF=1.6E-8 CJC=2.2E-10 TR=5.1E-8 XTB=3)
.ENDS
Given the above, I was able to construct the following schematic in LTspice:
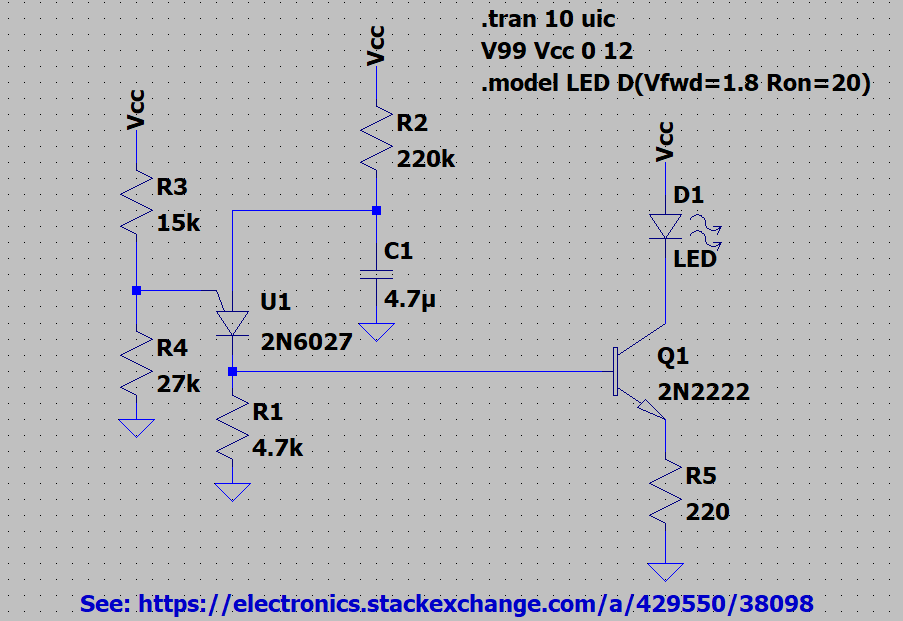
As you can see, there's nothing different nor particularly special here. It's just a replication of what I had discussed, earlier. (The main thing is the models, which I took from ORCAD's set of device models.) The BJT is just a typical 2N2222 device, which is quite common and not at all unusual. The LED model is a basic "red" LED designed to operate with about \$20\:\text{mA}\$ and about \$2\:\text{V}\$.
Here are the simulation results. The first picture here is for the entire 10 second run (using UIC):
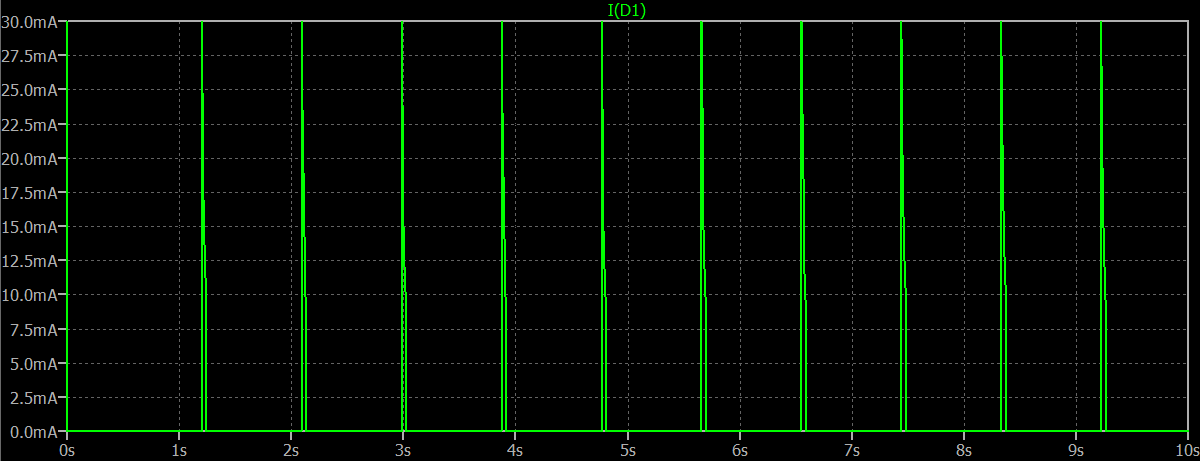
From above, you can see that the pulses occur approximately one second apart. Not quite, of course, because I hadn't accounted for the added load due to the BJT, itself, which will reduce the pulse duration somewhat. But this is well within reasonable expectations, I believe. And as you can see, LTspice does indicate that it will oscillate.
This second picture zooms up on one of the pulses:
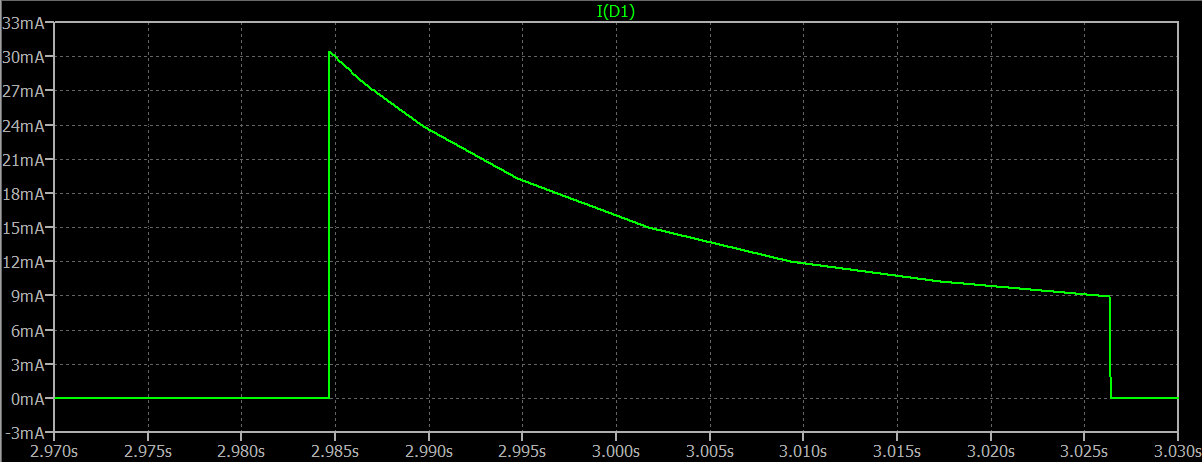
Here, you can see the peak pulse current, the pulse duration, and also the current at which it shuts off. I think you can see that the peak pulse current is close to the \$30\:\text{mA}\$ I'd predicted from theory. You can also see that the final current is \$10\:\text{mA}\$ just before it shuts off -- also as I'd predicted from theory. And finally, the pulse duration is about \$42\:\text{ms}\$, which I consider to be extremely close to what I had predicted from theory.
In short, I'm not sure how I could have possibly gotten any closer -- entirely from pure theory and reading a datasheet -- to what LTspice gets from using a model that was extracted from a source of PUJT models that came from ORCAD models developed circa 1990 and was at the time, obviously, completely unconnected directly to the datasheet I used to make my predictions of behavior, a few days ago.
This is a confirmation of sorts that independent thinking a few days ago, working from a datasheet, can result in very similar outcomes using a Spice simulator (which takes into account many, many more details than I did.)
What's left, of course, is to build it. Because of the relatively low values of resistors, I don't expect parasitics to be much of a problem. But I'll use dead-bug construction, anyway, just in case. Perhaps I'll uncover some important issue that wasn't in the datasheet and wasn't in the Spice models.
But for now, I consider the above to be a step towards confirming the approach I took here.

