8
\$\begingroup\$

I assembled this PCB using the SMD reflow process (I used the oven/toaster for heating step.)

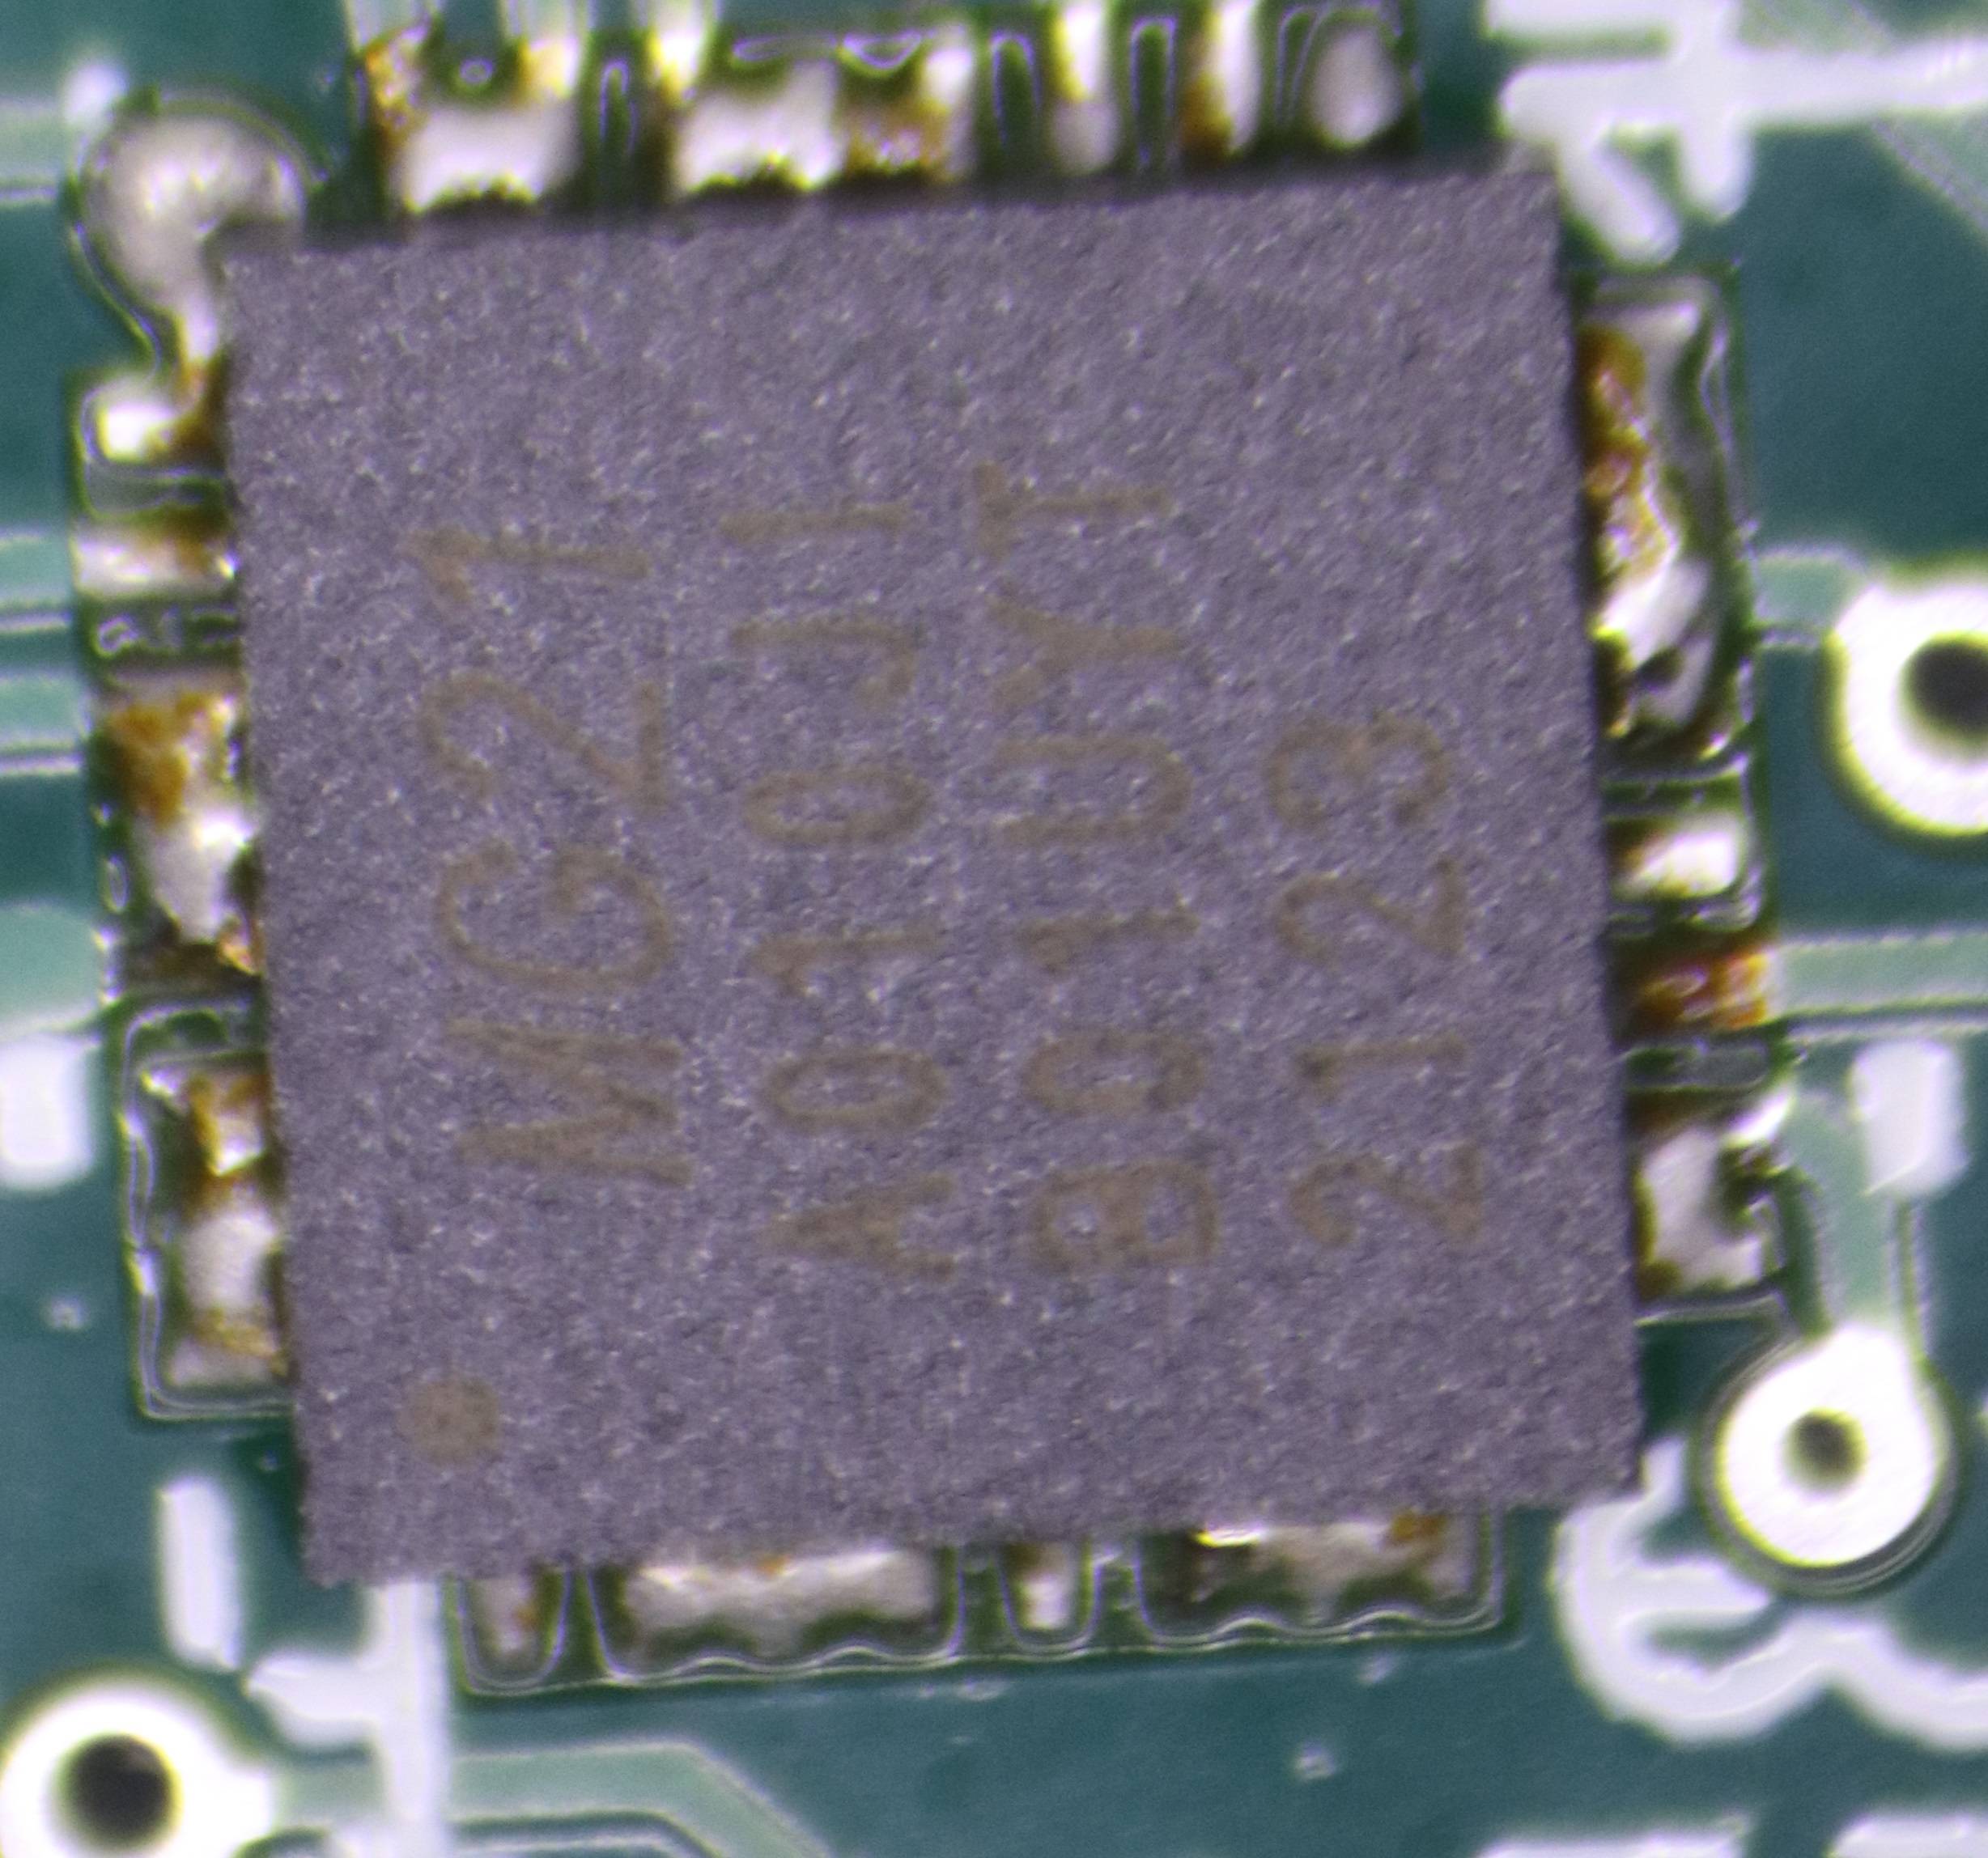
I am not sure why, but there there are solder bridges that have been formed on the MCU's pads. The footprint of this MCU is 3x3mm. Please refer to the image. I made this image using a microscope.

Is there anyway I can remove the solder bridges?

I feel like I can't use a soldering gun since its tip is too thick to remove the excess solder. Even though I somehow managed to remove the chip completely, I won't be able to put it back since I won't be able to use the stencil to put the solder paste back (since there are a couple of components beside it, I can't place the stencil.)

Can anyone help me with any suggestions?

solder bridges

\$\endgroup\$
9
  • 6
    \$\begingroup\$ God help you if that's lead free. \$\endgroup\$
    – DKNguyen
    Commented Sep 21, 2021 at 23:35
  • 6
    \$\begingroup\$ You dont absolutely need a stencil to solder SMD ICs. You can just pre tin the pads and use a hot air station. Far from ideal for assembly but works for repais. Be generous with flux. \$\endgroup\$
    – Wesley Lee
    Commented Sep 22, 2021 at 0:15
  • 3
    \$\begingroup\$ Hundreds of YouTube videos showing people swapping ICs on huge boards without stencils. It's easier if you watch it done thanks trying to have someone explain the technique. \$\endgroup\$ Commented Sep 22, 2021 at 0:33
  • 1
    \$\begingroup\$ @GaganBatra - By pre-tin I meant adding some solder to the pads, like you would with through hole components, with an iron and some solder wire. \$\endgroup\$
    – Wesley Lee
    Commented Sep 22, 2021 at 14:25
  • 1
    \$\begingroup\$ for prototype construction, to prevent this in the future, deposit less solder paste. Also slightly longer pads can help the excess solder have a place to go, and slightly narrower pads can maybe help. \$\endgroup\$
    – Pete W
    Commented Sep 23, 2021 at 4:09

5 Answers 5

28
\$\begingroup\$

With solder wick and a soldering iron. Flux will help

\$\endgroup\$
10
  • 1
    \$\begingroup\$ Oh wow, thank you, I am going to try this. \$\endgroup\$ Commented Sep 21, 2021 at 23:42
  • 5
    \$\begingroup\$ @GaganBatra Use flux, do not touch the chip with the iron. Instead, put the wick on the solder you want to remove and then heat it with your iron. A chisel tip is strongly recommended for your iron as well as it will let you get heat directly to the bridges. \$\endgroup\$ Commented Sep 22, 2021 at 2:12
  • 4
    \$\begingroup\$ The flux is the critical part - the wick might help. \$\endgroup\$
    – J...
    Commented Sep 22, 2021 at 12:04
  • 2
    \$\begingroup\$ @GaganBatra - The chip shouldn't melt if you touch the iron onto it. IC packages are designed to be able to withstand soldering temperatures. \$\endgroup\$ Commented Sep 22, 2021 at 15:52
  • 2
    \$\begingroup\$ surprised the wick didn't work. try ChipQuik gel flux too. \$\endgroup\$
    – Pete W
    Commented Sep 23, 2021 at 4:10
16
\$\begingroup\$

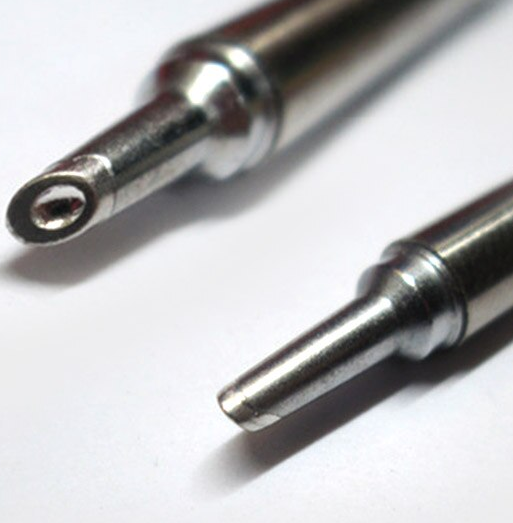
One of the best tips for this kind of stuff is BCM2, you can get it for most brands of soldering stations. If you don't have a soldering station, get the latest KSGER from aliexpress.

As you can see from the picture, it's a bevel tip with a small pocket hole in it.

enter image description here

This shape is extremely convenient. You can use the pointy end if you need a fine tip, one of the sides if you need it larger, and you can contact the flat part of the bevel with the PCB when you need lots of power and heat transfer.

The small hollow pocket can store some solder. If you put solder in it beforehand, you can then use it for drag soldering. If you clean it with the copper sponge so there is no solder in it, then apply it to your wrecked QFN, the hollow pocket will suck the solder blobs from the pcb and the job will be done quick and easy. This style of tip can both add and remove solder from your pcb, which makes it really convenient. For larger quantities of solder you still need to reach for the solder wick, but for small solder blobs, this saves a lot of wick.

Of course you need to put enough flux on the board.

Also if you want to hand solder QFN's, it helps to make the footprint pads a little bit longer, so there is more exposed copper for the soldering iron to contact.

\$\endgroup\$
8
  • 2
    \$\begingroup\$ I find the bevel tips without the concave and without the tinning on the sides (which are known as hoof tips) are significantly better (and cheaper) than the tip shown with the concave and tinning on the sides (which are known as spoon tips). Reason is solder won't wet on the sides for more control and though the concave holds more solder it does not allow as large a bead to form and protrude from the tip. This makes the much of the extra solder not all that useful since it can't make pin contact without contacting the iron itself. \$\endgroup\$
    – DKNguyen
    Commented Sep 23, 2021 at 13:42
  • 1
    \$\begingroup\$ Without the concave, 100% of the solder bead is easily available without iron contact. Enough that you can actually get under some components because the solder bead deforms as it squeezes in while the solder tension still keeps to together like the T-1000. The concave tip is unable to do that. The difference is less pronounced when removing solder but the untinned sides helps prevent knew bridges and the deforming solder ball helps get at small bit of solder deep between pins to remove bridges which are inaccessible even with the concave tip. \$\endgroup\$
    – DKNguyen
    Commented Sep 23, 2021 at 13:42
  • 1
    \$\begingroup\$ I only use the largest 3.8mm concave tip for thru-hole now since I can turn it upside down, load it with solder and dab a several leads like a normal chisel tips which frees up one hand from holding solder wire to hold awkward components. I consider the rest of my concave tips wasted money. \$\endgroup\$
    – DKNguyen
    Commented Sep 23, 2021 at 13:46
  • \$\begingroup\$ @DKNguyen Interesting! Thx for the vocabulary ;) The hoof tips I got are all tinned on the sides. Also they have worse thermal transfer than the spoon tip, probably something to do with the price being about 3€ for the hoof vs 12€ for the spoon. What's the reference of your hoof tip without tin on the sides? \$\endgroup\$
    – bobflux
    Commented Sep 23, 2021 at 14:38
  • \$\begingroup\$ My experience is from JBC 245 tips. Hoof are the C245-064/102/784-797. Spoon are C245-965/931/938. Terminology seems loose, especially between manufacturers. Bevel tips seems to be a catch all term, whether or not they have tin on the sides. Some people also use hoof interchangeably with bevel tip. I've never actually tried to use a bevel tip (flat faced, tinned on the sides) for drag soldering as the only one I have is a massive 8.8mm tip for soldering giant connectors so I don't know how it fares. But no side tinning and flat face really helps make a defined solder bead that protrudes \$\endgroup\$
    – DKNguyen
    Commented Sep 23, 2021 at 14:46
6
\$\begingroup\$

Another answer mention solder wick, which would be my first choice. There are also soldering irons with a tip with a hole attached to a rubber bulb. You squeeze the bulb, then melt the solder. When the solder melts you suddenly let go of the bulb, and the solder gets sucked up into it. But honestly, braided copper wick is easier. I'm only answering for the sake of completeness.

\$\endgroup\$
5
  • \$\begingroup\$ Solder wick didn't help, because it was hard to remove it from the chip with a footprint of 3x3 mm. Although, thanks for the info about that kind of soldering gun. \$\endgroup\$ Commented Sep 22, 2021 at 1:48
  • 1
    \$\begingroup\$ There are also separate bulbs, and spring-loaded plungers. You melt the solder and then quickly use the bulb or plunger before it unmelts. \$\endgroup\$ Commented Sep 23, 2021 at 10:31
  • 1
    \$\begingroup\$ (I could say "freezes", but who thinks of solder as "freezing"? physicists maybe) \$\endgroup\$ Commented Sep 23, 2021 at 10:31
  • \$\begingroup\$ Note lone solder bulbs work great (no recoil like a spring vacuum to throw off the tip) until they plug and I find the plug often. Unplugging them tends to produce a splash of molten solder or a cloud od lead dust which is why I no longer use them. \$\endgroup\$
    – DKNguyen
    Commented Sep 23, 2021 at 13:48
  • 3
    \$\begingroup\$ @user253751 There's also the word "solidifies". \$\endgroup\$
    – nanoman
    Commented Sep 23, 2021 at 15:20
4
\$\begingroup\$

If you have a soldering iron, you can add some solder flux around each edge and use a larger tip iron (if you don't have smaller tips). The flux will help the solder bead up from the pads and the large tip can help pool the solder away from the pads. Just make sure to clean your tip each time. I second having solder wick handy if you don't already for the future.

\$\endgroup\$
1
\$\begingroup\$

For the sake of completeness: in an absolute pinch you can do this without wick and without (extra) flux. The technique is similar:

  • with the smallest iron you have (but if you are in this pickle you may not have a small iron...)
  • run a little solder onto the end of the iron and wipe it away
  • melt the solder with your soldered tip and draw the iron away from the pads. The bridges will follow you backwards, and as they lengthen they will separate. A small amount of solder will come away with the iron.
  • repeat until the bridges are no longer bridged
  • there will likely be excess solder on the back end of the pad, and you can very carefully remove it by melting it with the iron.

This can be done with a standard 18W Antex or the like, even with the broad chisel tip. (Don't even think about it with a heavy iron or one whose temperature regulation you distrust.) But you must be careful to heat as little as possible and not lift the pads or tracks.

In extremis you can make solder wick from coaxial cable braid, particularly if you have a short section of e.g. microphone cable. Lastly, you can pick up large blobs of solder with a little tinned copper wire: heat the solder, draw it onto the wire with the iron, and then remove the wire.

All these techniques have the potential to damage the board much quicker than doing it properly. Note that I do not advise doing it this way.

But sometimes you are stuck somewhere without tools and you have no choice.

\$\endgroup\$

Your Answer

By clicking “Post Your Answer”, you agree to our terms of service and acknowledge you have read our privacy policy.

Not the answer you're looking for? Browse other questions tagged or ask your own question.