0
\$\begingroup\$

I am trying to multiplex two seven segment displays, once a switch input is detected.

  1. If a switch is pressed then the seven segment displays should show 1
  2. If pressed again, 2, then 3 and so on.

My problem arises when I reach number 9 since the next switch input will show 10. 1 on the first SSD and 0 on the second SSD. Below is a snippet of my code with regards to how I am detecting inputs from 1 - 9.

   int k = 0;
   unsigned int SW1;

   PINSEL0 = 0;                             //Set P0.0 - P0.15 as GPIOS
   PINSEL1 = 0;                             //Set P0.16 - P0.31 as GPIOS
   IO0DIR  = 0xFFFFF9FF;                //Setting  P0.9 as input for SW1     

    while (1)
   {

    SW1 = IO0PIN & 0x00000200; //switch connected on P0.9
    if ( SW1 != 0x00000200 )  //when pressed        
      {
        k++;                
        IO0SET = T1;
        IO0SET = T2;

        if (k == 1){
        IO0SET = T1;               //switching on left seven segment display
        IO0CLR = T2;               //clearing the right seven segment display 
        IO0CLR = a;
        IO0SET = b;
        IO0SET = c;
        IO0CLR = d;             
        IO0CLR = g;                //displaying number 1
        IO0CLR = e;
        IO0CLR = f;
        small_delay();
        }       
       }

I am following the same structure for the 10th switch press:

        else if (k == 10){ 
        IO0CLR = 0x000000FF;        //turn off all the segments as well as both common anodes. Then your outputs will be ready for the new segment patterns to be set up.
        IO0SET = T2;                //switching on first display                            
        IO0SET = b;                     
        IO0SET = c;                 //displaying number 1         
        small_delay();              //calling short delay           
        IO0CLR = 0x000001FF;        

        IO0SET = a;
        IO0SET = b;
        IO0SET = c;             
        IO0SET = d;                 //displaying number 0
        IO0SET = e;
        IO0SET = f;
        IO0SET = T1;    
        small_delay();
        IO0CLR = 0x000000FF;}

The problem with the second code I provide is that the seven segment display only displays 10 once. That is, first 1 is shown on the left display and then 0 on the second display as required, however this is performed only once and does not go on until the next switch input is detected.

One solution this problem which I have come up with is that I included a while statement after the if else such that:

    else if (k == 10){
        while (k == 10) {   //rest of code

This actually does what I want it to do, and keeps multiplexing both seven segments, showing number 10, however the problem in this case is that it does not step out of the while loop to accommodate for the next switch input.

How can I multiplex both displays until the next switch input is detected? Any ideas/suggestions would be greatly appreciated.

\$\endgroup\$
5
  • \$\begingroup\$ How are you getting to the first line? What is the fuller context here? \$\endgroup\$
    – jonk
    Commented Feb 21, 2017 at 15:35
  • \$\begingroup\$ I edited my question, showing where switch 1 is connected. Hope this helps. \$\endgroup\$
    – Rizzo
    Commented Feb 21, 2017 at 15:39
  • \$\begingroup\$ @Andrew provided a great solution and one much better than I am trying to implement here. I will look to try out something of the sort. However I was looking for a solution within my if else statements as I would think my problem would be easily solved without the use of functions. \$\endgroup\$
    – Rizzo
    Commented Feb 21, 2017 at 15:55
  • \$\begingroup\$ Do you want to count to 99 and then back to 0? And I'm not sure why you don't like Andrew's approach enough to implement it. Are you stuck on some aspect of it? \$\endgroup\$
    – jonk
    Commented Feb 21, 2017 at 16:27
  • \$\begingroup\$ @jonk unfortunately I am not so proficient yet in C language and I haven't yet covered functions on my own from the book I am learning from. Thus I wished to implement my solution using basic if else methods. Also not necessarily up to 99 but that would do. I want to be able to multiplex 2 SSD upon an input detected from a switch. To what number I want to count is not really relevant. I just saw your answer, thanks for your suggestion. \$\endgroup\$
    – Rizzo
    Commented Feb 21, 2017 at 17:56

3 Answers 3

2
\$\begingroup\$

Two options:

The correct way to do this would be that your counting code just counts, it doesn't set the display it sets a variable. You then have code running on a timer interrupt that reads the count variable and displays the number. If the number is over 9 then this timer can switch between digits as needed.

The second way is to only set one digit each time through your loop

int digitToDisplay = 0; // track which digit we need to display next
while (true) {          // loop forever 
  if (buttonPress())      // count button presses
    count++;

  // no need to do this every time, could be only when count changes but I'm being lazy
  int topDigit = count / 10;       // split value into separate digits.
  int bottomDigit = count % 10;      

  setDisplayOff();                // avoid glitches by turning all LED pins off

  displaySelect(digitToDisplay);  // select the display digit to drive
  if (digitToDisplay == 0)         
    setDisplay(bottomDigit);      // set the pins to display a number
  else
    setDisplay(topDigit);

  if (++digitToDisplay == 2)      // next time we display the other digit
    digitToDisplay = 0;
}

I've assumed a few functions, bool buttonPress(void) which returns tru if the button has been pressed, void setDisplay(int value) which sets the correct IO pins active to display the given value from 0 to 9 and void setDisplayOff(void) which turns off all the leds.
By setting the IO lines in a separate function you keep the big messy switch command (or if...else if...else if...) away from your core logic, this makes the logic a lot easier to follow since it now all fits on the screen at the same time.

Update -
Just in case your dislike of functions and switch commands is due to a lack of familiarity with using them here are the function definitions. These either need to go before main() or you need to declare them in advance and then put the code after main(). I also moved the display select into a function so that all of the IO is out of the main code.
You'd need to fill in the remaining values of the switch but it should be fairly obvious how.

void setDisplay(int value) {
  IO0CLR = 0x000000FF; // all pins low (probably redundant but best to be safe.)
  switch (value) {
    default:
        // outside the allowed range. Ignore it. (or display an E I suppose)
      break;
    case 0:
      IO0SET = a;
      IO0SET = b;
      IO0SET = c;             
      IO0SET = d; 
      IO0SET = e;
      IO0SET = f;
      break;
    case 1:
      IO0SET = b;                     
      IO0SET = c;
      break;
    case 2:
      IO0SET = a;
      IO0SET = b;
      IO0SET = d; 
      IO0SET = e;
      IO0SET = g;
      break;
    }
}

void displaySelect(int digitToDisplay) {
  if (digitToDisplay == 0) { // right hand digit
    IO0CLR = T1;  // always clear first.
    IO0SET = T2;           
  } else {
    IO0CLR = T2;  // always clear first.
    IO0SET = T1;           
  }
}


void setDisplayOff(void) {
  IO0CLR = 0x000000FF;
}


// detect button press with basic de-bouncing
// button must have been down exactly 5 calls to this function to return true.

int buttonPress(void) {
  static int downCount= 0; // static = value isn't lost between calls.
  //switch connected on P0.9
  int currentButton = ((IO0PIN & 0x00000200) == 0x00000200); 

  if (currentButton) { // button is down
    if (downCount == 5) { // button has been down for 5 counts
        downCount++;      // increase the count so we don't trigger next time
        return 1;
    } else {              // some count other than 5
      if (downCount < 5)  // increase if it's less than 5
         downCount++;
    }
  } else  // button is up
    downCount=0; 

  return 0;
}
\$\endgroup\$
11
  • \$\begingroup\$ Thanks for the good advice and suggestions. This method is far better than the one I am using and I will look to implement something of the sort. However is there any other method which can be implemented in this messy if else structure, to prevent the SSD from switching off once, after they have displayed the two digits once ? (without the use of functions in this case) \$\endgroup\$
    – Rizzo
    Commented Feb 21, 2017 at 15:45
  • 1
    \$\begingroup\$ You can always put the if statement to set the LEDs in place of the function call. If you were to do that I'd add int valueToDisplay; if (digitToDisplay == 0) valueToDisplay = bottomDigit; else valueToDisplay = topDigit; and then use if (valueToDisplay == 0) <set IO for 0> else ... to set the IO, that avoids the need to have the same code in there twice. And you really should use a switch rather than a stack of if's, it's a lot cleaner for this sort of thing. \$\endgroup\$
    – Andrew
    Commented Feb 21, 2017 at 16:47
  • \$\begingroup\$ I am trying to implement this however I keep getting stuck on the error: called object type int is not a function or function pointer in the third line: if (buttonPress()) \$\endgroup\$
    – Rizzo
    Commented Feb 21, 2017 at 18:36
  • 1
    \$\begingroup\$ Did you define that function? It needs to return true when the button is pressed. This could be as simple as int buttonPress(void) { return (IO0PIN & 0x00000200); } if you have hardware button debouncing. I've added a longer version with software debouncing to the code above. \$\endgroup\$
    – Andrew
    Commented Feb 22, 2017 at 9:17
  • \$\begingroup\$ Hi, Andrew, sorry for bothering you on this one. I am having some small issues with the software debouncing. I am not managing to implement this code to increment a counter. For example: if (buttonPress()) count++; Such a simple code is not working. I must be overlooking something from my side, if the code you provided worked for you. EDIT: Switch, and 7 segment displays are working correctly (hardware) \$\endgroup\$
    – Rizzo
    Commented Mar 7, 2017 at 15:47
1
\$\begingroup\$

For LED displays I prefer to ensure that ever LED is given time at least 100 times a second. So in this case, I'd want your "small delay" routine to be about \$5\:\textrm{ms}\$.

I also use a state machine, documented on EE.SE here, to debounce switches.

With that in hand:

int main() {
    unsigned int previous, temp;
    unsigned int state= 0;
    unsigned int current= 0;
    unsigned int debounced= 0;
    unsigned int prior_debounced= 0;
    unsigned int ones_digit= 0;
    unsigned int tens_digit= 0;
    unsigned int multiplex= 0;
    IO0CLR= T1;
    IO0CLR= T2;
    for ( ; ; small_delay() ) {

        /* debounce the switch */
        previous= current;
        current= (IO0PIN & 0x00000200);
        temp= (previous ^ current) | state;
        prior_debounced= debounced;
        debounced= (debounced & temp) | (current & ~temp);
        state= previous ^ current;

        /* increment the display value each time a button is pressed */
        if ( debounced != prior_debounced && debounced != 0 ) {
            if ( ++ones_digit > 9 ) {
                if ( ++tens_digit > 9 ) tens_digit= 0;
                ones_digit= 0;
            }
        }

        /* multiplex */
        IO0CLR= T1;
        IO0CLR= T2;
        if ( multiplex == 0 ) {
            set_segments( ones_digit );
            IO0SET= T2;
        } else {
            set_segments( tens_digit );
            IO0SET= T1;
        }
        multiplex= 1 - multiplex;
    }
    return 0; /* never gets here */
}

Of course, I've no way to verify the above code. And it's quite possible I missed a detail. I don't know how you set up your A to F segment choices from a binary digit value, so I simply used a "set_segments()" function that supposedly achieves this. You will need to replace that with appropriate code. (However, your code specifies how to enable each digit for display. So I just copied that, as I understood it.)

\$\endgroup\$
2
  • \$\begingroup\$ Hi Jonk, would you be kind enough as to explain if ( multiplex == 0 ) ? where is multpilexbeing set before in the program? I am not quite sure how it changes from 0 to ``1` \$\endgroup\$
    – Rizzo
    Commented Feb 22, 2017 at 13:19
  • \$\begingroup\$ @Rizzo good catch!!! It's added now. \$\endgroup\$
    – jonk
    Commented Feb 22, 2017 at 18:01
1
\$\begingroup\$

You may want to look up a quick routine I posted about driving 14 segment LEDs. The basic process is the same.

  1. Turn off thee current display.
  2. Send segment data to the led.
  3. Turn on the next digit.

You can write it in a generic way so that the code is useful for all mcus. You also want to call it from a timer Isr so the display is updated at fizzed intervals.

edit: here is the approach above implemented on a lpc2106:

//update the display
void led7_display(void) {
    static uint8_t dig=0;         //current digit to be displayed

//blanking
DIG_OFF(DIG_0 | DIG_1 | DIG_2 | DIG_3 | DIG_4 | DIG_5 | DIG_6 | DIG_7);     //turn off all digits
SEG_OFF(SEG_A | SEG_B | SEG_C | SEG_D | SEG_E | SEG_F | SEG_G | SEG_DP);    //turn off all segments

//update segment data
SEG_ON(led7_font[lRAM[dig]]); //update the segment data

//turn on the current digit, and advance to the next
//expand to support more digits
//set dig to 0 to force an earlier return - to support fewer digits
switch (dig) {
    case 0: DIG_ON(DIG_0); dig = 1; break;
    case 1: DIG_ON(DIG_1); dig = 0; break;      //only need to support 2 digits
    case 2: DIG_ON(DIG_2); dig = 3; break;
    case 3: DIG_ON(DIG_3); dig = 4; break;
    case 4: DIG_ON(DIG_4); dig = 5; break;
    case 5: DIG_ON(DIG_5); dig = 6; break;
    case 6: DIG_ON(DIG_6); dig = 7; break;
    case 7: DIG_ON(DIG_7); dig = 0; break;      //round off to digit 0 on the next round
    default: DIG_ON(DIG_0); dig = 1; break;     //default to digit 0
}

}

you will notice that it follows exactly the same logic. as is, the code support 8 digits but can be expanded on this particular chip to support up to 32-digits. the code here supports only two digits.

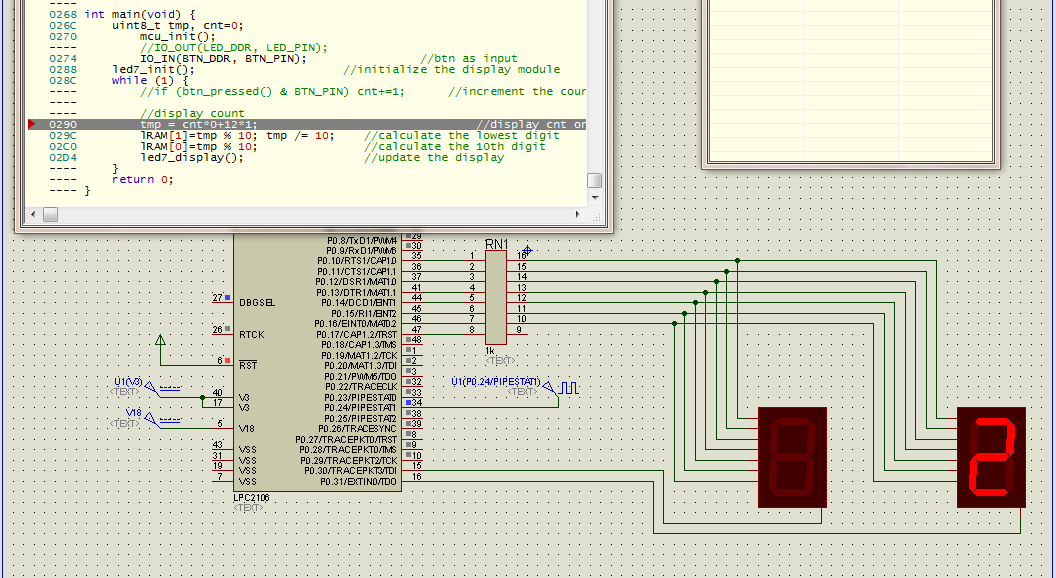
here is how it is doing in simulation - displaying a fixed number of 12 -> only '2' is being displayed because of multiplexing.

enter image description here

I didn't run the led_display() in a timer isr for simplicity here but in a real project, it should.

as you can see, the code is immensely portable: there is no way you can tell if the code runs on a particular mcu. as a matter of fact, the code originally ran on a 8-bit PIC and I changed it slightly to run on a 32-bit ARM7.

on an 8-bit PIC, the code compiles to about 100 bytes with XC8 in free mode.

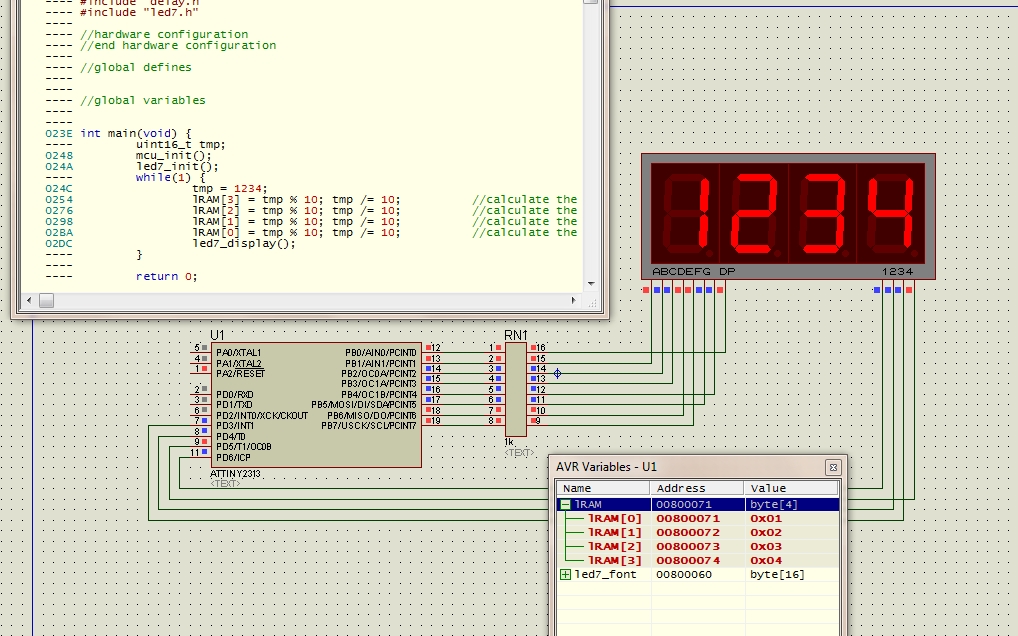
edit 2: here is the same code running on a low attiny2313 displaying a number 2313.

enter image description here

the code allows arbitrary connection of the mcu pins to led pins so great for the layout guys.

and to the extent there are unused pins on a port, their operations are un-hindered by the code - ie you can use them for something else.

all the user does is to include the .h/.c files in the project, specify the connection, and fill the display buffer lRAM[] with the numbers to be displayed and the module does its own things, fire-and-forget.

oh, the code supports both common anode and common cathod leds: the leds in the lpc2106 is a common cathod type and the ones in the attiny simulation is a common anode type.

edit 3:

the prior led driver allows arbitrary assignment of led pins to mcu pins, as long as they are on the same port.

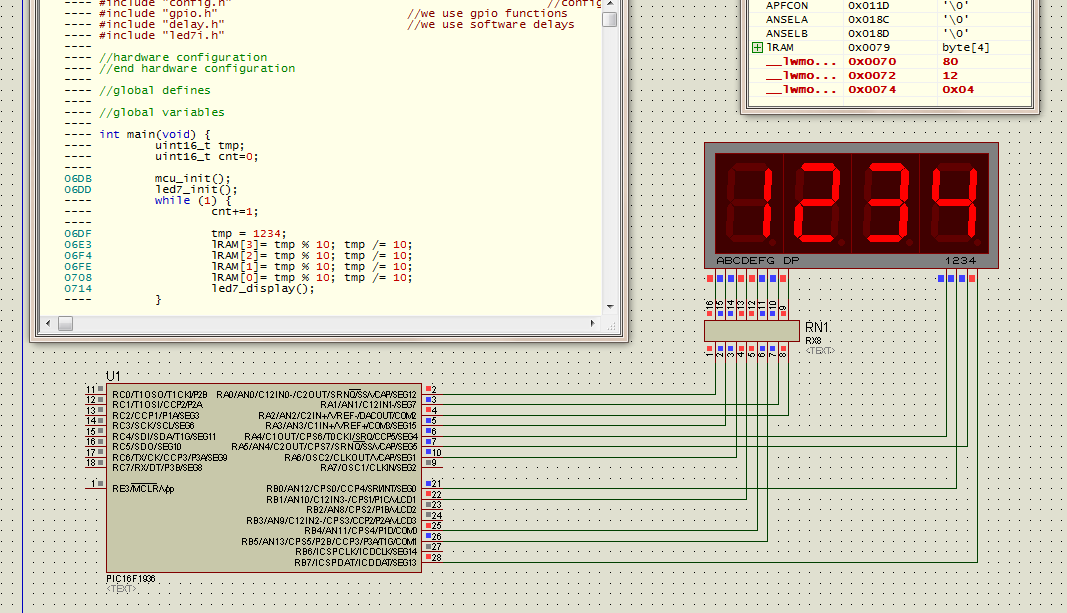
here is a revised version where led pins can be connected to totally different pins on different ports - completely arbitrary.

it follows the same process as the driver earlier. here is the simulation where it runs on a pic16f1936 driving a common anode led display.

enter image description here

\$\endgroup\$
1
  • \$\begingroup\$ dannyf, the problem with my code is that I cannot get the multiplexing to continue until the switch has detected an input. I have managed to multiplex two SSD without switch input successfully. \$\endgroup\$
    – Rizzo
    Commented Feb 21, 2017 at 19:12

Your Answer

By clicking “Post Your Answer”, you agree to our terms of service and acknowledge you have read our privacy policy.

Not the answer you're looking for? Browse other questions tagged or ask your own question.