4
\$\begingroup\$

I'm interested in building a 3d printer myself. I need to get Sanguinololu 1.3a board.

I saw two options on ebay, assembled and unassembled.

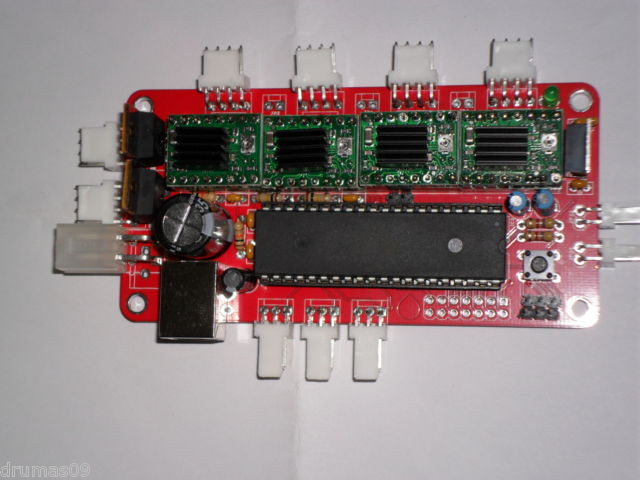
RepRap Sanguinololu

Cost difference is quite large where assembled (DIY £35, built £58).

I'm wondering exactly what challenges am I facing with this project? I have no prior experience in soldering, but I believe in curiosity and that fact that nothing is impossible.

Would experience be worth it? Will I get some interesting skills that will go into my future electrical engineering career? (joking).

Both kits available on eBay here (check dropdowns).

\$\endgroup\$
4
  • \$\begingroup\$ You've followed the makers proposal, right? :) \$\endgroup\$
    – Bryan B
    Commented Jul 13, 2012 at 14:07
  • \$\begingroup\$ @insta what do you mean? \$\endgroup\$
    – user8539
    Commented Jul 14, 2012 at 20:57
  • \$\begingroup\$ area51.stackexchange.com/proposals/41850/digital-fabrication \$\endgroup\$
    – Bryan B
    Commented Jul 16, 2012 at 18:28
  • \$\begingroup\$ If you are a beginner and buy un-assembled kit I suggest that you at least buy the one with FTDI chip soldered \$\endgroup\$ Commented May 1, 2013 at 7:10

2 Answers 2

3
\$\begingroup\$

Soldering really isn't that hard, If you practice first, then you can be reasonably confident of doing a good job. If you're buying a 3D printer, then you must be fairly technically minded.

Rule 1: Solder flows onto hot metal. It is practically repulsed from cool metal. To make a good solder joint, you must make sure the pin of the component and the pad on the PCB are hot.

That's pretty much all the rules. It's all about the heat. Most of the soldering problems I see are have something to do with heat transfer. Now follows advice about following rule 1.

Advice 1: Make sure the soldering iron tip is shiny. Shiny metal conducts heat well. Dull brown coating on the tip is a surprisingly effective insulator. Use tip cleaner. Touch the solder onto the iron. It should melt instantly.

Advice 2: Touch the iron to the pin and pad at the same time. Get them both hot, otherwise the solder will flow onto one of them and avoid the other. Do not blob some solder onto the iron then try to wipe it onto the pin and pad. As Olin mentioned in the comment below, you should touch a little solder onto the iron and use that to conduct heat effectively onto the pin and pad. Then apply the solder to the pad.
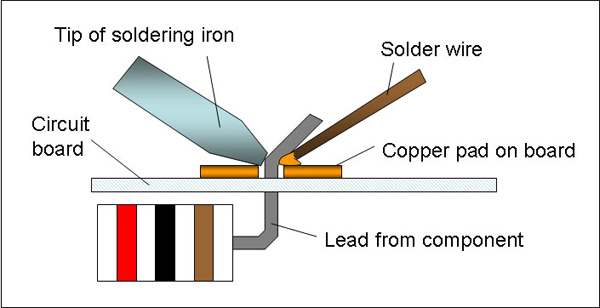
Soldering advice

Advice 3: The way to be sure that the pin and pad are hot enough is to touch the solder onto them. It should melt immediately and flow beautifully onto the pin and pad.

Advice 4: Lastly, if the solder is being annoying, behaving more like custard, it probably means all the flux inside it has evaporated. Wipe it off with the iron, wipe the iron clean and try again.

Buy some vero board (strip board) and some cheap components to practice on. Once you're confident about making beautiful hot joints (you should be able to make about one every 2 seconds) you're good to go.
\$\endgroup\$
9
  • 9
    \$\begingroup\$ I see this kind of soldering advice as your picture illustrates a lot, but that's not how it's actually done. The picture is good at showing how the soldering iron will only touch the board and part at a few points. Those don't transfer heat well. Feeding the solder at the other side of the wire as the picture shows doesn't work well. You need to feed at least a little right between the iron and what it is touching to provide thermal conductivity. Then the joint will heat and you can feed solder elsewhere if you want. I still usually feed it touching both the part and the iron. \$\endgroup\$ Commented Jul 12, 2012 at 23:22
  • \$\begingroup\$ @OlinLathrop - That is very true, I should have mentioned that. \$\endgroup\$ Commented Jul 13, 2012 at 7:06
  • \$\begingroup\$ I'm slightly paranoid about damaging components if I heat them too much. Is this a real fear? If so, what can I do to mitigate this issue? \$\endgroup\$
    – drxzcl
    Commented Jul 13, 2012 at 7:50
  • \$\begingroup\$ How hot do you set your iron? In my experience one joint every 2 seconds is quite fast. At 350 degrees I take about five (3 seconds heat up, 1 second for the solder to flow, 1 second to go to the next). \$\endgroup\$
    – starblue
    Commented Jul 13, 2012 at 9:04
  • 1
    \$\begingroup\$ @drxzcl I've never killed a through-hole component by soldering. If a joint gives you problems stop after five to ten seconds, let it cool down a bit, maybe remove bad solder, try again. \$\endgroup\$
    – starblue
    Commented Jul 13, 2012 at 9:10
2
\$\begingroup\$

1st of all, please post links to the eBay items (assembled one and unassembled one).

Even without seeing the instrument (or the kit), here are a few considerations:

  1. If you do soldering on the product, the supplier is less likely to accept it back for a refund. Unless there is an explicit agreement.
  2. At least here in the US, most guys overestimate their basic soldering skills. This is my observation from the occasions when I had to hire and evaluate technicians.

Update: OK, thanks for posting the links. This is a throughole board. Looks like the SMT ship is already soldered for you (before the kit is shipped for you). This looks like doable DIY.

Practice on a veroboard (strip board, perf board, something expendable) before soldering the kit.

\$\endgroup\$
2
  • \$\begingroup\$ Hi, yes I updated OP. \$\endgroup\$
    – user8539
    Commented Jul 12, 2012 at 22:51
  • \$\begingroup\$ I agree with the practicing first. Eg. on some veroboard and try to solder a wire cube from 12 pieces of wire (2cm / 1in each). \$\endgroup\$
    – jippie
    Commented Jul 13, 2012 at 8:13

Your Answer

By clicking “Post Your Answer”, you agree to our terms of service and acknowledge you have read our privacy policy.