0
\$\begingroup\$

I have an analog signal from a fluid flow sensor that is buffered to the input of a BeagleBone Black ADC input line. The buffer ensures the signal does not exceed the Beagle's max input voltage of 1.8VDC.

With the Beagle, we can access the ADC using either a program running on the ARM processor under Linux or a program running on one of the programmable real-time units on the AM355x SOC from TI. On the ADC side we are using the 'off the shelf' ADC kernel driver which by default samples all 7 ADC inputs, and is set up to take average 16 readings.

On the PRU side, we set our own configuration and only read three analog lines and average 4 readings.

Everything is written in C.

We monitor this analog value using a Diligent USB1408-FS DAQ and their DAQami software.

When running the system using the ARM/Linux code, the baseline value seen in the DAQami software stays about zero.

Using the PRU code, the baseline value drifts up to a DC offset of about 300-400mv seen using the DAQami software.

I'm puzzled why a different ADC configuration would cause the actual voltage (not the ADC's output digital equivalent) to shift like this. Why would this happen?

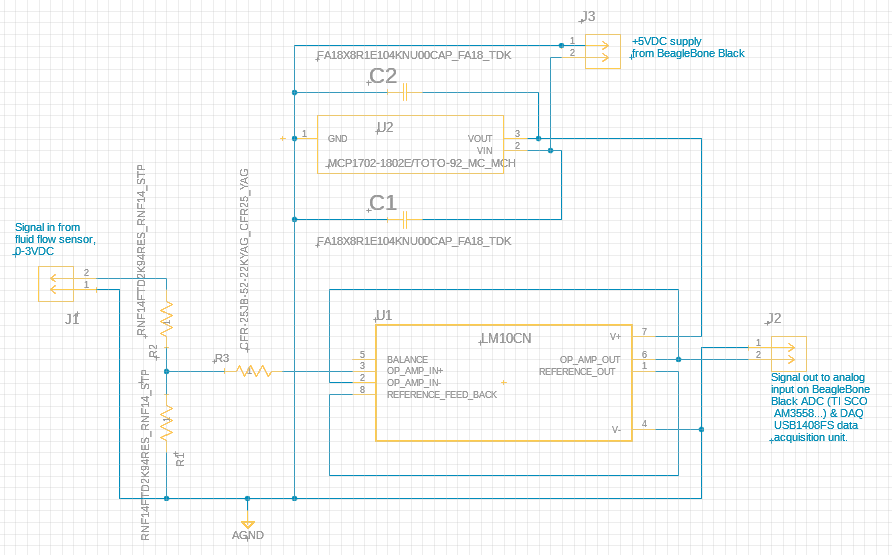
Here is the schematic of the unity gain isolation amp circuit. This is a prototype built on a protoboard currently.
This circuit serves two purposes

  1. primarily, our microcontrollers ADC has a max input of 1.8V. R1 and R2 are precision 2.94k resistors that divide the voltage 50/50 resulting in a max input of 1.5V, below the max ADC input of 1.8V. We lose some resolution but in this application that is not an issue.
  2. As a double safety, we power the LM10 from a 1.8V regulator (U2). Thus, the output can't go above 1.8V.

R3 is 22k C1 & C2 are 0.1uF J1, J2 and J3 are Phoenix 2 position screw terminal connectors

enter image description here

\$\endgroup\$
5
  • \$\begingroup\$ Schematic of the buffer circuit? \$\endgroup\$ Commented Sep 18, 2023 at 22:07
  • \$\begingroup\$ I can get it. It hasn't changed between when this did not exhibit this behaviour and now that it does. \$\endgroup\$ Commented Sep 18, 2023 at 22:40
  • \$\begingroup\$ Assuming the Beaglebone ADC is some kind of SAR with an input multiplexer, there can be some amount of charge injection that happens at start of sample acquisition — this is more noticeable with sensors that have high source impedance, or with shorter acquisition time. There can also be charge injection when the input multiplexer scans from one channel to another. You might try repeatedly sampling on the same channel without scanning, or configure a different sampling rate, to see if that has a noticeable effect. Input network RC values will also influence this effect. \$\endgroup\$
    – MarkU
    Commented Sep 18, 2023 at 23:36
  • \$\begingroup\$ I've added a schematic to the original post with some additional information. \$\endgroup\$ Commented Sep 19, 2023 at 14:43
  • \$\begingroup\$ The ADC is built into the TI AM3358 microcontroller. It has a touchscreen controller & general purpose ADC modes. We use the latter. It's 12-bit & has 7 addressable input channels. The 8th isn't exposed for use with the BeagleBone Black. TI's docs don't specify if it is SAR but I think it's likely a safe assumption given how it can be software configured with 16 possible steps, open delays, several averaging options, etc. I think you are on the right track. We use the same isolation amp circuit on our desktop prototype on a breadboard and have no drift/offset. \$\endgroup\$ Commented Sep 19, 2023 at 14:49

1 Answer 1

0
\$\begingroup\$

To close this out, we have learned that the problem we've been dealing with has nothing to do with the ADC. Our sensor A output is a 4-20ma current loop. We use a HW-685 current loop to voltage module to convert this sensor's output to a value that the BeagleBone can handle (max input is 1.8V). We also use a follower op amp circuit powered at 1.8V to ensure the Beagle does not accidentally get > 1.8V. We powered the HW-685 from 5VDC from our custom PCB's 5VDC rail, which also powers the BeagleBone and an onboard 1.8V regulator on our PCB that powers a different analog sensor B. The HW-685 actually requires a minimum of 7VDC power on the analog side. We temporarily powered it with a 9V transistor battery, and the DC offset drift ceased. What is really puzzling is that the drift was never noticed on readings of sensor A's output but showed up consistently on sensor B's. The 1.8V powered sensor B's circuitry never dropped. It's a mystery I'd like to have an answer to but for now, we can move forward.

\$\endgroup\$

Your Answer

By clicking “Post Your Answer”, you agree to our terms of service and acknowledge you have read our privacy policy.

Not the answer you're looking for? Browse other questions tagged or ask your own question.