deleted 10 characters in body
Source Link
Ricardo
  • 6.2k
  • 20
  • 54
  • 89

Yes, you can do a POV application with your ATmega16L and a bunch of LEDs and resistors and some clever programming.

The simplest POV application I've seen and that I have incidentally built is an Arduino shield called Blinkenlight.

This particular board has a set of 20 inline LEDs that you can program to display the POV effect. You can then achieve the POV effect by waving it around in the dark. So, it's mechanical and human powered (yes, your arm will get tired after playing with it for a while).
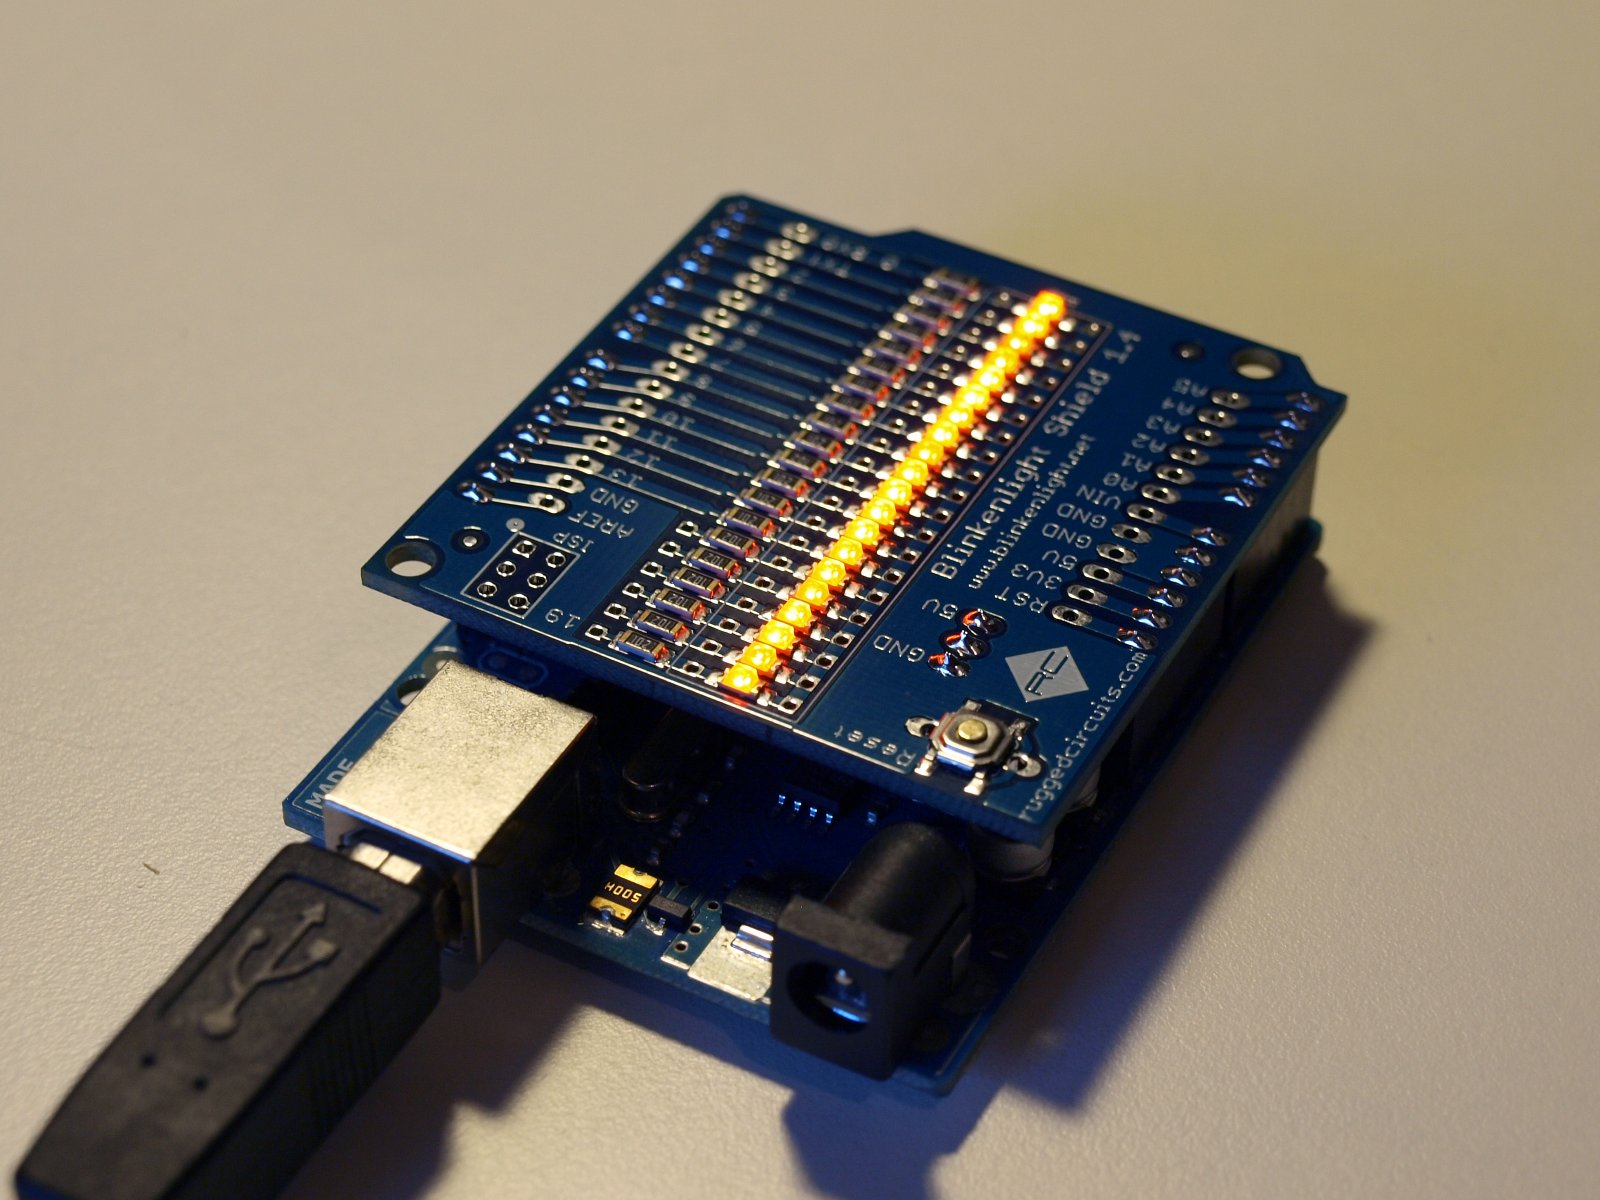
Image of Blinkenlight Arduino shield

It's based on Arduino Uno and related boards, but you can easily build your own standalone version and even modify it to use your ATmega16L.

Here's a few pictures of the POV effect in action:

POV effect example 1 POV effect example 2 POV effect example 3

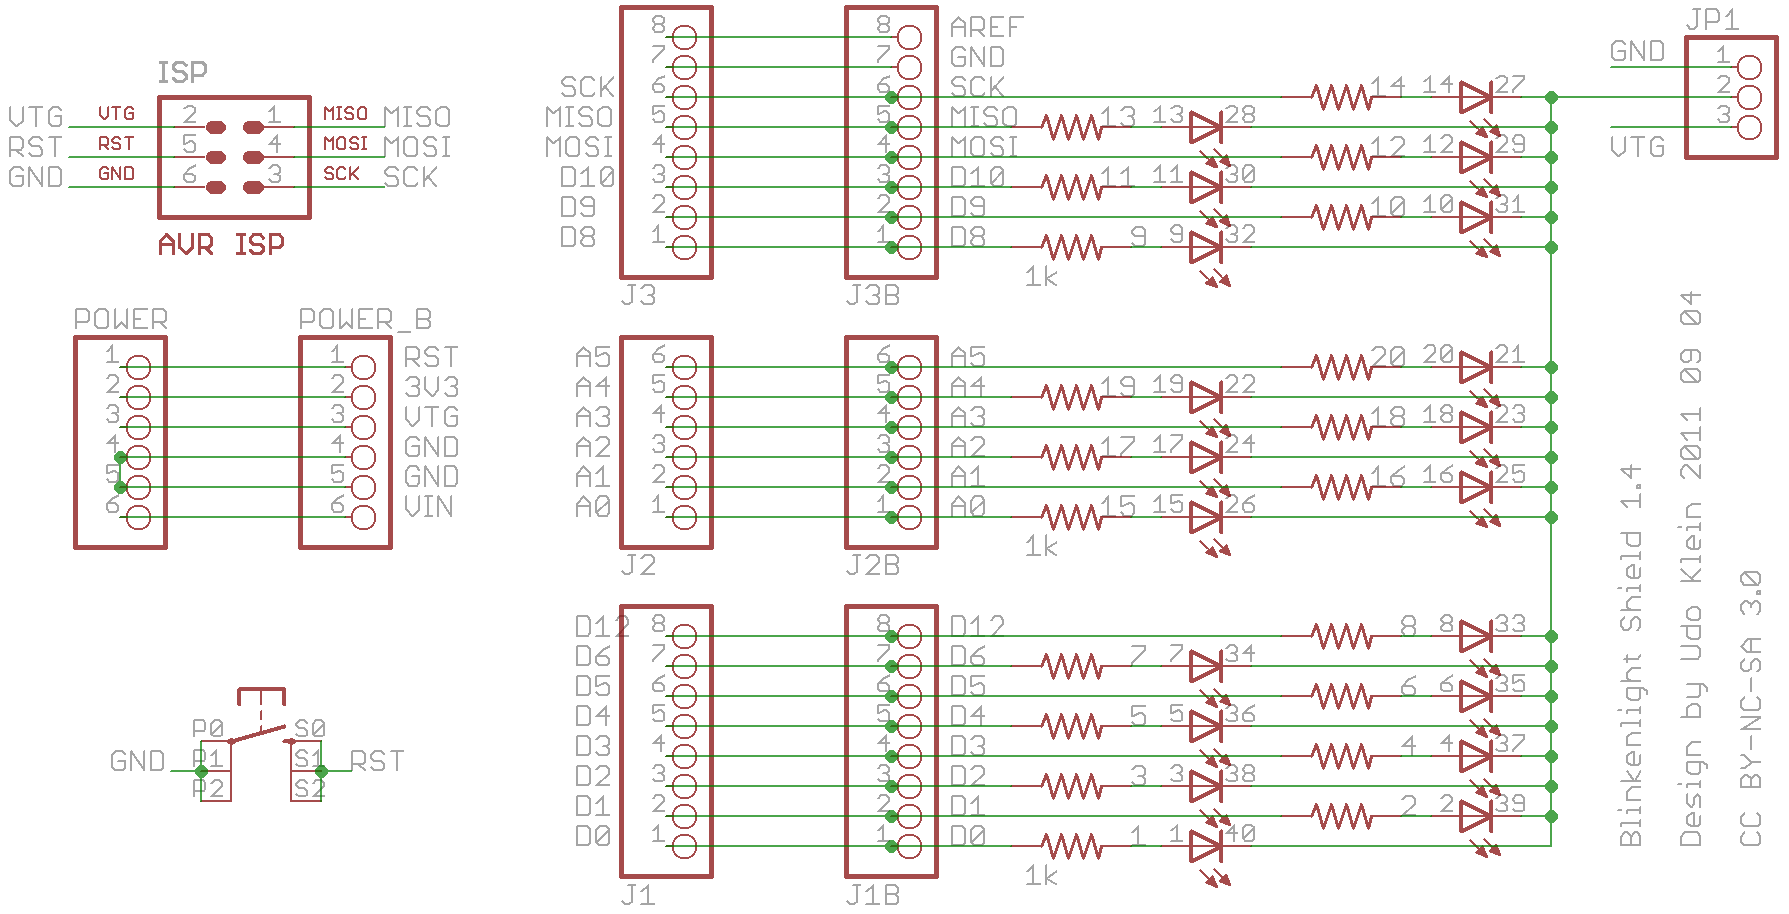
The idea behind the circuit is quite simple, you just have to wire a LED and its corresponding series current limiting resistor to every available digital output pins you have available (as in the schematic below). The rest is programming.

Blinken light schematics

The board can do a few other tricks as well, such as The Night Rider effect and more.

Yes, you can do a POV application with your ATmega16L and a bunch of LEDs and resistors and some clever programming.

The simplest POV application I've seen and that I have incidentally built is an Arduino shield called Blinkenlight.

This particular board has a set of 20 inline LEDs that you can program to display the POV effect. You can then achieve the POV effect by waving it around in the dark. So, it's mechanical and human powered (yes, your arm will get tired after playing with it for a while).

Image of Blinkenlight Arduino shield

It's based on Arduino Uno and related boards, but you can easily build your own standalone version and even modify it to use your ATmega16L.

Here's a few pictures of the POV effect in action:

POV effect example 1 POV effect example 2 POV effect example 3

The idea behind the circuit is quite simple, you just have to wire a LED and its corresponding series current limiting resistor to every available digital output pins you have available (as in the schematic below). The rest is programming.

Blinken light schematics

The board can do a few other tricks as well, such as The Night Rider effect and more.

Yes, you can do a POV application with your ATmega16L and a bunch of LEDs and resistors and some clever programming.

The simplest POV application I've seen and that I have incidentally built is an Arduino shield called Blinkenlight.

This particular board has a set of 20 inline LEDs that you can program to display the POV effect. You can then achieve the POV effect by waving it around in the dark. So, it's mechanical and human powered (yes, your arm will get tired after playing with it for a while).

Image of Blinkenlight Arduino shield

It's based on Arduino Uno and related boards, but you can easily build your own standalone version and even modify it to use your ATmega16L.

Here's a few pictures of the POV effect in action:

POV effect example 1 POV effect example 2 POV effect example 3

The idea behind the circuit is quite simple, you just have to wire a LED and its corresponding series current limiting resistor to every digital output pins you have available (as in the schematic below). The rest is programming.

Blinken light schematics

The board can do a few other tricks as well, such as The Night Rider effect and more.

Fixed typo.
Source Link
Ricardo
  • 6.2k
  • 20
  • 54
  • 89

Yes, you can do a POV application with your ATmega16L and a bunch of LEDs and resistors and some clever programming.

The simplest POV application I've seen and that I have incidentally built is an Arduino shield called Blinkenlight.

This particular board has a set of 20 inline LEDs that you can program to display the POV effect. You can then achieve the POV effect by waving it around in the dark. So, it's mechanical and human powered (yes, your arm will get tired after playing with it for a while).

Image of Blinkenlight Arduino shield

It's based on Arduino Uno and related boards, but you can easily build your own standalone verstionversion and even modify it to use your ATmega16L.

Here's a few pictures of the POV effect in action:

POV effect example 1 POV effect example 2 POV effect example 3

The idea behind the circuit is quite simple, you just have to wire a LED and its corresponding series current limiting resistor to every available digital output pins you have available (as in the schematic below). The rest is programming.
Blinken light schematics

The board can do a few other tricks as well, such as The Night Rider effect and more.

Yes, you can do a POV application with your ATmega16L and a bunch of LEDs and resistors and some clever programming.

The simplest POV application I've seen and that I have incidentally built is an Arduino shield called Blinkenlight.

This particular board has a set of 20 inline LEDs that you can program to display the POV effect. You can then achieve the POV effect by waving it around in the dark. So, it's mechanical and human powered (yes, your arm will get tired after playing with it for a while).

Image of Blinkenlight Arduino shield

It's based on Arduino Uno and related boards, but you can easily build your own standalone verstion and even modify it to use your ATmega16L.

Here's a few pictures of the POV effect in action:

POV effect example 1 POV effect example 2 POV effect example 3

The idea behind the circuit is quite simple, you just have to wire a LED and its corresponding series current limiting resistor to every available digital output pins you have available (as in the schematic below). The rest is programming.

Blinken light schematics

The board can do a few other tricks as well, such as The Night Rider effect and more.

Yes, you can do a POV application with your ATmega16L and a bunch of LEDs and resistors and some clever programming.

The simplest POV application I've seen and that I have incidentally built is an Arduino shield called Blinkenlight.

This particular board has a set of 20 inline LEDs that you can program to display the POV effect. You can then achieve the POV effect by waving it around in the dark. So, it's mechanical and human powered (yes, your arm will get tired after playing with it for a while).

Image of Blinkenlight Arduino shield

It's based on Arduino Uno and related boards, but you can easily build your own standalone version and even modify it to use your ATmega16L.

Here's a few pictures of the POV effect in action:

POV effect example 1 POV effect example 2 POV effect example 3

The idea behind the circuit is quite simple, you just have to wire a LED and its corresponding series current limiting resistor to every available digital output pins you have available (as in the schematic below). The rest is programming.

Blinken light schematics

The board can do a few other tricks as well, such as The Night Rider effect and more.

added 65 characters in body
Source Link
Ricardo
  • 6.2k
  • 20
  • 54
  • 89

Yes, you can do a POV application with your ATmega16L and a bunch of LEDs and resistors and some clever programming.

The simplest POV application I've seen and that I have incidentally built is an Arduino shield called Blinkenlight.

This particular board has a set of 20 inline LEDs that you can program to display the POV effect. You can then achieve the POV effect by waving it around in the dark. So, it's mechanical and human powered (yes, your arm will get tired after playing with it for a while).

Image of Blinkenlight Arduino shield

It's based on Arduino Uno and related boards, but you can easily build your own standalone verstion and even modify it to use your ATmega16L.

Here's a few pictures of the POV effect in action:

POV effect example 1 POV effect example 2 POV effect example 3

The idea behind the circuit is quite simple, you just have to wire a LED and its corresponding series current limiting resistor to every available digital output pins you have available (as in the schematic below). The rest is programming.

Blinken light schematics

The board can do a few other tricks as well, such as The Night Rider effect and more.

Yes, you can do a POV application with your ATmega16L and a bunch of LEDs and resistors.

The simplest POV application I've seen and that I have incidentally built is an Arduino shield called Blinkenlight.

This particular board has a set of 20 inline LEDs that you can program to display the POV effect. You can then achieve the POV effect by waving it around in the dark. So, it's mechanical and human powered.

Image of Blinkenlight Arduino shield

It's based on Arduino Uno and related boards, but you can easily build your own standalone verstion and even modify it to use your ATmega16L.

Here's a few pictures of the POV effect in action:

POV effect example 1 POV effect example 2 POV effect example 3

The idea behind the circuit is quite simple, you just have to wire a LED and its corresponding series current limiting resistor to every available digital output pins you have available (as in the schematic below). The rest is programming.

Blinken light schematics

The board can do a few other tricks as well, such as The Night Rider effect and more.

Yes, you can do a POV application with your ATmega16L and a bunch of LEDs and resistors and some clever programming.

The simplest POV application I've seen and that I have incidentally built is an Arduino shield called Blinkenlight.

This particular board has a set of 20 inline LEDs that you can program to display the POV effect. You can then achieve the POV effect by waving it around in the dark. So, it's mechanical and human powered (yes, your arm will get tired after playing with it for a while).

Image of Blinkenlight Arduino shield

It's based on Arduino Uno and related boards, but you can easily build your own standalone verstion and even modify it to use your ATmega16L.

Here's a few pictures of the POV effect in action:

POV effect example 1 POV effect example 2 POV effect example 3

The idea behind the circuit is quite simple, you just have to wire a LED and its corresponding series current limiting resistor to every available digital output pins you have available (as in the schematic below). The rest is programming.

Blinken light schematics

The board can do a few other tricks as well, such as The Night Rider effect and more.

added 165 characters in body
Source Link
Ricardo
  • 6.2k
  • 20
  • 54
  • 89
Loading
added 165 characters in body
Source Link
Ricardo
  • 6.2k
  • 20
  • 54
  • 89
Loading
Source Link
Ricardo
  • 6.2k
  • 20
  • 54
  • 89
Loading