Title, tags
Source Link
Davide Andrea
  • 25.6k
  • 7
  • 39
  • 86

Button Switch matrix activating more than 1 row at the same time

I'm new to electronics and I am working on a 3x3 buttonswitch matrix prototype using an Arduino UNO. I created a simple circuit using TinkerCAD but it seems that whenever I press a button, the susbequent rows are activated instead. Example, if I press the button in Row 0, Col 0, then the matrix will activate Row 1, Col 0 and and Row 2, Col 0.

I was watching a tutorial on how buttonswitch matrices work, and the way I understand it is that I want to set each row to HIGH one by one, and check each column in that row to determine if it has been pressed or not. I'm not sure where the issue lies, any help would be greatly appreciated!

Video Demonstration

Circuit Diagram

Here is the code:

const byte rowCount = 3;
const byte colCount = 3;

byte rows[rowCount] = {13,12,11};
byte cols[colCount] = {10,9,8};

char keys[3][3] = {
  {'A', 'B', 'C'},
  {'D', 'E', 'F'},
  {'G', 'H', 'I'}
};

void setup() 
{
  Serial.begin(115200);
  
  // setting up outputs
  for(int i = 0; i < rowCount; i++)
  {
    pinMode(rows[i], OUTPUT);
    Serial.print(rows[i]);
    Serial.println(" as OUTPUT");
  }
  
  // setting up inputs
  for(int i = 0; i < colCount; i++)
  {
    pinMode(cols[i], INPUT_PULLUP);
    Serial.print(cols[i]);
    Serial.println(" as INPUT_PULLUP");
  }
}

void loop() 
{
  for(int i = 0; i < rowCount; i++)
  {
    digitalWrite(rows[i], HIGH);
    
    if(digitalRead(cols[0]) == LOW)
    {
      Serial.println(keys[i][0]);
    }
    else if(digitalRead(cols[1]) == LOW)
    {
      Serial.println(keys[i][1]);
    }
    else if(digitalRead(cols[2]) == LOW)
    {
      Serial.println(keys[i][2]);
    }
    
    digitalWrite(rows[i], LOW);
  }
}

UPDATE: Thanks to Frog, I was able to fix the problem. Here is an updated diagram and updated code. I tested this with the Keypad library as well and it seems to be working.

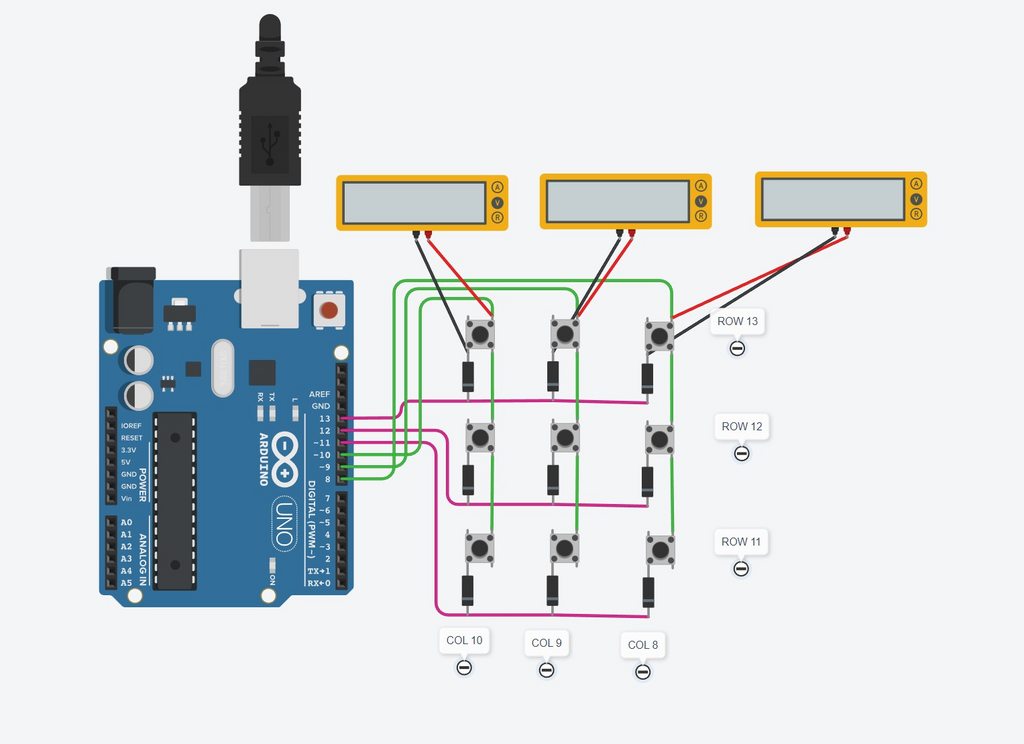
Updated Circuit Diagram

Updated Code Pastebin

Button matrix activating more than 1 row at the same time

I'm new to electronics and I am working on a 3x3 button matrix prototype using an Arduino UNO. I created a simple circuit using TinkerCAD but it seems that whenever I press a button, the susbequent rows are activated instead. Example, if I press the button in Row 0, Col 0, then the matrix will activate Row 1, Col 0 and and Row 2, Col 0.

I was watching a tutorial on how button matrices work, and the way I understand it is that I want to set each row to HIGH one by one, and check each column in that row to determine if it has been pressed or not. I'm not sure where the issue lies, any help would be greatly appreciated!

Video Demonstration

Circuit Diagram

Here is the code:

const byte rowCount = 3;
const byte colCount = 3;

byte rows[rowCount] = {13,12,11};
byte cols[colCount] = {10,9,8};

char keys[3][3] = {
  {'A', 'B', 'C'},
  {'D', 'E', 'F'},
  {'G', 'H', 'I'}
};

void setup() 
{
  Serial.begin(115200);
  
  // setting up outputs
  for(int i = 0; i < rowCount; i++)
  {
    pinMode(rows[i], OUTPUT);
    Serial.print(rows[i]);
    Serial.println(" as OUTPUT");
  }
  
  // setting up inputs
  for(int i = 0; i < colCount; i++)
  {
    pinMode(cols[i], INPUT_PULLUP);
    Serial.print(cols[i]);
    Serial.println(" as INPUT_PULLUP");
  }
}

void loop() 
{
  for(int i = 0; i < rowCount; i++)
  {
    digitalWrite(rows[i], HIGH);
    
    if(digitalRead(cols[0]) == LOW)
    {
      Serial.println(keys[i][0]);
    }
    else if(digitalRead(cols[1]) == LOW)
    {
      Serial.println(keys[i][1]);
    }
    else if(digitalRead(cols[2]) == LOW)
    {
      Serial.println(keys[i][2]);
    }
    
    digitalWrite(rows[i], LOW);
  }
}

UPDATE: Thanks to Frog, I was able to fix the problem. Here is an updated diagram and updated code. I tested this with the Keypad library as well and it seems to be working.

Updated Circuit Diagram

Updated Code Pastebin

Switch matrix activating more than 1 row at the same time

I'm new to electronics and I am working on a 3x3 switch matrix prototype using an Arduino UNO. I created a simple circuit using TinkerCAD but it seems that whenever I press a button, the susbequent rows are activated instead. Example, if I press the button in Row 0, Col 0, then the matrix will activate Row 1, Col 0 and and Row 2, Col 0.

I was watching a tutorial on how switch matrices work, and the way I understand it is that I want to set each row to HIGH one by one, and check each column in that row to determine if it has been pressed or not. I'm not sure where the issue lies, any help would be greatly appreciated!

Video Demonstration

Circuit Diagram

Here is the code:

const byte rowCount = 3;
const byte colCount = 3;

byte rows[rowCount] = {13,12,11};
byte cols[colCount] = {10,9,8};

char keys[3][3] = {
  {'A', 'B', 'C'},
  {'D', 'E', 'F'},
  {'G', 'H', 'I'}
};

void setup() 
{
  Serial.begin(115200);
  
  // setting up outputs
  for(int i = 0; i < rowCount; i++)
  {
    pinMode(rows[i], OUTPUT);
    Serial.print(rows[i]);
    Serial.println(" as OUTPUT");
  }
  
  // setting up inputs
  for(int i = 0; i < colCount; i++)
  {
    pinMode(cols[i], INPUT_PULLUP);
    Serial.print(cols[i]);
    Serial.println(" as INPUT_PULLUP");
  }
}

void loop() 
{
  for(int i = 0; i < rowCount; i++)
  {
    digitalWrite(rows[i], HIGH);
    
    if(digitalRead(cols[0]) == LOW)
    {
      Serial.println(keys[i][0]);
    }
    else if(digitalRead(cols[1]) == LOW)
    {
      Serial.println(keys[i][1]);
    }
    else if(digitalRead(cols[2]) == LOW)
    {
      Serial.println(keys[i][2]);
    }
    
    digitalWrite(rows[i], LOW);
  }
}

UPDATE: Thanks to Frog, I was able to fix the problem. Here is an updated diagram and updated code. I tested this with the Keypad library as well and it seems to be working.

Updated Circuit Diagram

Updated Code Pastebin

updated question with fixes
Source Link

I'm new to electronics and I am working on a 3x3 button matrix prototype using an Arduino UNO. I created a simple circuit using TinkerCAD but it seems that whenever I press a button, the susbequent rows are activated instead. Example, if I press the button in Row 0, Col 0, then the matrix will activate Row 1, Col 0 and and Row 2, Col 0.

I was watching a tutorial on how button matrices work, and the way I understand it is that I want to set each row to HIGH one by one, and check each column in that row to determine if it has been pressed or not. I'm not sure where the issue lies, any help would be greatly appreciated!

Video Demonstration

Circuit Diagram

Here is the code:

const byte rowCount = 3;
const byte colCount = 3;

byte rows[rowCount] = {13,12,11};
byte cols[colCount] = {10,9,8};

char keys[3][3] = {
  {'A', 'B', 'C'},
  {'D', 'E', 'F'},
  {'G', 'H', 'I'}
};

void setup() 
{
  Serial.begin(115200);
  
  // setting up outputs
  for(int i = 0; i < rowCount; i++)
  {
    pinMode(rows[i], OUTPUT);
    Serial.print(rows[i]);
    Serial.println(" as OUTPUT");
  }
  
  // setting up inputs
  for(int i = 0; i < colCount; i++)
  {
    pinMode(cols[i], INPUT_PULLUP);
    Serial.print(cols[i]);
    Serial.println(" as INPUT_PULLUP");
  }
}

void loop() 
{
  for(int i = 0; i < rowCount; i++)
  {
    digitalWrite(rows[i], HIGH);
    
    if(digitalRead(cols[0]) == LOW)
    {
      Serial.println(keys[i][0]);
    }
    else if(digitalRead(cols[1]) == LOW)
    {
      Serial.println(keys[i][1]);
    }
    else if(digitalRead(cols[2]) == LOW)
    {
      Serial.println(keys[i][2]);
    }
    
    digitalWrite(rows[i], LOW);
  }
}

Here is the circuitUPDATE: Thanks to Frog, I was able to fix the problem. Here is an updated diagram and updated code. I tested this with the Keypad library as well and it seems to be working.

Updated Circuit Diagram

Updated Code Pastebin

I'm new to electronics and I am working on a 3x3 button matrix prototype using an Arduino UNO. I created a simple circuit using TinkerCAD but it seems that whenever I press a button, the susbequent rows are activated instead. Example, if I press the button in Row 0, Col 0, then the matrix will activate Row 1, Col 0 and and Row 2, Col 0.

I was watching a tutorial on how button matrices work, and the way I understand it is that I want to set each row to HIGH one by one, and check each column in that row to determine if it has been pressed or not. I'm not sure where the issue lies, any help would be greatly appreciated!

Video Demonstration

Circuit Diagram

Here is the code:

const byte rowCount = 3;
const byte colCount = 3;

byte rows[rowCount] = {13,12,11};
byte cols[colCount] = {10,9,8};

char keys[3][3] = {
  {'A', 'B', 'C'},
  {'D', 'E', 'F'},
  {'G', 'H', 'I'}
};

void setup() 
{
  Serial.begin(115200);
  
  // setting up outputs
  for(int i = 0; i < rowCount; i++)
  {
    pinMode(rows[i], OUTPUT);
    Serial.print(rows[i]);
    Serial.println(" as OUTPUT");
  }
  
  // setting up inputs
  for(int i = 0; i < colCount; i++)
  {
    pinMode(cols[i], INPUT_PULLUP);
    Serial.print(cols[i]);
    Serial.println(" as INPUT_PULLUP");
  }
}

void loop() 
{
  for(int i = 0; i < rowCount; i++)
  {
    digitalWrite(rows[i], HIGH);
    
    if(digitalRead(cols[0]) == LOW)
    {
      Serial.println(keys[i][0]);
    }
    else if(digitalRead(cols[1]) == LOW)
    {
      Serial.println(keys[i][1]);
    }
    else if(digitalRead(cols[2]) == LOW)
    {
      Serial.println(keys[i][2]);
    }
    
    digitalWrite(rows[i], LOW);
  }
}

Here is the circuit:

I'm new to electronics and I am working on a 3x3 button matrix prototype using an Arduino UNO. I created a simple circuit using TinkerCAD but it seems that whenever I press a button, the susbequent rows are activated instead. Example, if I press the button in Row 0, Col 0, then the matrix will activate Row 1, Col 0 and and Row 2, Col 0.

I was watching a tutorial on how button matrices work, and the way I understand it is that I want to set each row to HIGH one by one, and check each column in that row to determine if it has been pressed or not. I'm not sure where the issue lies, any help would be greatly appreciated!

Video Demonstration

Circuit Diagram

Here is the code:

const byte rowCount = 3;
const byte colCount = 3;

byte rows[rowCount] = {13,12,11};
byte cols[colCount] = {10,9,8};

char keys[3][3] = {
  {'A', 'B', 'C'},
  {'D', 'E', 'F'},
  {'G', 'H', 'I'}
};

void setup() 
{
  Serial.begin(115200);
  
  // setting up outputs
  for(int i = 0; i < rowCount; i++)
  {
    pinMode(rows[i], OUTPUT);
    Serial.print(rows[i]);
    Serial.println(" as OUTPUT");
  }
  
  // setting up inputs
  for(int i = 0; i < colCount; i++)
  {
    pinMode(cols[i], INPUT_PULLUP);
    Serial.print(cols[i]);
    Serial.println(" as INPUT_PULLUP");
  }
}

void loop() 
{
  for(int i = 0; i < rowCount; i++)
  {
    digitalWrite(rows[i], HIGH);
    
    if(digitalRead(cols[0]) == LOW)
    {
      Serial.println(keys[i][0]);
    }
    else if(digitalRead(cols[1]) == LOW)
    {
      Serial.println(keys[i][1]);
    }
    else if(digitalRead(cols[2]) == LOW)
    {
      Serial.println(keys[i][2]);
    }
    
    digitalWrite(rows[i], LOW);
  }
}

UPDATE: Thanks to Frog, I was able to fix the problem. Here is an updated diagram and updated code. I tested this with the Keypad library as well and it seems to be working.

Updated Circuit Diagram

Updated Code Pastebin

fixed screenshot
Source Link

I'm new to electronics and I am working on a 3x3 button matrix prototype using an Arduino UNO. I created a simple circuit using TinkerCAD but it seems that whenever I press a button, the susbequent rows are activated instead. Example, if I press the button in Row 0, Col 0, then the matrix will activate Row 1, Col 0 and and Row 2, Col 0.

I was watching a tutorial on how button matrices work, and the way I understand it is that I want to set each row to HIGH one by one, and check each column in that row to determine if it has been pressed or not. I'm not sure where the issue lies, any help would be greatly appreciated!

Video Demonstration

Circuit DiagramCircuit Diagram

Here is the code:

const byte rowCount = 3;
const byte colCount = 3;

byte rows[rowCount] = {13,12,11};
byte cols[colCount] = {10,9,8};

char keys[3][3] = {
  {'A', 'B', 'C'},
  {'D', 'E', 'F'},
  {'G', 'H', 'I'}
};

void setup() 
{
  Serial.begin(115200);
  
  // setting up outputs
  for(int i = 0; i < rowCount; i++)
  {
    pinMode(rows[i], OUTPUT);
    Serial.print(rows[i]);
    Serial.println(" as OUTPUT");
  }
  
  // setting up inputs
  for(int i = 0; i < colCount; i++)
  {
    pinMode(cols[i], INPUT_PULLUP);
    Serial.print(cols[i]);
    Serial.println(" as INPUT_PULLUP");
  }
}

void loop() 
{
  for(int i = 0; i < rowCount; i++)
  {
    digitalWrite(rows[i], HIGH);
    
    if(digitalRead(cols[0]) == LOW)
    {
      Serial.println(keys[i][0]);
    }
    else if(digitalRead(cols[1]) == LOW)
    {
      Serial.println(keys[i][1]);
    }
    else if(digitalRead(cols[2]) == LOW)
    {
      Serial.println(keys[i][2]);
    }
    
    digitalWrite(rows[i], LOW);
  }
}

Here is the circuit:

I'm new to electronics and I am working on a 3x3 button matrix prototype using an Arduino UNO. I created a simple circuit using TinkerCAD but it seems that whenever I press a button, the susbequent rows are activated instead. Example, if I press the button in Row 0, Col 0, then the matrix will activate Row 1, Col 0 and and Row 2, Col 0.

I was watching a tutorial on how button matrices work, and the way I understand it is that I want to set each row to HIGH one by one, and check each column in that row to determine if it has been pressed or not. I'm not sure where the issue lies, any help would be greatly appreciated!

Video Demonstration

Circuit Diagram

Here is the code:

const byte rowCount = 3;
const byte colCount = 3;

byte rows[rowCount] = {13,12,11};
byte cols[colCount] = {10,9,8};

char keys[3][3] = {
  {'A', 'B', 'C'},
  {'D', 'E', 'F'},
  {'G', 'H', 'I'}
};

void setup() 
{
  Serial.begin(115200);
  
  // setting up outputs
  for(int i = 0; i < rowCount; i++)
  {
    pinMode(rows[i], OUTPUT);
    Serial.print(rows[i]);
    Serial.println(" as OUTPUT");
  }
  
  // setting up inputs
  for(int i = 0; i < colCount; i++)
  {
    pinMode(cols[i], INPUT_PULLUP);
    Serial.print(cols[i]);
    Serial.println(" as INPUT_PULLUP");
  }
}

void loop() 
{
  for(int i = 0; i < rowCount; i++)
  {
    digitalWrite(rows[i], HIGH);
    
    if(digitalRead(cols[0]) == LOW)
    {
      Serial.println(keys[i][0]);
    }
    else if(digitalRead(cols[1]) == LOW)
    {
      Serial.println(keys[i][1]);
    }
    else if(digitalRead(cols[2]) == LOW)
    {
      Serial.println(keys[i][2]);
    }
    
    digitalWrite(rows[i], LOW);
  }
}

Here is the circuit:

Source Link
Loading