8
\$\begingroup\$

I learned about coding a controller, but never actually put the code on the physical device. I am trying to figure out what I need to order to start developing a basic embedded system.

For example, if I have a PIC18F1330, I have MPLAB IDE and XC8 compiler. Great, so I have the code compiled, and I'm ready to put this on the controller. What do I need to have to have to transfer my compiled code on my PC, onto the controller?

I've seen things like an in-circuit debugger, and a PIC kit. I'm just lost at this point.

\$\endgroup\$
2
  • \$\begingroup\$ So once I have a PICkit, the PICkit allows me to physically connect my PC to the microcontroller? \$\endgroup\$
    – Adam
    Commented Jun 29, 2015 at 19:07
  • \$\begingroup\$ Yes, there is a connector on the PICKit, ICD etc. that you connect to your board for in-circuit programming and debugging. \$\endgroup\$ Commented Jun 29, 2015 at 19:44

5 Answers 5

4
\$\begingroup\$

There are several ways to flash your code to a microcontroller.

On the web, you will find quite a lot of self-made programmers, but they usually also have self-made software and are not (well) integrated in the MPLAB IDE.

The cheapest solution from Microchip is a PicKit for ~40€ which is just connected to the PC via USB. Though the PicKit has some debugging options, there is also the more powerful 'In Circuit Debugger' ICD for ~180€, which has more debugging features, but of course can also flash the chips.

I always felt the PicKit is sufficient for me.

There are third-party versions out there, as microchip publishes firmware and schematics for the PicKit, but if you buy them, be sure you really get what you think what you get. I once saw an offer for PicKit 3, but I was not sure if it isn't a PicKit 2.


Just as comment: There are Microchip MCUs, which can flash themselves. For example, we used the PIC18F2450/2550/4450/4550 family with embedded USB and put a boot loader on it. When a jumper is closed, the MCU enteres the boot loader mode on startup, and you can flash your MCU with your code. That stuff is all available from Microchip.

To use this, you need a few modifications to your code. And of course, you need a regular programmer to initially flash the boot loader on the MCU. So, this feature does not make sense if you have a programmer. But it's nice if you want firmware updates to your customers.

\$\endgroup\$
12
\$\begingroup\$

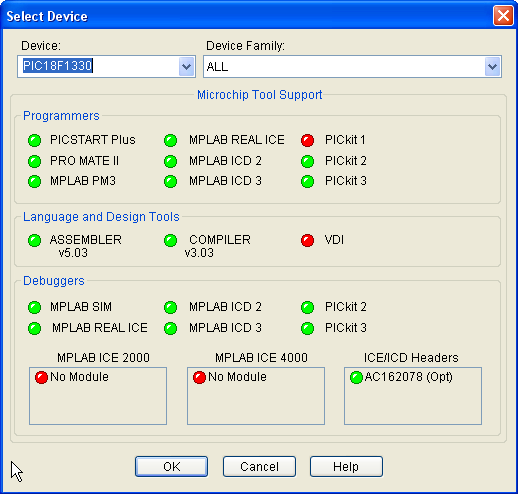
Since you are using the MPLAB IDE with the XC8 C compiler, you can check the compatibility from the menu Configure->Select Device (green indicator means fully supported, yellow is partial, and red is not supported).

Right now, the best choices would be Pickit 3, ICD3, or RealICE (in order of increasing price)

Here are the compatible programmers, debuggers:

You really want to have debugging support as well as programming support.

enter image description here

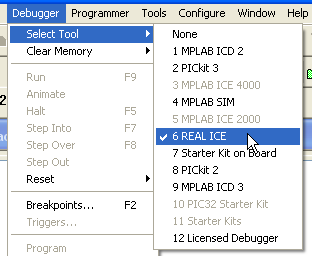
Once the device drivers are installed you can select and connect to it (a given device can only be installed as a debugger or a programmer at given time):

enter image description here

Then when you program is compiled (in either debug or release form) you can program the microcontroller with the buttons shown below:

enter image description here

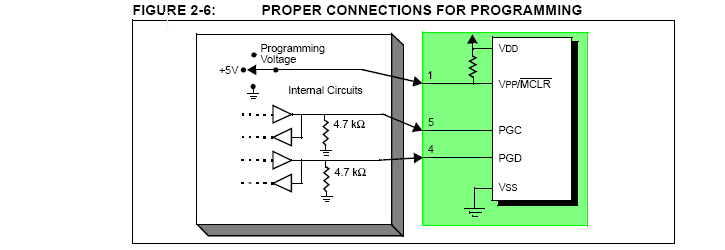
Physically, the PICkit or other debug/programmer unit has a connector that you connect to your system. There are 6 pins, of which 5 are used including power and ground.

enter image description here

\$\endgroup\$
4
\$\begingroup\$

At the time of writing, there are 3 main ways to burn a binary to a microcontroller. Depending on a particular micro any 3 of them may be available. The oldest method is device-specific programmer/debugger. Current ones for Microchip parts are Pickit3/ICD3, they are compatible with all current PIC micros and some older ones. You can't use them to program parts made by other manufacturers.

The second method is called a bootloader. It is a small program burned into the micro prior to you taking possession of the part. Bootloader allows programming via micro's standard interface[s] - UART, SPI, Ethernet, etc. ARM chips often come with a bootloader pre-loaded, as well as AVR. You don't need proprietary programming gear if a bootloader is present but you won't be able to do single step debugging easily.

The third is called JTAG. It is semi-generic interface, you can program many different parts with it and also debug. You will need a piece of gear called JTAG dongle. Some PIC parts have JTAG. ARM chips typically have JTAG, and many don't have any other debug interface.

\$\endgroup\$
3
\$\begingroup\$

A microcontroller programming device is what you need. That is a piece of hardware that connects to your PC and the microcontroller, in order to perform the necessary functions to load the program to the chip. In circuit debugger is a device that has more functionality than a programmer, like debugging your code while it's running on the chip. You can either use the ICD or the PIC Kit to program the uC. Or, if you like, you can use a very simple circuit like the JDM programmer also.

Note that MPLAB IDE supports PIC Kit and ICD. But if you use a JDM programmer, you'll have to use another software like PICPgm to load your compiled chip.

\$\endgroup\$
2
\$\begingroup\$

General recipe:

  1. Type in your code in a text editor using the language of your choice
  2. Translate that language into machine code using a compiler. Machine code is a list of hexadecimal numbers: some represent an instruction, the rest is arguments/parameters for these instructions. Commonly called a "HEX file". Any piece of program comes down to this succession of elementary instructions + their parameters.
  3. Transfer this machine code to the program memory of your device. This is done using a programmer. The programmer is shipped with a driver, which is a piece of software that controls the programmer: give it a HEX file, it will do the rest. The programmer will read your HEX file and wiggle the programming lines of the device (kind of like morse code) in a coded way to actually write the program memory. When the program is loaded, the device is rebooted and then, the device automatically starts executing code at the very beginning of the program memory. That's your code. This is grossly said, but it's pretty much what you need to know for now.

You're nearly there. You have the integrated development environment that does 1 and 2 in a very user friendly way. It even has interfaces to programmers so that you don't need to worry about what's a HEX file (hit "play" and you're done).

However you still need the physical programmer to interface your device with the PC - there is a number out there for PICs. Pickit is one of them. If you intend on getting serious with embedded programming, you should probably invest in an In Circuit Debugger (ICD). It's a programmer, and also something that allows you to peek or poke at variables and registers in the micro, and even step through and stop a program at will.

\$\endgroup\$

Your Answer

By clicking “Post Your Answer”, you agree to our terms of service and acknowledge you have read our privacy policy.

Not the answer you're looking for? Browse other questions tagged or ask your own question.