0
\$\begingroup\$

I occasionally do minor SMT assembly and re-work. I know the standard practice for holding parts is to glue them, but sometimes I'd like to have a more temporary approach. For example, sometimes I need to build an assembly of several SMT components connected in "free space" to wires without being on a board.

My binocular microscope has a couple of spring-steel "tabs" that can hold the board, but are to big and too short to hold components. (see image below)

Does anyone know of if something exists like hold-down probes made of spring steel or piano wire, that would be small enough to hold down a component or package while soldering (without gluing it?) and thin enough to not get in the way of soldering small resistors or diodes?
I thought this would exist, but maybe I don't have the right term to search on. I'm imagining something like the "catwhisker" probe from early crystal radios, but larger.

Example of tabs on my current microscope:
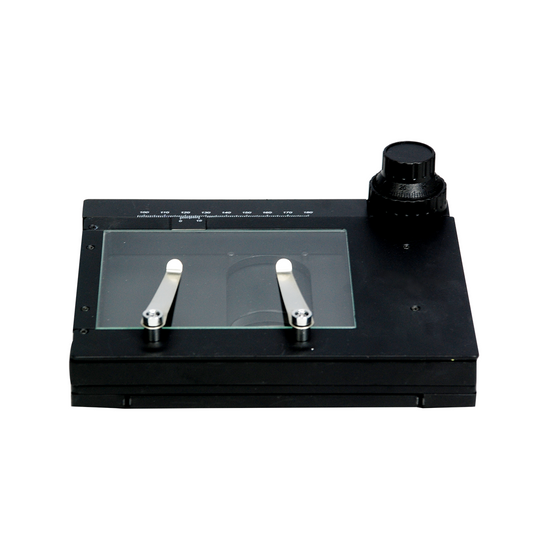
Text

Example of cat whisker for crystal radio:

(Image no longer available.)

\$\endgroup\$
3
  • \$\begingroup\$ "Shopping questions" are off topic here, but beyond that you may want to re-consider the wisdom of complex 3d constructions of parts that are really intended to be mounted flat on a board to a much greater degree than old through-hole ones were. As you gain experience with an iron and a hot air tool you may get a little better at doing this kind of thing in a pinch, but at the kind of complexity your question implies, you probably want to use a board substrate, even if some kind of improvised hand carved one, modified generic proto board, etc. \$\endgroup\$ Commented Oct 4, 2020 at 22:11
  • \$\begingroup\$ This is not normal assembly, so normal electronics tools are not necessarily appropriate. Jewelers have tools that may be of assistance. Check one of the specialist suppliers. \$\endgroup\$ Commented Oct 5, 2020 at 6:14
  • \$\begingroup\$ tim11g - Hi, It seems like your question is very similar to this previous one: "How to hold SMD parts in place while soldering?". If that one does answer your question, we could close yours as a duplicate of that one. At the very least, the answers there are relevant to this topic. \$\endgroup\$
    – SamGibson
    Commented Dec 26, 2020 at 11:51

3 Answers 3

1
\$\begingroup\$

Nothing. No springs, no clips, no glue.

  1. Clean all solder off all the pads for your part.
  2. Apply a small blob of solder to one pad on the board.
  3. Move your part into position with a pair of tweezers, then heat the pin and pad so the solder melts.
  4. Press the part down so it sits flat.
  5. Remove the heat, let the solder cool while holding the part in place.
  6. Solder all the other pins. The first one will hold things in place just fine - at least as well as the glue and a darned sight better than any wiggly mechanical construction.

I missed your mention of "free space" assembly of parts.

This known as "dead bug" assembly. For that kind of thing, it is better to stick at least some of the larger parts to something larger.

A piece of protoboard is good. I've even used a scrap of cardboard from a cereal box at times.

Glue the larger part(s) down with some thing fast drying, then use fine wire to connect the smaller parts.

Magnet wire or wire wrapping wire are good for the interconnections. I've also used telephone wire at times.

Here's one I did a few weeks ago to try out a circuit:

enter image description here

It looks rather ugly because I had to go back and burn some of the glue off of it. The glue was effectively a short circuit between the gate and the drain and source of the JFET transistor in the middle of the mess.

That hacked up "prototype" proved the circuit so that I could have a bunch of PCBs made.

They look like this:

enter image description here

enter image description here

It cost about 70€ to have 12 PCBs made, and I didn't want to go straight to from idea to PCB if it didn't work.

\$\endgroup\$
1
  • \$\begingroup\$ I'm glad that you have no physical problems that make it difficult for you to hold the part completely still while the solder cools. Myself, I need a little drop of glue so I can nudge the part into position and then let the glue set before soldering. \$\endgroup\$ Commented Dec 26, 2020 at 17:59
0
\$\begingroup\$

I find that sticky flux works well.

\$\endgroup\$
0
\$\begingroup\$

There are tools used by jewelers to hold parts precisely while they are being soldered together. It bears some similarity in appearance to the 'helping hands' crappy devices that some people use for electronic soldering because they lack the dexterity to simulate a third or fourth hand, but there is really no comparison in precision (they're also a lot more expensive, but still reasonable enough as tools go).

enter image description here

The replaceable block is intended to be soldered upon, just as you plan to do, and it will withstand far in excess of typical electronic soft-soldering temperatures. It's primarily composed of calcium silicate (no asbestos) but you should still avoid inhaling dust from the block.

Available from major jewelry product suppliers such as Rio Grande (where the photo came from).

It's often productive to consider re-purposing specialized tools used in other domains, such as the inexpensive and quite well-made hemostats (you can even buy them at Digikey now).

\$\endgroup\$

Your Answer

By clicking “Post Your Answer”, you agree to our terms of service and acknowledge you have read our privacy policy.

Not the answer you're looking for? Browse other questions tagged or ask your own question.