6
\$\begingroup\$

I'm trying to replace the triac in a floor lamp dimmer, and completely failing to remove solder from the pads with desoldering braid. I've desoldered plenty of times before, though admittedly not recently, and this is the first time I have ever seen desoldering braid simply not work.

I placed the braid over the joint, heated through the braid, and nothing happened. After multiple attempts, I decided my iron must just be too old or dirty or something, so I ordered a new one, but that made no difference. Then I decided my desoldering braid of uncertain provenance might have been sitting around too long, and perhaps all of the flux was gone, so I tried other packs, and ordered more braid from DigiKey, but that didn't help either.

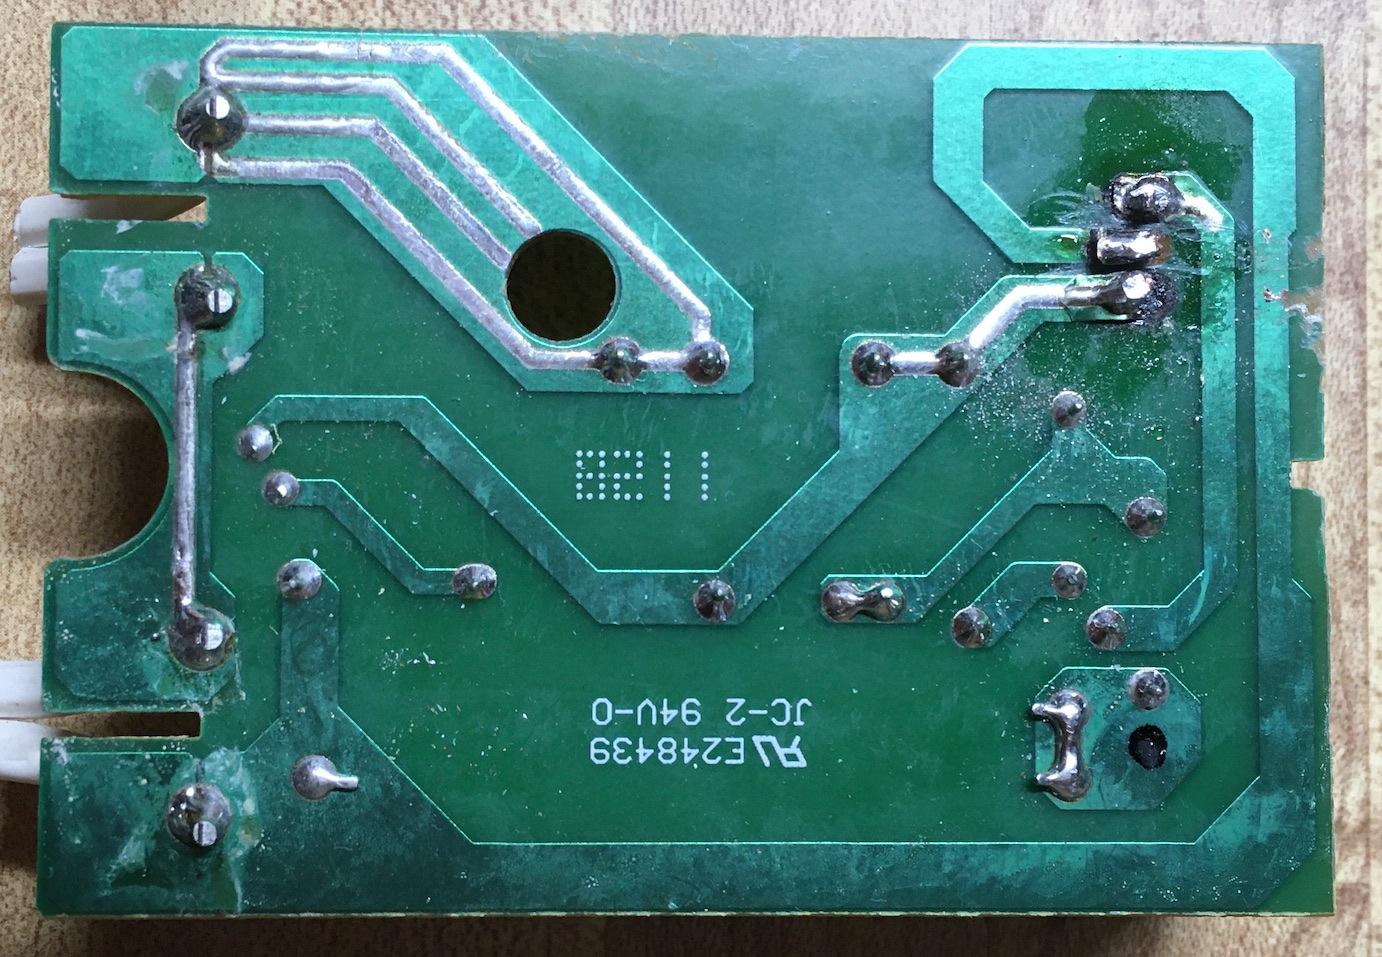
The best I was able to do was melt the solder—which the iron has no problem doing—and kind of wick it away with the iron, but by that point some of the pads were lifting up or severed. The TO-220 in question is at the upper right of the image below. I also tried desoldering elsewhere on the board, just in case I was dealing with some crazy localized problem.

enter image description here

I have two more of these dimmers, one of which still works, and another one which does not, but I really like the lamps, and would like to get all of them working again. I know some people swear by solder suckers as in this question, but what stumps me is that I've never before had any problems with desoldering braid. Could my triac board have been made with some other kind of solder that copper desoldering braid can't suck up?

\$\endgroup\$
12
  • 2
    \$\begingroup\$ No need for a solder sucker or braid - just apply lots of solder to heat up all three pads then remove triac. Then heat the solder and tap the pcb against a hard surface to fling the excess solder off. \$\endgroup\$
    – Kartman
    Commented Jun 23 at 13:09
  • 1
    \$\begingroup\$ You could let us know the model and wattage of the soldering iron. Cheaper soldering stations simply don’t have the power to move enough heat to the tip, and even more expensive ones won’t do well with thin tips. \$\endgroup\$ Commented Jun 23 at 22:03
  • 3
    \$\begingroup\$ Quick tip, flux your desoldering braid. \$\endgroup\$ Commented Jun 23 at 22:04
  • 1
    \$\begingroup\$ Cheap soldering braid you find on Ebay/AliExpress and the like often doesn't have enough flux. Add a LOT of flux and a hot iron should do the trick. A large thermal mass such as a TO-220 can be difficult even with a lot of heat and flux. \$\endgroup\$ Commented Jun 24 at 3:29
  • 1
    \$\begingroup\$ @RussellMcMahon I have gone through some nearly twenty years of self-taught soldering, with all the bad quackery tricks up my sleeve as a result. Sometimes they work, sometimes they don't indeed. Having a chat about said tricks with the teacher during IPC training mostly resulted in him chuckling and shaking his head. There is always (at least) one correct method to do something and as it turns out, that method is often also the easiest, with the least damage to the board or components. Vacuum desoldering stations are great and you don't need lots of practice to use them. \$\endgroup\$
    – Lundin
    Commented Jun 26 at 6:24

7 Answers 7

6
\$\begingroup\$
  1. Braid gets old. It's coated with a little bit of flux, and the active ingredients evaporate over time (or maybe oxidize, I don't know). The metal itself will oxidize as well, using up more rosin before the joint even melts. (Corroded braid, I would suggest just throwing out and buying fresh. No realistic amount of flux is going to cut through crusty deposits.)
  2. Use flux. Always use flux. Keep the iron tip clean and bright, tin it if not, and clean off crud with a wet sponge or brass wool.

A lot of heat transfer is required for effective soldering, and a rough layer of oxide, no matter how microscopic it may seem, blocks direct metal-on-metal contact between parts. The remaining air gap between is a highly effective insulator -- not so much that heat doesn't get through at all, but the joint might never get to melting point, even with an overheated iron (but then you have other problems, like the tip oxidizing while you're using it, and the plating dissolving away).

Cleaning off dust and residue from the board serves a similar purpose, and flux helps carry away those residues.

\$\endgroup\$
1
  • 1
    \$\begingroup\$ With due appreciation for the other answers, this is the one that best helped me understand the problems. I ended up cleaning the contacts, using a larger tip, and dipping the braid in my bottle of flux. It worked like a charm. \$\endgroup\$ Commented Jul 1 at 11:46
12
\$\begingroup\$

The surface of old solder can be very oxidized. Tin and lead oxides don't melt at soldering iron temperatures. If the solder is melted before cleaning the surface with flux, the oxides break into tiny particles and mixes with the melted solder preventing absorption into the solder wick. Applying flux after melting may not help. Sometimes the oxides can be removed by abrasion (eraser) prior to applying flux.

Flux is not activated until it boils. Try applying flux then heating it until it boils, while the solder remains solid.

A solder sucker removes the solder with airflow so may be a better choice in this case.

Often applying more new flux core solder can help with removal, the new solder mixes with the old making it easier to withdraw. Repeating the process as necessary. working from both sides. One of the advantages of solder wick is it keeps removing heat, reducing the chance of delamination. If repeated operations are required, then pause between operations to let the board cool. Always keep the iron tip shiny clean.

A tech I knew would use a metal straw to blow the melted solder through the hole. The solder splattered everywhere, but in a pinch...

\$\endgroup\$
3
  • \$\begingroup\$ Adding flux with a flux pen is definitely a good idea, but mostly I would like to second the recommendation for a solder sucker. I've found they work better for cleaning out through holes, especially when there's a lot of copper around the holes. \$\endgroup\$
    – Adam Haun
    Commented Jun 23 at 4:30
  • \$\begingroup\$ I generally prefer solder wick, but sometimes airflow is necessary.@AdamHaun \$\endgroup\$
    – user319836
    Commented Jun 23 at 4:32
  • 1
    \$\begingroup\$ There are so many good things about this answer. Thank you for better helping me understand the problem. \$\endgroup\$ Commented Jul 1 at 11:52
3
\$\begingroup\$

Desoldering braid has to be wet by the solder.

  • If the solder joint is covered by lacquer, sand it a bit.
  • If the braid is oxidized or dirty, polish with fine sandpaper.
  • Apply a bit of flux to the end of the braid to facilitate it soaking up solder.
  • Add a drop of rosin-core solder to the tip of the braid, while it's on the triac pins, to start wicking. This also may help when removing RoHS solders, which might not flow as well as Sn/Pb alloys.
  • A hemostat can be useful to grab the triac itself and add some weight, so no braid is needed: as each lead is heated, the part will start to come loose and fall off.

BTW, the dimmer can still be used; just use jumper wires to replace the broken PC traces.

\$\endgroup\$
3
  • \$\begingroup\$ Never use sandpaper! It's not a piece of lumber. Sandpaper will no doubt ruin the soldermask, maybe damage the pads as well. Use isopropyl, then lots of flux. \$\endgroup\$
    – Lundin
    Commented Jun 24 at 6:40
  • \$\begingroup\$ +1 for mentioning the lacquer - looks to me as thought the board has been lacquered as a final step, covering the solder. Logically, since the OP has changed both the braid and the iron (!) the problem must lie with the board itself. \$\endgroup\$
    – MikeB
    Commented Jun 24 at 7:24
  • \$\begingroup\$ +1 for giving me the confidence to solder a jumper wire between the broken traces. And the rest of your comments helped reinforce what I was seeing in other answers. Thank you. \$\endgroup\$ Commented Jul 1 at 11:47
2
\$\begingroup\$

As a newcomer to electronics in the 2010s, I suspect the difficulty of desoldering has increased in the recent decade, in comparison to the old time (say 1980s). I don't know how exactly the old-timers here learned to become experts on desoldering. But my personal experience is the following:

  1. Desolering braids never work consistently, they require substantially more heat to start working - unless the joint has a very low thermal mass. If it works easily, it only means you're lucky.

  2. Desoldering in general is difficult. Having difficulty when removing components is the norm. It's only easy when you're applying it on a solder joint with a very small thermal mass, like single-layer boards, or tiny ungrounded SMD pads. Anything else can be a headache. Such as a pad connected to the ground plane of the PCB, a lead-free solder joint, a metal connector, a component inserted in an undersized through hole, a pad without thermal relief.

    • The nightmare combination: A metal connector inserted in an undersized through hole directly connected to the solid ground plane in layer 2 and layer 4 without thermal relief using lead-free soldering - also known as a coaxial RF connector. - I designed and soldered the board myself and I have no idea about how to remove it (to maintain the best RF performance, thermal relief can't be used).

Here's my standard operating procedure when desoldering a component:

  1. Consider using a larger soldering iron tip to improve heat transfer. Most soldering irons come with a "default" conical iron tip, which is not the best for transferring heat. A larger "knife" or "chisel" type tip works better. If you're using a conical iron tip, try touching the desolering braid horizontally for greater surface area.

  2. Before a desoldering attempt, feed huge quantity of fresh solder to the original solder joint, on both sides of the PCB while heating the solder joint, until the entire solder joint is able to liquefy and flow freely. Old solder joints are oxidated and conduct heat poorly, reformed joints are easier to work with. Likewise, having some molten solder on the soldering iron tip improves its thermal conductivity dramatically. Also, adding leaded solder to a lead-free joint can reduce its melting point.

  3. Place the desolering braid on top of the solder joint, and start heating it with a soldering iron. The presence of a desolering braid itself can severely degrade heat transfer. If a joint is solderable originally, once a desolering braid is inserted in the middle, the solder may stop melting. In this case, increase the iron temperature by 20 °C to apply more heat.

    • All of the previous suggestions can help, like using a larger soldering iron tip, touching the desolering braid horizontally for greater surface area, and preparing the joint with refresh solder.

    • Sometimes it requires the use of uncomfortably high temperature - If 380 °C is already needed to heat a difficult joint during lead-free soldering, using desoldering braid can push this temperature up to 400 °C to 420 °C - but you don't have a choice if a braid is your only tool. My experience is that high-quality multilayer PCBs can withstand this abuse twice, and the risk of damaging it can in fact be lower in comparison to attempting it unsuccessfully at lower temperature.

  4. Once the solder in the joint has been completely removed after 5 to 10 seconds, lift the desolering braid with minimum force. If the solder joint has great heat dissipation, solder may immediately solidify before you're able to lift the braid. Thus, use minimum force to avoid pulling the pads out. If you're able to remove the braid, the job is done. If you cannot, add more solder to free the braid, and repeat the procedure above.

  5. A little bit of solder on the desoldering braid itself can sometimes improve heat transfer, and sometimes it's helpful to reuse the braid to try again. But old desoldering braid should be removed with a scissor once the job is done since they dissipate heat.

  6. Buy both narrower or wider desoldering braid for different tasks. narrower braids are suitable for SMD soldering, wider braids are suitable for removing solder from large through holes. Always use the proper braid for the job.

  7. There are two types of desoldering braid, one type with flux, and another type without. It's generally believed that one should buy high-quality, pre-fluxed braids. However, I have once seen from a marketing poster from a braid that claims fluxless braids can be helpful for lead-free soldering, since the high temperature does nothing but burning the flux in the braid - I'm not sure how true this claim is, and I use pre-fluxed braids personally, but perhaps fluxless braids have their uses and this would explain why they're common.

Finally, a desoldering braid can be a crude tool for the job. When situation allows, consider the following options:

  1. Vacuum desoldering guns - It gives much more consistent results even on joints with high thermal mass as heat is applied simultaneously during desolering. A common failure mode when desoldering a through hole on a multilayer board is that the solder may have been removed at the top layer, but some solder remain on the bottom layer, preventing component removal. This problem is largely avoided.

    • Downside: Cost.
  2. PCB preheater - Often mandatory for not destroying multilayer PCBs during a desoldering attempt.

    • Downside: The PCB is dangerously hot to work with after preheating.
  3. Wire cutter. 90% of the time, it does not worth the effort and risk to desolder a difficult through-hole component. The job becomes easier by an order of magnitude by removing transistors, connectors and other components destructively using a wire cutter. After the component is removed, the remaining pins can be extracted one by one with tweezers from the molten solder. Finally, the through-hole is cleaned by a desoldering pump or braid by heating joints one by one.

    • Downside: Component destruction.
\$\endgroup\$
1
  • \$\begingroup\$ Thank you for the well considered response. Probably far more information than I needed, but no doubt helpful to people who peruse this question in the future. \$\endgroup\$ Commented Jul 1 at 11:49
2
\$\begingroup\$
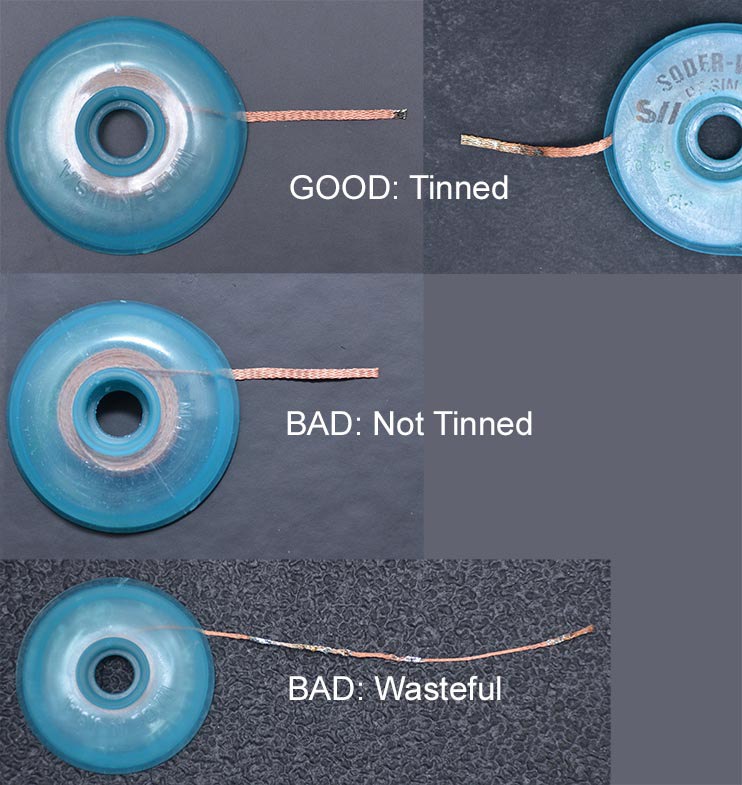
  1. I have found that tinning the end of the braid helps transmit the heat more efficiently to the joint which also helps to reduce splaying of the strands. The upper right image was used on a few pads where the tinned part of the braid closest to the bare_braid is applied to the joint. The image below is a reminder to our employees on proper preparation & usage of the braid. Those that repeatedly use the wick as shown in the bottom image are spanked (metaphorically).

    enter image description here

  2. Use the appropriate width braid for the job. Big joints require wide braid.

  3. Use an appropriate soldering iron tip and temperature for the job. A large joint, such as yours, requires a larger tip with sufficient thermal mass to heat the joint.

  4. Some braid brands work better than others. You need to experiment to find the brand that works best for you. I have found that MG Chemicals "Superwick" works better than other brands I have tried.

  5. Sometimes, additional flux is required on the braid. On brands that don't work well, I usually put a drop of flux on the braid. For really stubborn cases, I get out my jug of RMA flux from the 1980s (when fluxes smelled good) which is more active than modern fluxes.

  6. Minimize handling the braid with your fingers as it will tarnish the copper. Tarnished braid will benefit with a drop of flux on the braid.

  7. If the joint uses no-lead solder, contaminate the joint with lead-bearing solder to lower the melting point. Bismuth solder will lower the melting point even more than lead-bearing solder and probably is RoHS friendly.

  8. If the joint area is large, preheating the board to approximately 180°C is helpful. Or, contaminate the joint with bismuth solder to lower the melting point. Be sure to remove excess bismuth solder during cleanup as solder with more than 4% bismuth content, in the case of no-lead solder, will have poorer mechanical properties. Under 2 to 3% bismuth content improves no-lead solder characteristics according to a white paper published by AIM Solder.

  9. Remove conformal coating on the joint. You can remove the coating by tinning the joint.

\$\endgroup\$
1
  • 1
    \$\begingroup\$ This is all good advise and all. Braids are great for removing SMD components which is what we usually deal with these days. However, the task here is to remove a through-hole component. And that's where braids are bad, because they often fail to remove all solder from the hole. \$\endgroup\$
    – Lundin
    Commented Jun 26 at 6:30
0
\$\begingroup\$

One additional reason for problems during soldering not mentioned by others:

  • This board has traces with large areas. Many soldering irons do not have enough power to allow heating them without radiating a significant portion of the heat away by the trace. You can see also thermal relief pads that have reduced area on which the heat can spread.
\$\endgroup\$
0
\$\begingroup\$

When one thing doesn't work, try something else.

I have never used desoldering braid. My go-to methods are (1) solder sucker and (2) heat and tap.

And this doesn't answer the question, because OP asked WHY the braid didn't work, not how to solve his desoldering problem.

\$\endgroup\$

Your Answer

By clicking “Post Your Answer”, you agree to our terms of service and acknowledge you have read our privacy policy.

Not the answer you're looking for? Browse other questions tagged or ask your own question.