2
\$\begingroup\$

I have the following LED display, which I want to hook up to Arduino UNO.

According to datasheet, there is clock pin. Do I have to build external clock source for it or I can feed it from Arduino?
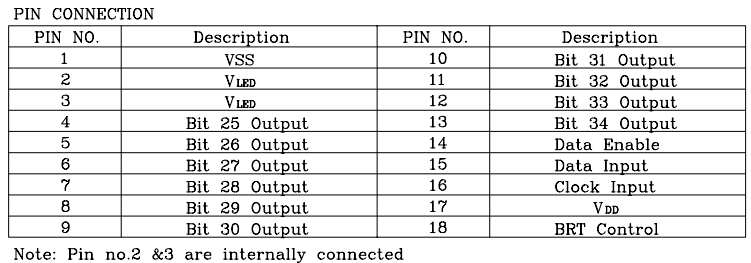
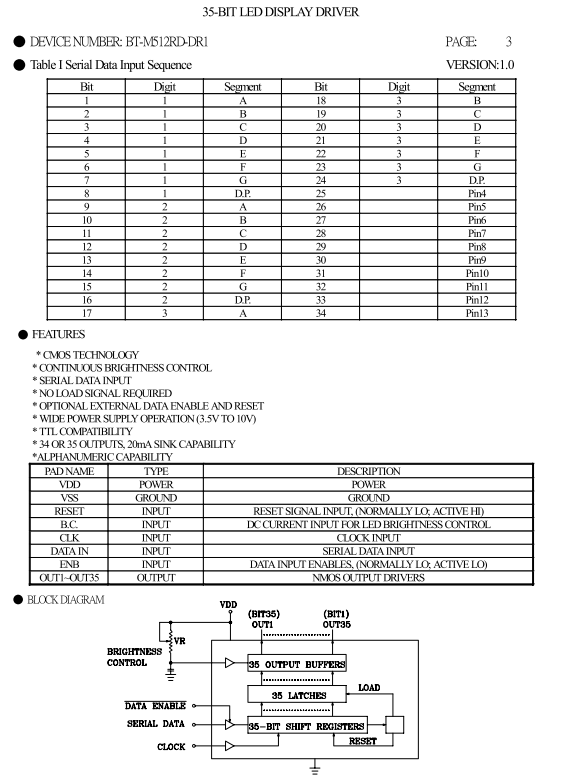
enter image description here

enter image description here

Any practical advice on how to connect will be appreciated.

Update:

Thanks to Oli Glaser, I've created sketch for Arduino and presenting it here, just in case someone will have same type of LED display.

const int CLOCK_PIN = 2; 
const int DATA_PIN  = 3; 
const int DATA_EN_PIN  = 4; 

const byte numbers[16] = {
                    0b11111100,
                    0b01100000,
                    0b11011010,
                    0b11110010,
                    0b01100110,
                    0b10110110,
                    0b10111110,
                    0b11100000,
                    0b11111110,
                    0b11100110,
                    0b11101110,
                    0b00111110,
                    0b10011100,
                    0b01111010,
                    0b10011110,
                    0b10001110
};

void loadLed(byte d1, byte d2, byte d3)
{
  digitalWrite(DATA_EN_PIN, 0);

  digitalWrite(DATA_PIN, 1);
  digitalWrite(CLOCK_PIN, 1);
  delayMicroseconds(5);
  digitalWrite(CLOCK_PIN, 0);
  delayMicroseconds(5);

  for (int i=7; i >= 0; i--)
  {
    if(d1 & (1 << i))
      digitalWrite(DATA_PIN, 1);
    else
      digitalWrite(DATA_PIN, 0);
    digitalWrite(CLOCK_PIN, 1);
    delayMicroseconds(5);      
    digitalWrite(CLOCK_PIN, 0);
    delayMicroseconds(5);
  }

  for (int i=7; i >= 0; i--)
  {
    if(d2 & (1 << i))
      digitalWrite(DATA_PIN, 1);
    else
      digitalWrite(DATA_PIN, 0);
    digitalWrite(CLOCK_PIN, 1);
    delayMicroseconds(5);      
    digitalWrite(CLOCK_PIN, 0);
    delayMicroseconds(5);
  }

  for (int i=7; i >= 0; i--)
  {
    if(d3 & (1 << i))
      digitalWrite(DATA_PIN, 1);
    else
      digitalWrite(DATA_PIN, 0);
    digitalWrite(CLOCK_PIN, 1);
    delayMicroseconds(5);      
    digitalWrite(CLOCK_PIN, 0);
    delayMicroseconds(5);
  }

  for (int i=0; i <= 10; i++)
  {
    digitalWrite(DATA_PIN, 0);
    digitalWrite(CLOCK_PIN, 1);
    delayMicroseconds(5);      
    digitalWrite(CLOCK_PIN, 0);
    delayMicroseconds(5);
  }
  digitalWrite(DATA_EN_PIN, 1);
}

void setup()
{
  pinMode(CLOCK_PIN, OUTPUT);
  pinMode(DATA_PIN, OUTPUT);
  pinMode(DATA_EN_PIN, OUTPUT);
  delay(100);
  loadLed(numbers[7], numbers[8], numbers[3]);
}


void loop()
{
}

This can be optimized of course, but there is a slight problem - every fifth reset of the board will display random garbage. Tried to play with delay, set to 50 - no good. Looking for solution.

\$\endgroup\$
1
  • 1
    \$\begingroup\$ Your original picture was grossly oversized. I reduced it from 3.1 Mpix image to 160 kpix without any loss of information. \$\endgroup\$ Commented Nov 3, 2012 at 16:35

1 Answer 1

2
\$\begingroup\$

The clock and data pins are for your serial input. These can be controlled directly from the Arduino, just connect each to a digital out.

For the data routine, according to the datasheet there is one start bit, followed by 35 data bits which correspond to the "Serial Input Sequence" table in your question.

Create a function in your "sketch" to control the serial loading, something like below - I haven't checked this code. You only need to call it whenever you want to update the display.
You will have to replace the set_data_pin and set_clock_pin with the correct Arduino calls to whatever GPIO pins you have attached to the clock data pins on the display (I don't use Arduino so I don't know them) Same for the delay_us (microsecond delay) which can be adjusted to whatever timing you want up to 500kHz clock speed - you can add a define for the value to save changing each one.
Each segment is shifted out MSB to LSB, which corresponds with A(MSB) to DP(LSB) for each input char:

void load_data(char seg1, char seg2, char seg3)
{
    char i, temp;
    char position = 0;

    set_data_pin(1);  // clock start bit in
    set_clock_pin(1);
    delay_us(5);
    set_clock_pin(0);
    delay_us(5);

    temp = seg1;
    while(i<8)
    {
        set_data_pin(temp & 0x80);  // set data pin
        set_clock_pin(1);
        delay_us(5);
        set_clock_pin(0);
        delay_us(5);
        i++;
        temp = temp << i; // shift next bit out
    }

    temp = seg2;
    while(i<8)
    {
        set_data_pin(temp & 0x80);  // set data pin
        set_clock_pin(1);
        delay_us(5);
        set_clock_pin(0);
        delay_us(5);
        i++;
        temp = temp << i; // shift next bit out
    }

    temp = seg3;
    while(i<8)
    {
        set_data_pin(temp & 0x80);  // set data pin
        set_clock_pin(1);
        delay_us(5);
        set_clock_pin(0);
        delay_us(5);
        i++;
        temp = temp << i; // shift next bit out
    }

    // Last 11 bits - do something here if needed
    while(i<11)
    {
        set_data_pin(0);  // set data pin
        set_clock_pin(1);
        delay_us(5);
        set_clock_pin(0);
        delay_us(5);
        i++;
    }
}

Connections

  • Connect the VDD pin to +5V, and the VSS pin to ground (0V)
  • Connect the VLED pins to +5V also.
  • Connect the DATA ENABLE pin low (i.e. to ground), as it is active low.
  • For Bits 25-34 pins, leave these unconnected if you don't wish to use them, otherwise you can use them as digital outputs. Don't tie them high or low (i.e. don't connect to +5V or ground)
  • For the BC (brightness control) pin, you can use just a resistor to fix the brightness, or a potentiometer and resistor to control the brightness of the display.
    To work out the value we can use the info in the datasheet:

    1. The absolute maximum \$I_f\$ (forward current) for the display is 30mA (pg.2)
    2. The display current is typically 36 times larger than the current into the BC pin (pg. 4) and the maximum current into the BC pin is \$550\mu A\$ (pg.5)

    So with this info we can work out the best value for the pot. If we aim for a typical operating maximum of 20mA, then:

    \$ \dfrac{+5V}{20mA \div 36} = 9k\Omega \$

    This is the minimum value of resistance we would use (connected between +5V and BC pin)
    If we want to vary the current, say from \$10mA - 20mA\$, then we can add a \$9k\Omega\$ pot in series with the resistor with it's wiper connected to one end (either end) Then the current varies between:

    \$ \dfrac{+5V}{9k\Omega} \times 36 = 20mA \$

    with the pot turned fully the other way

    \$ \dfrac{+5V}{9k\Omega + 9k\Omega} \times 36 = 10mA \$

    Note that the datasheet is not particularly helpful with details on the brightness control pin - it shows the pot set up for a varying voltage control in the diagram which confuses things a bit. I have just ignored this diagram and taken what is written to be correct. I'm also assuming the resistance to be across the full 5V (i.e. the BC pin is just above 0V), which is probably not be the case, but it's better to be on the conservative side if no details are given.
    This means you may need to experiment a bit to get the brightness right - if it's too dim try changing to a lower resistance.

\$\endgroup\$
9
  • \$\begingroup\$ thanks, I will try to "convert" it to Arduino shortly and get back to you with more questions. Meanwhile, do I have to call this just once of continuously? Should I give give 1 to Data Enable pin(connect to +5V)? \$\endgroup\$
    – Pablo
    Commented Nov 3, 2012 at 22:35
  • \$\begingroup\$ Should I connect VDD and VLED both to Arduino +5V? \$\endgroup\$
    – Pablo
    Commented Nov 4, 2012 at 10:22
  • \$\begingroup\$ You only need to call it whenever you want to update the display. I updated the answer a bit with more details. \$\endgroup\$
    – Oli Glaser
    Commented Nov 4, 2012 at 10:39
  • \$\begingroup\$ This worked great, however, as I mentioned in my update, roughly every fifth reset will produce garbage. \$\endgroup\$
    – Pablo
    Commented Nov 4, 2012 at 12:17
  • \$\begingroup\$ That sounds like it may be a separate problem, possibly not to do with the code (at least not the bit you show). Try adding a reasonable delay (e.g. 100ms) on startup (e.g. at the end of an init routine) before you send any data to the display. If this doesn't help, we will need more details to fix it - I would start a new question and mention exactly what is happening (reset process used, power supply, which arduino, any scope/multimeter data taken, etc) \$\endgroup\$
    – Oli Glaser
    Commented Nov 4, 2012 at 12:33

Your Answer

By clicking “Post Your Answer”, you agree to our terms of service and acknowledge you have read our privacy policy.

Not the answer you're looking for? Browse other questions tagged or ask your own question.