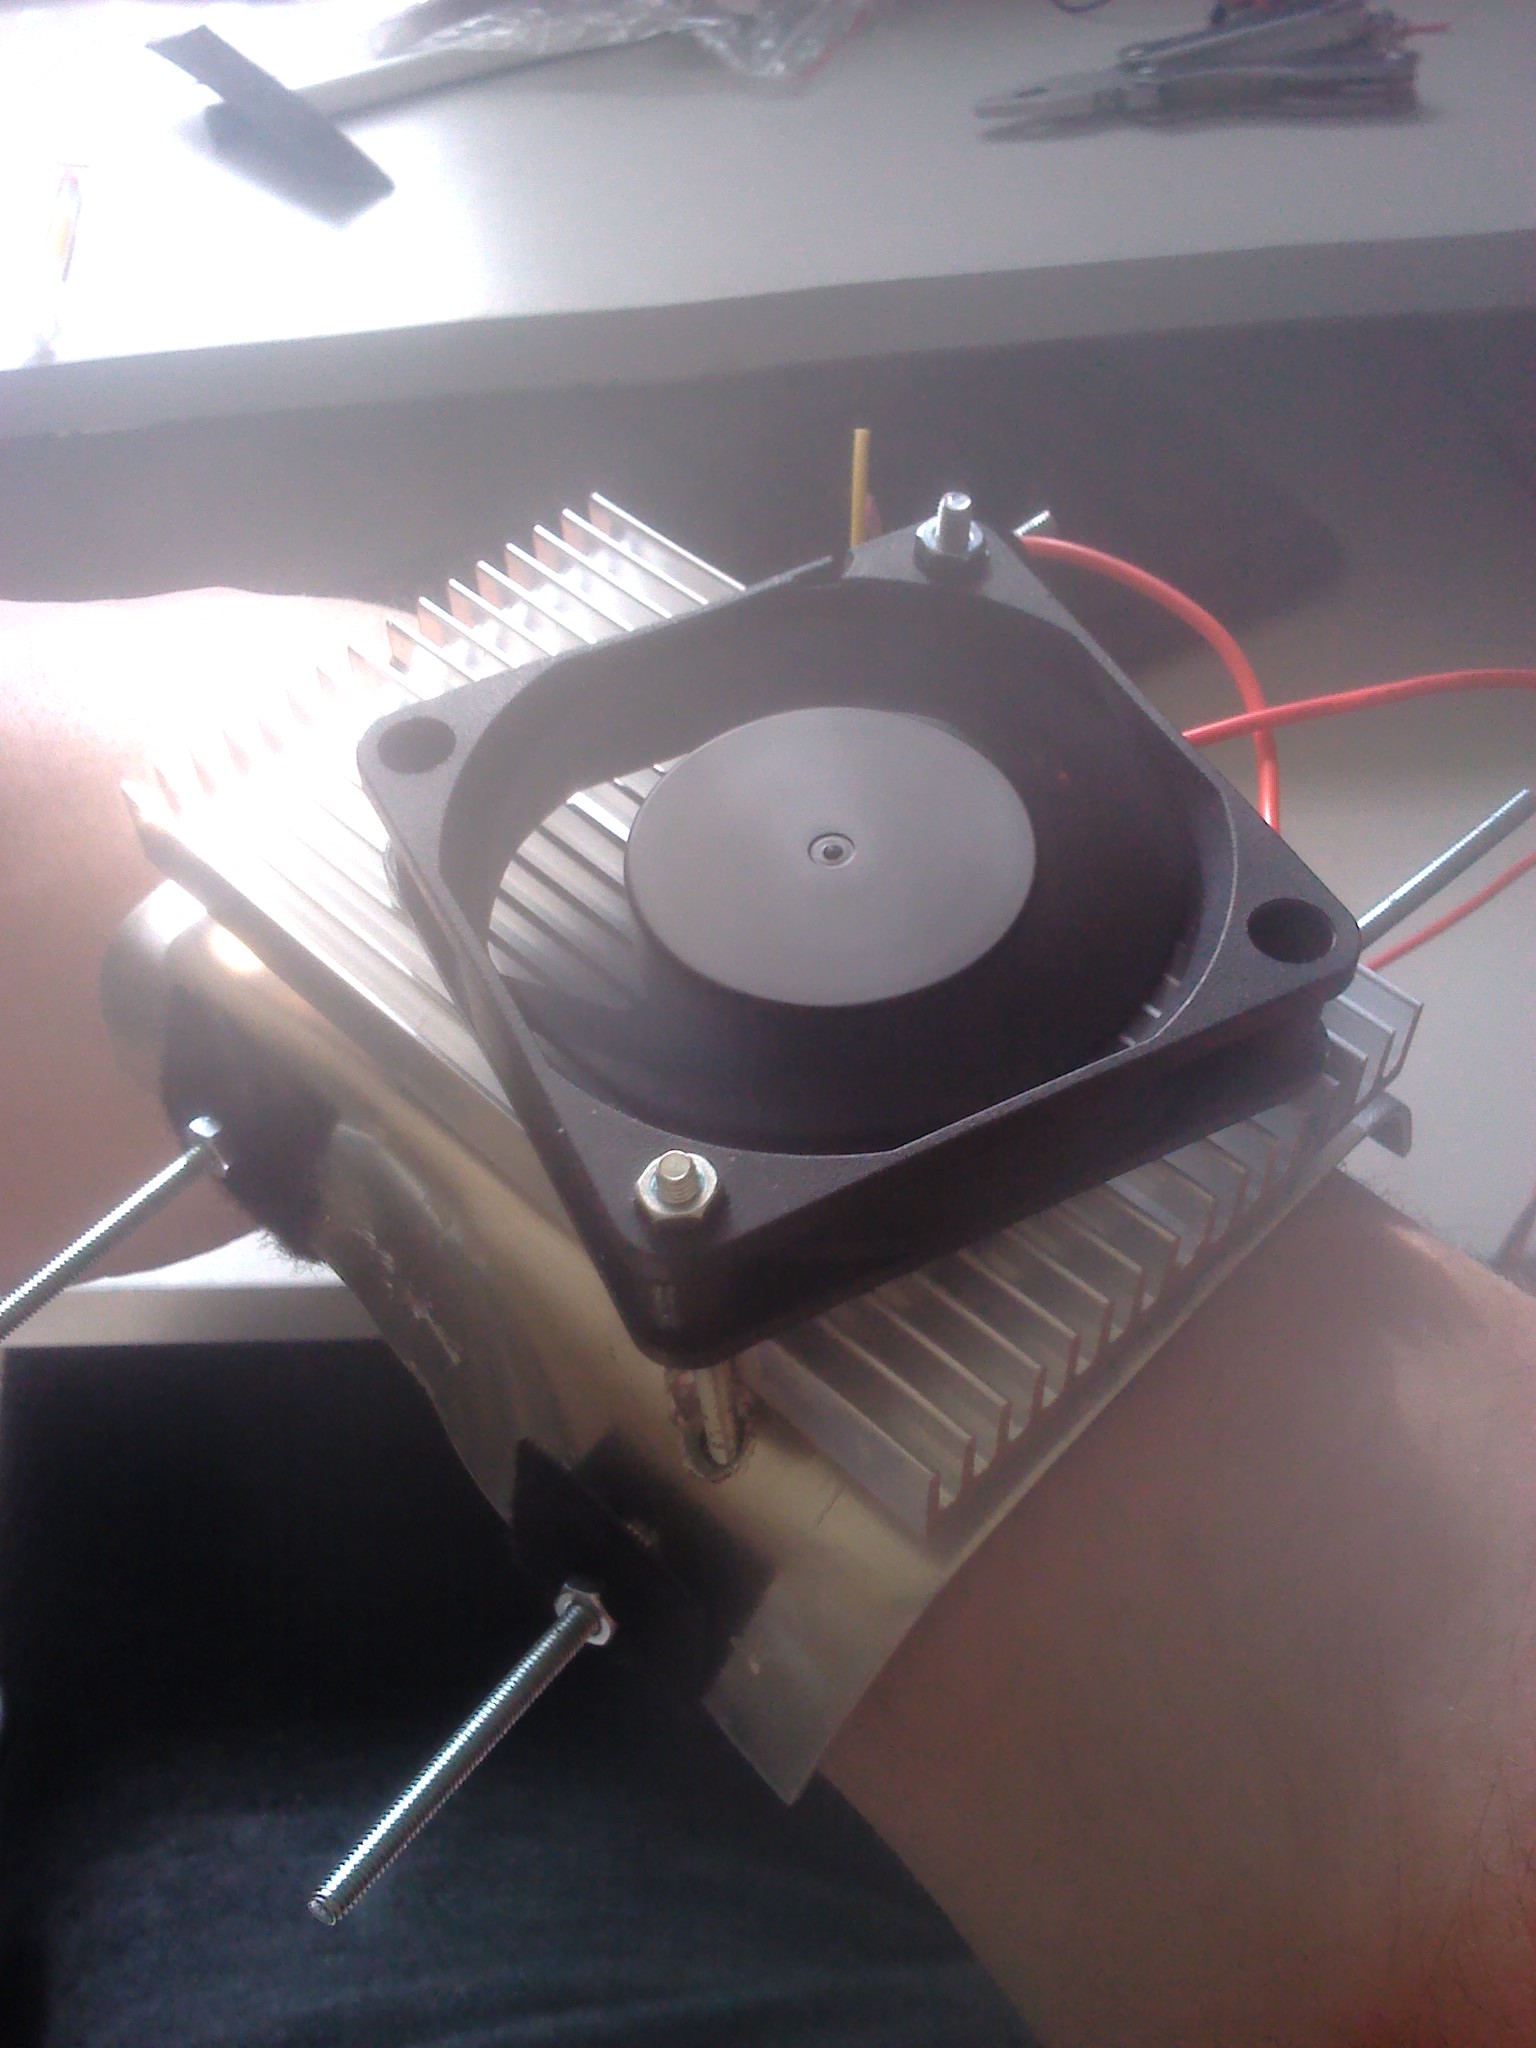
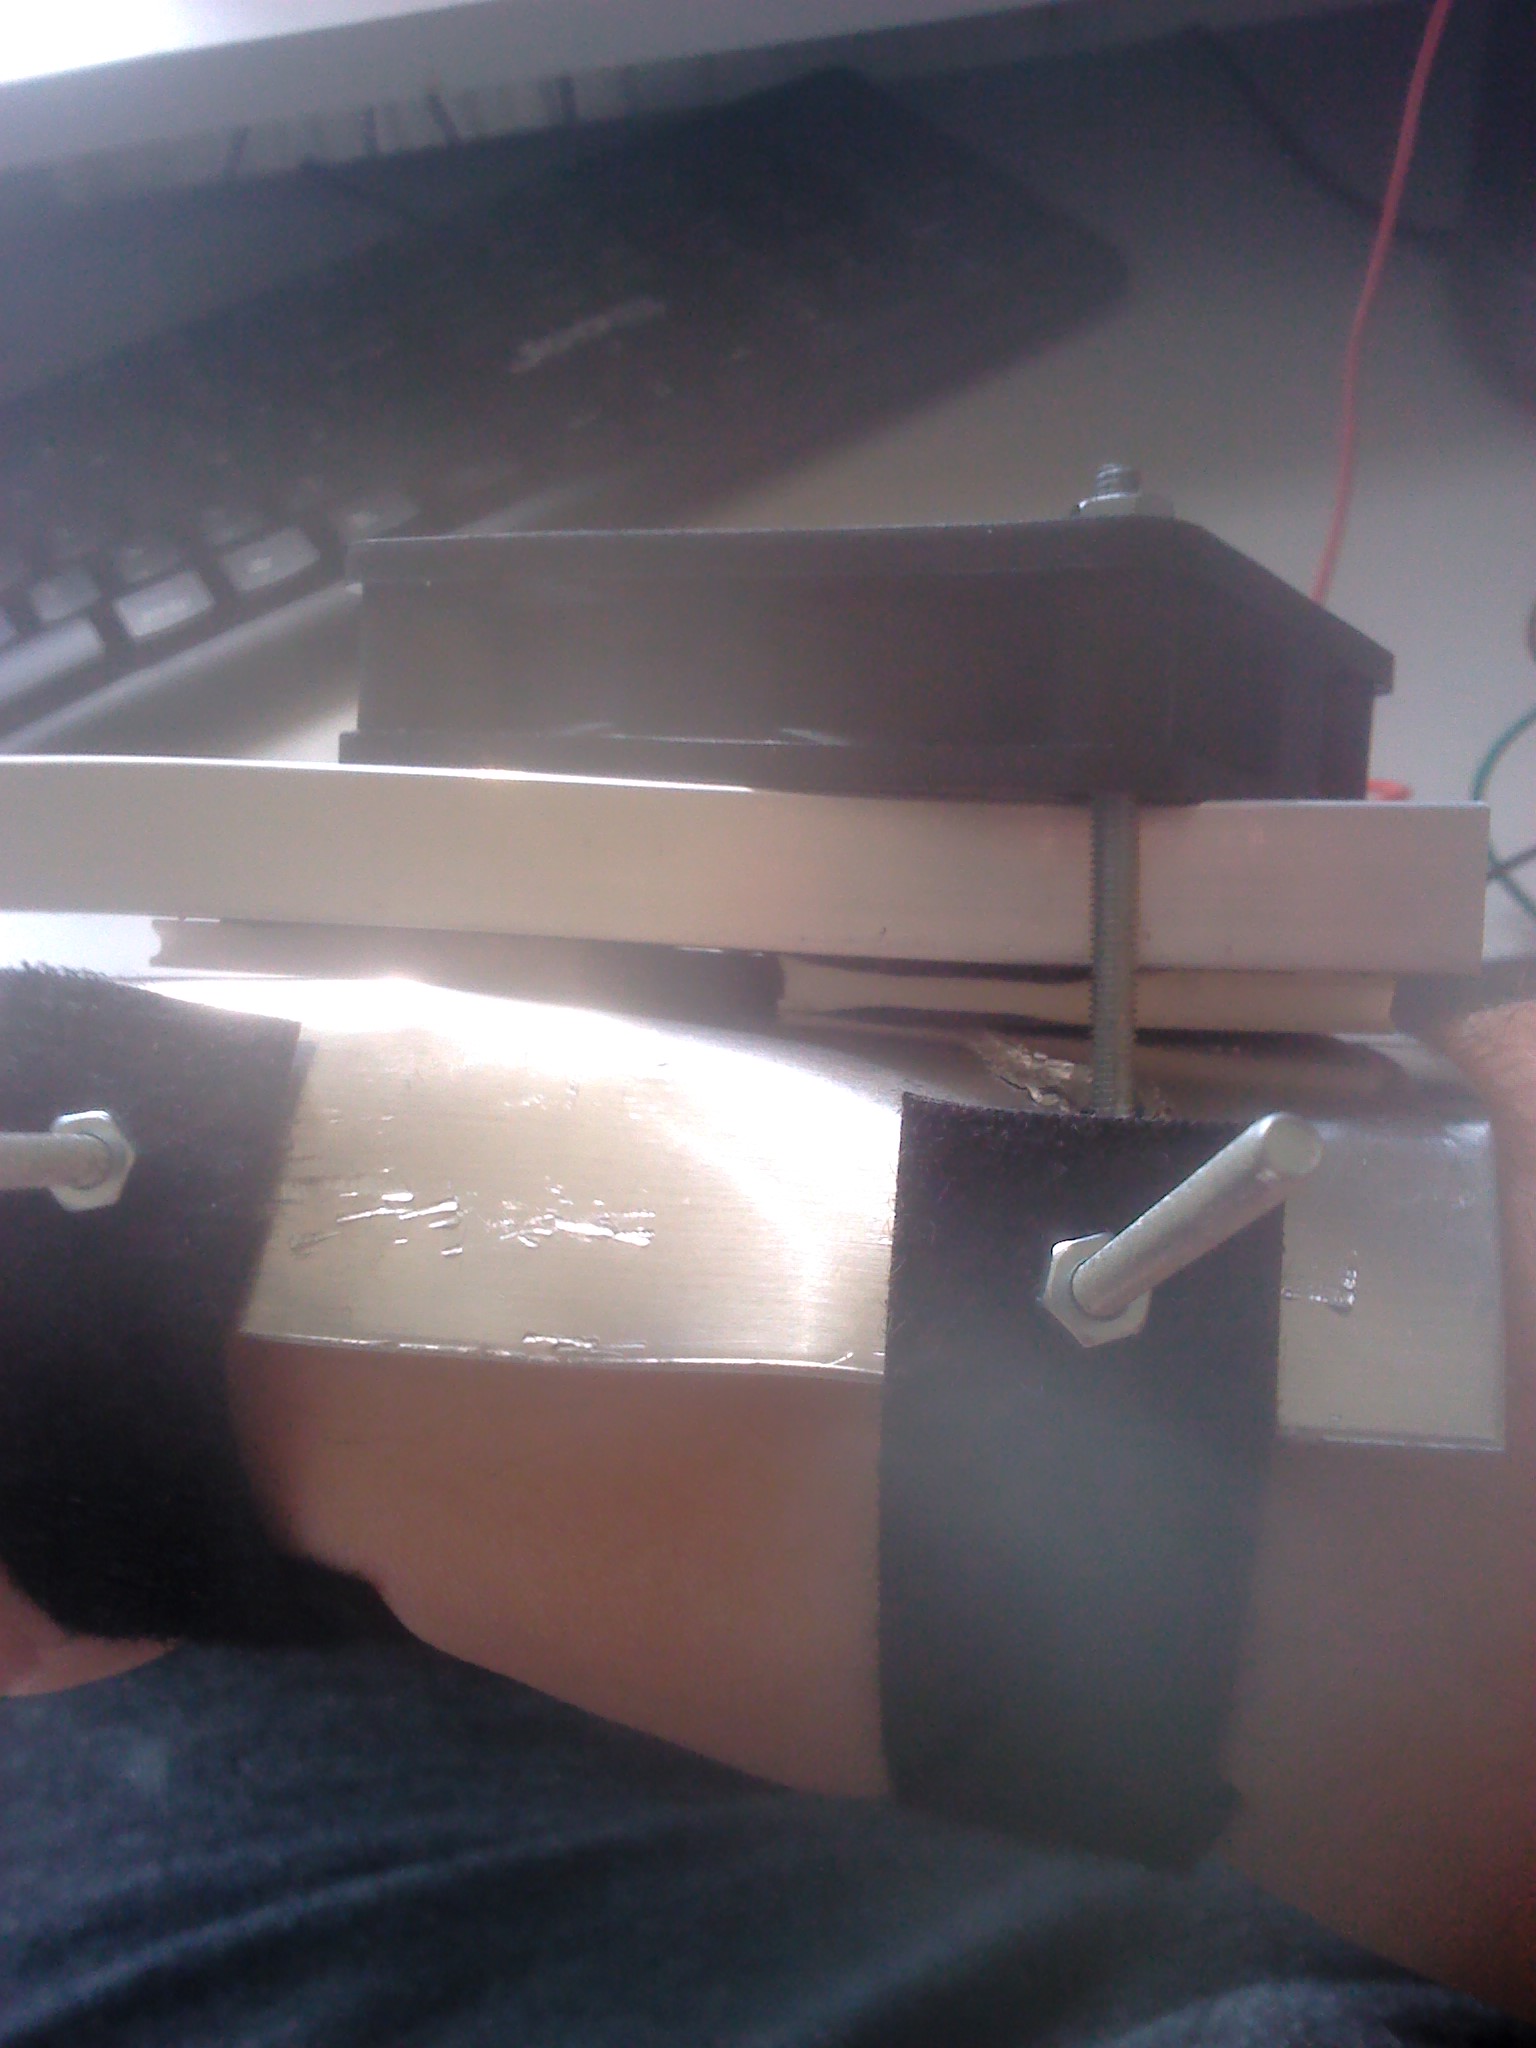
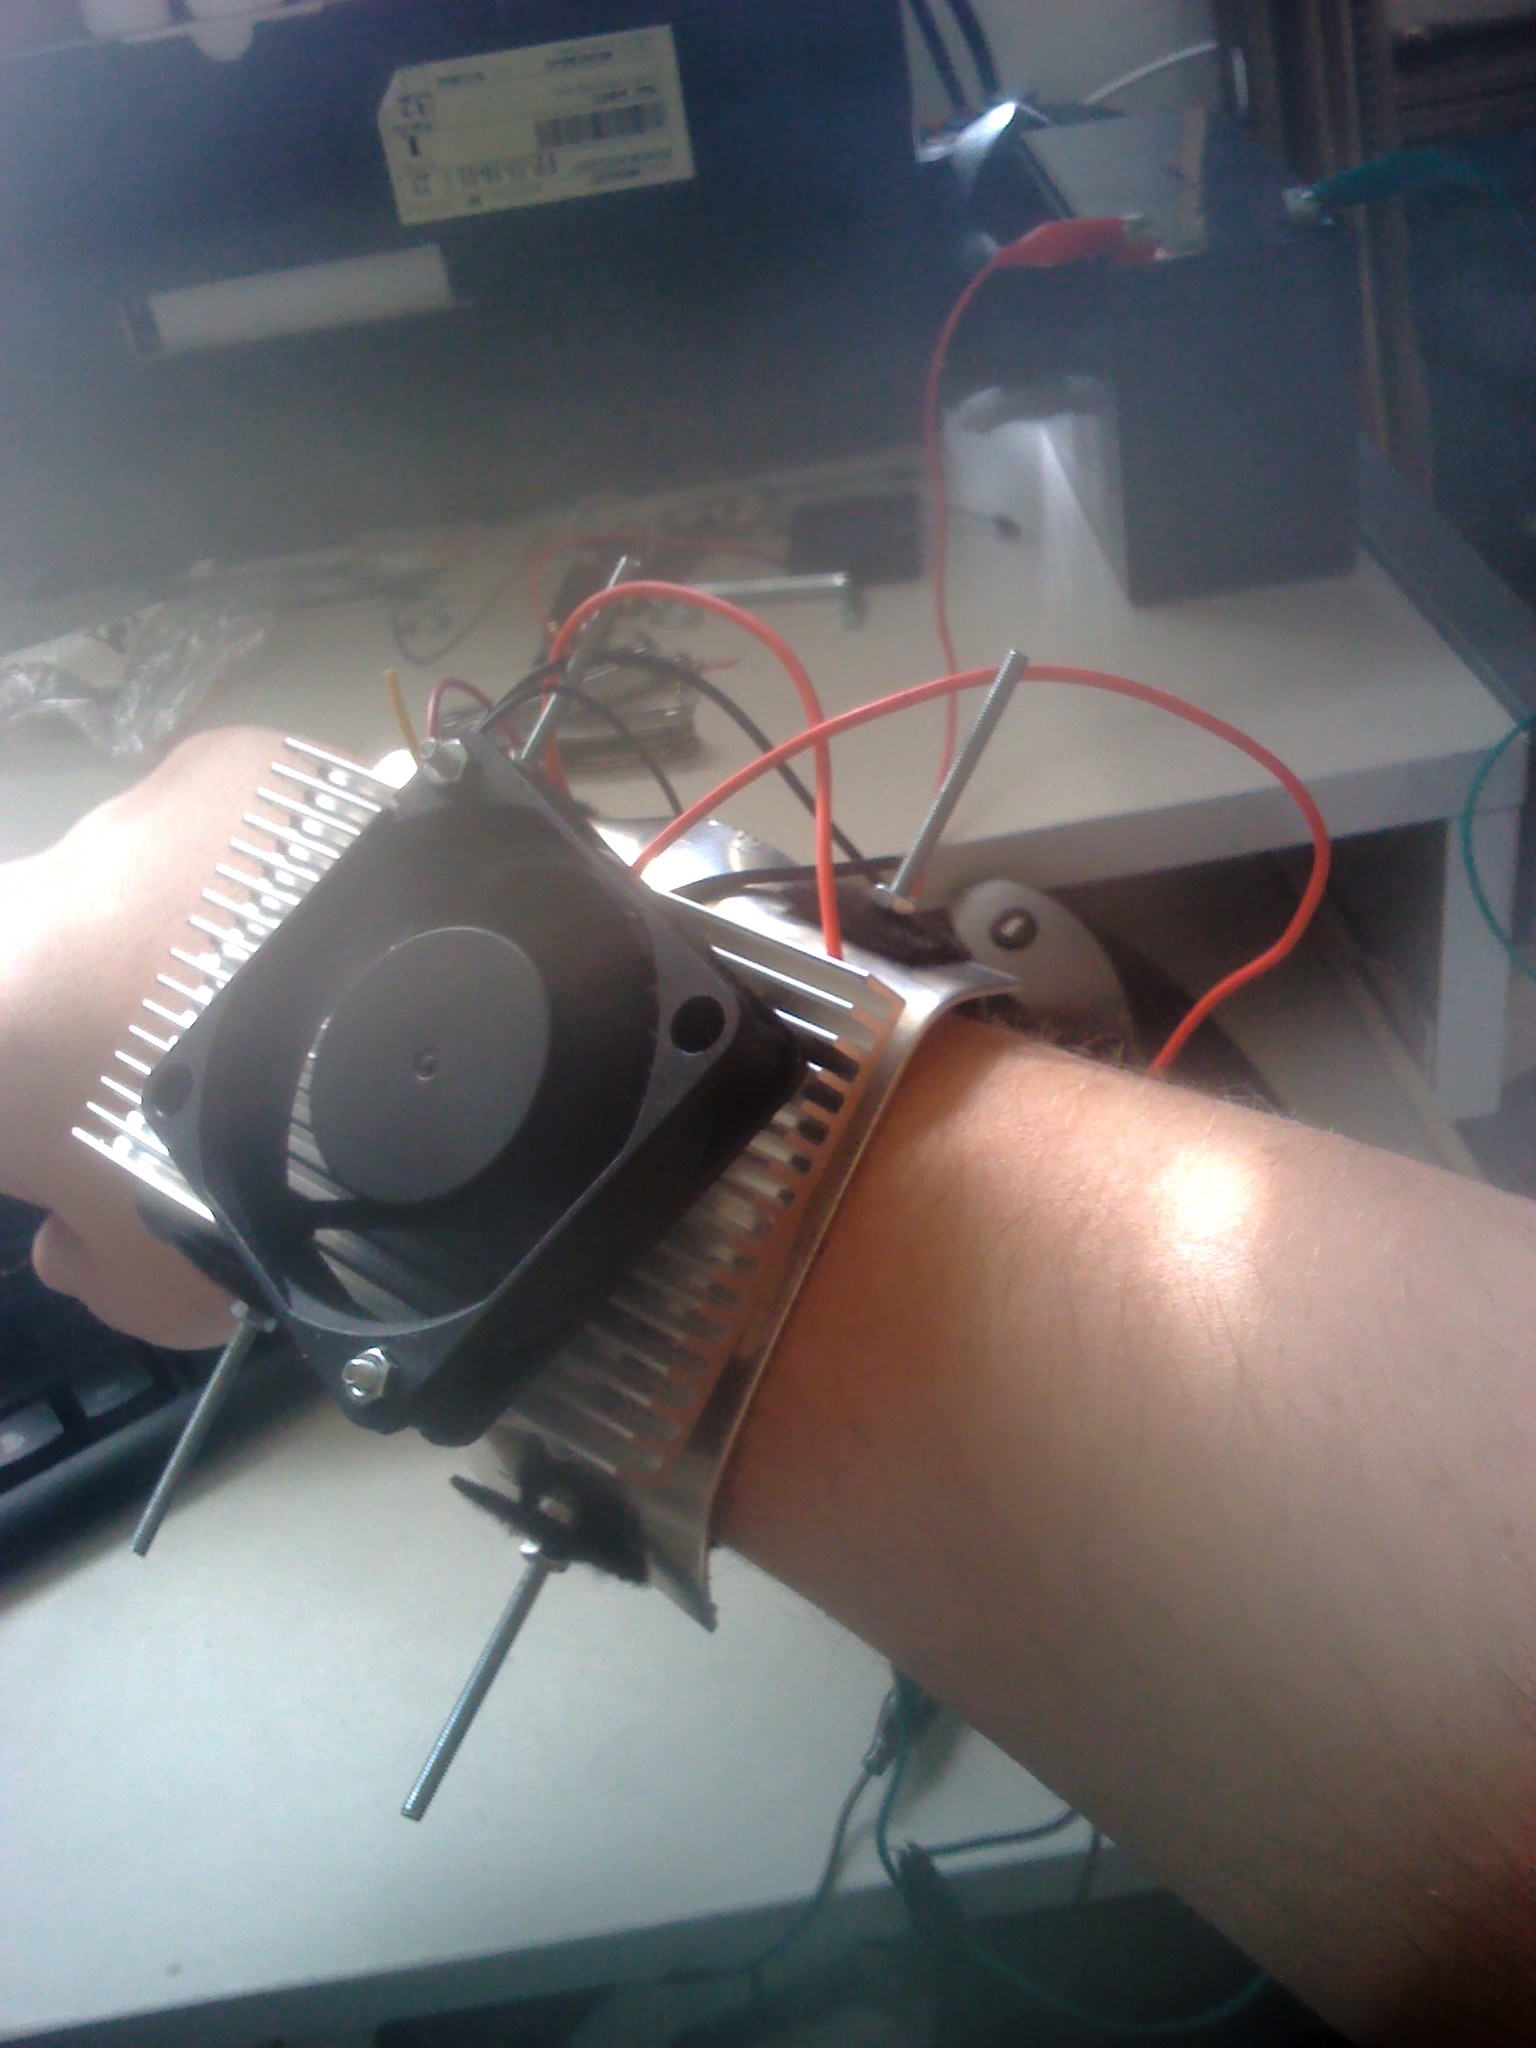
Ok, so the goal of the device is to cool the wrist, thereby cooling the rest of your body as blood circulates. I wonder if that works. No matter! First let's establish the limit of temperatures you'll want to expose yourself to. This document seems to indicate that 15\$^\circ\$C is where things feel unpleasant(may not be a great concern when only at the wrist with the rest of one's body overheating, but it is described as the pain threshold, so I'd make that a hard limit at least until you've had a chance to test extensively. 7\$^\circ\$ is numbness, so bad idea, and 0\$^\circ\$ is frostbite so stay well away. Hopefully no one would put one of these on without a good idea of what it did, and especially for efficiency and heat sink size, temperature regulation would be wise on the cold side to regulate the peltier, and for best fan efficiency, it may be wise to use it on the hot side to regulate the fan. Some off the shelf set of temperature regulators and current controllers probably exist that could be used(I'll let you do your own shopping) but if you happen to know how to program, a tiny microcontroller would be optimal/cheapest.
For a simple, yet still decent set up, you'll want to get a PWM voltage regulator (buck ones like this one can only step voltage down but are easy to use). The regulator will step the battery or power supply voltage down so you can run it at a sensible current level. This converter has a 3A limit, so the most voltage you'll want to feed the peltier would be about 7.5V. Buck(Step down) converters operate best with a bit of headroom, so we'll say you want 9V-30V to feed the converter. That lets you choose from a wide variety of DC power sources, although this sounds portable, So I'd suggest you use a 3S Li-ion battery pack and a discharge board(the pack almost certainly includes discharge protection. One would hope. Maybe not. Who knows?) and charger and then you just need a fan. Since the voltage controllers are only half a currency unit each, I'd use a separate one for the fan as the best efficiency will come from running the fan pretty hard. Maybe order a smaller converter that matches the fan's max current. A 12V fan of no more than 2W(I'd go for 1W or 1.25W) should be fine and the biggest heat sink you're willing to tolerate. Check sales and liquidation on CPU heatsinks, or just get a 80mmx80mm plate fin heat sink, or if you've already gotten one, use that one. Shrug. That's about it. Get a jack for your lipo battery to plug in to, and solder it to the voltage converter inputs, solder the outputs to the fan and the peltier, and start adjusting voltage on both until you find something that seems to work. Because the peltier and fan are using such a considerable amount of power, you may even be able to add a voltage/current meter without noticing the extra loss.
I've put microcontroller pseudocode at the bottom.
As far as assembly, it's hard to get an idea of how your thermal performance will be without using thermal compound on the peltier, and that's probably part of the reason your efficiency isn't great. Ensure the skin-side aluminum plate is rigid enough not to bend when the you clamp the peltier and be sure to sand it flat ans smooth. For testing use a good non-adhesive thermal compound (For one off hobby projects even arctic silver isn't that expensive so I use it despite being overkill.) and be sure to follow procedure when clamping or torquing the peltier. Having accurate clamping pressure will maximise life of the peltier, especially at high temperature differentials. If your peltier is not sealed, consider sealing it with non-thermally conductive potting compound, bearing in mind you don't want to connect the plates with anything more thermally conductive than convective air. If temperature differential is intended to be extreme, consider cutting grooves in your peltier, like lines in the sidewalk to ensure when it cracks it won't impede function.
 You can see from this side view of a peltier element that the copper plates don't line up on both sides. If you groove your peltier, minimise the amounts the grooves cross the copper plates by lining your grooves up with the gaps between plates. A crack over a copper plate will decrease performance and may cause failure. If a bismuth cube cracks or you lose a solder connection the peltier will also fail. This is not necessary at small thermal differentials with correct mounting pressure. Consider a shield for the hot side heat sink, as in many conditions like a hot day outdoors in which you would want to strap this thing on and attempt to cool down, direct sunlight could get the heatsink far above ambient before your peltier was even turned on. Remember your body can radiate about 100W of heat or more on it's own, so the work your peltier does will be in addition to that. Your goal is not actually to reach a specific temperature, but rather to remove as much heat as reasonably possible with the heat sink and battery you are willing to carry. Peltiers can be quite reasonably efficient if operated at low drive currents and low temperature differentials.
A few examples using this datasheet for a similar peltier:
If you use it in an already cool environment, like retiring to a shady, breezy spot after your strenuous activity, say 25\$^\circ\$C, and size your heat sink to have a thermal differential of 25\$^\circ\$C at worst case load, you'll end up with a smallish heat sink. you can choose your worst case efficiency based on the 50\$^\circ\$C performance graphs. With the cool side set to 20\$^\circ\$C, your peltier will have a 30\$\circ\$C delta T, so we can check how much cooling will be done and how large a heatsink you will need by reading the graphs. Lets check at 2A and 5A.
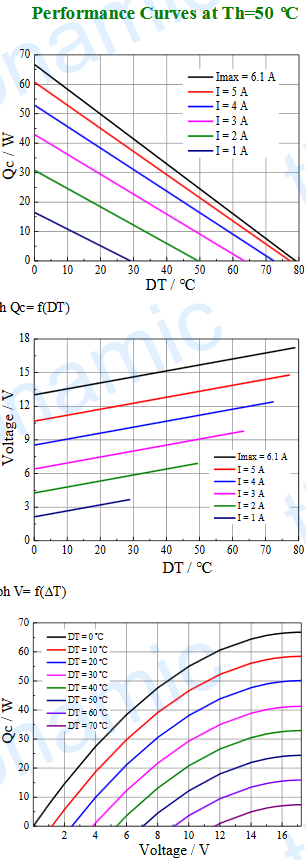
Looking at the top graph, we can see with a DT of 30\$^\circ\$C, with 2A we'll move about 13W of heat, and with 5A we'll move about 37W.
Looking at the second graph we can see at 2A the voltage will be about 5.8V, making the electrical consumption about 11.6W, And the thermal load the heat sink must dissipate 24.6W in still air.
At 5A, the voltage will be about 12.2V, making the electrical consumption about 61W, using almost twice the 37W it is pumping, and requiring a heat sink sized for 98W in still air. You can use an online blade fin heatsink calculator to get an idea of how big these will be.
Now looking at the last graph, we see That cooling increases less and less as you increase voltage. Running at the maximum rated voltage will cause the maximum cooling at a given temperature differential, but operate at minimum efficiency.
Given the 2A example, 12W is a large, but not-too terrible amount of power to carry around in the form of lithium ion batteries. 61W will mean a silly big battery pack or very low runtime and battery efficiency. Lets accept 12W as a maximum electrical load and dedicate 2W to a 12V fan.
Now we'll re evaluate the calculations based on sitting in shade at 20\$^\circ\$C with a heat sink sized to maintain a 7\$^\circ\$ temperature difference. This allows us to use the 27\$^\circ\$C Performance curves and if we choose a cold side temperature of 17\$^\circ\$C we can evaluate based on 10\$^\circ\$C DT
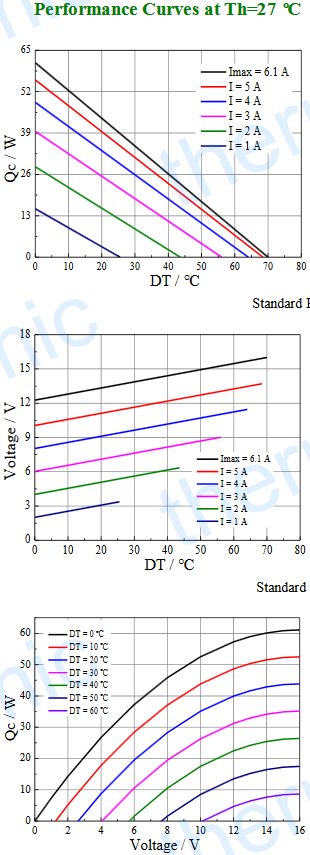
If we look at the 2A line in the first graph, we can see that about 21.6W of heat will be moved at 2A with our 10 degree DT
In the second graph we can see that this will require about 4.5V, for an electrical consumption of 9W, 11W including the 2W fan, pumping 1.5x the heat as in the first example, using less power, and requiring a heat sink capable of dissipating 30.6W with a 7\$^\circ\$C temperature gradient. This means the heatsink performance must be 0.22875\$^\circ\$C/W at the given airflow. I searched 12V 2W fans on digikey and find that 1.19m\$^3\$/min at up to 150 Pa is a very reasonable airflow at that power level, and using this heatsink calculator and punching in a few samples I find that a 90mmx90mmx50mm heat sink with a 4mm base and 21 2mm fins will suit just fine.
For comparison, in the first example at 5A with no fan, you would need a massive 120mm by 120mm by 120mm or larger heat sink to keep your DT down to 25\$^\circ\$C, using 5x the electrical power and pumping only 1.7x as much heat. The gains that will result from using a significant amount of power on a fan and a low drive current on the peltier will make a massive difference in performance, and you should have a good understanding of how to calculate or figure out what you need at this point.
In reality, I would suggest you start by figuring out the largest heat sink you are willing to use, perhaps a fairly generic computer heat sink(ones with copper heat pipes and extremely thin fins perform amazingly for their size BTW and subzero temperatures, the only reason not to use heat pipes, are not an issue) and if it is large enough, consider using two of the peltier devices in parallel, or the largest that will fit both the heatsink face and your wrist plate. reducing the I\$^2\$R losses. Find a reasonably powerful fan with a similar voltage, I'd aim for 2W and around 150 Pa static pressure, that should give you a bit of leeway for adjustment, giving you both more static pressure and more air velocity than required for the example above, which will be useful considering you'd probably like to use a smaller heat sink. Then figure out(or experimentally determine) a maximum drive current, and/or set up temperature control as described above and below.
Finally, the reason you'll want to have low power consumption and run efficiently: Your power source. In a scheme where you're using 11W at 12V and you were getting your 12V from a 1A output, 3-10V input boost converter draining a single 3.6V high quality 18650 cell at 90% efficiency, you'd be pulling 12.22W off the battery at a minimum of 2.5V, drawing a worst case 4.8A right before battery cut off, and drawing only 3.4A when the battery is fresh. The batteries are 2500mAH(2450mAH at 10A, but 2500 simplifies the math) or 2.5 AH, so you could expect a runtime between 2.5AH/4.8A=0.52H=31.25 minutes and 2.5AH/3.4A=0.73H=44.12 minutes. Not too bad. In reality you would be wise to use a larger battery bank, perhaps 3S to minimise load on each cell, increase runtime and increase boost converter efficiency by providing it a closer input voltage. Poorly documented Lithium ion BMS/Charge/Discharge boards are ubiquitous. Will this one serve your needs? Probably, but hard to say for sure without specs. This one has pictures that seem about right and is rated for 5-8A "working current" which I assume means continuous. You would choose your batteries, connect your loads and/or charger to the P+ and P- contacts, and use only loads (voltage converters/current controllers) with input voltage ranges that go from the minimum battery voltage to the maximum charge voltage.
Using a 3S battery pack would allow you to use a constant voltage/current output buck converter to drive the peltier, probably the easiest type of voltage converter to operate.
If you want to use a microcontroller, you'd need sufficient I/O to read two or three not particularly precise thermal sensors and output a reference voltage to an off the shelf constant current controller for the peltier, and some less specific form of control for the fan, likely PWM. You could also use a PWM output to control a buck converter to drive the peltier.
Set the processor up to run something like this when on:
Variables:
    P_Current=0% - initialise the set peltier current to none.  This loop should adjust it rather quickly so this should be fine.  Starting at max current is unnecessary and may be foolish.  If you're using a current controller with a 0-X Volt input reference, set up the CC so that max input voltage(X) will drive the peltier at its full rated current.
    P_CurrentMax=40% - Running the peltier at full blast is not a good idea.  Look at your temperature limits (the maximum delta T your variable settings will allow) and look at the peltier datasheet to find the worst efficiency you are willing to tolerate at that delta T.  Set the current limit to this.
    F_Current=0% - fan current, same thing.  Soft start.  Some fans require minimum 60% voltage to get started, so some other value may be wise depending on your arrangement.
    F_CurrentMax=100% - Include a current limit in the fan in case you choose to limit it to below its full rating.
    SkinTemp=27 - variable to store the current cold side temp
    MinSkinTemp=20 - No need to get close to the pain threshold before you've even tested it.  This sets the limit of how cold the cold side will be allowed to become.  The other side of the aluminum in contact with skin will be slightly warmer.
    MaxSkinTemp=40 - If the cold side gets as hot as the hot pain threshold, something is wrong, so the device should shut down.
    HotSideTemp=27 - variable to store the current hot side temp
    HotSideFanStart - The temperature at which the fan will start
    HotSideFanFull - At any temperature above this the fan should run at full speed
    HotSideMaxTemp=40 - The temperature at which the peltier current should be decreased, as the fan is running at full speed and the heat sink is not keeping up.
    Error=0 - Indicates the system is in error mode.  Peltier should shut down and fan continue to run until temperatures subside.  Do not reset until restart.

On start begin LOOP
  Read temp sensors and store values
  IF (P_Current<P_CurrentMax AND SkinTemp>MinSkinTemp AND SkinTemp<MaxSkinTemp AND HotSideTemp<HotSideMaxTemp AND NOT(Error))   'Safe to increase?
    P_Current++
  ELSE IF (SkinTemp>MaxSkinTemp)
  'If this happens, something is wrong, shut down until hard restart.
    P_Current=0     'arbitrarily set current to 0
    Error=-1        'Error mode set to true
  'If the cold side is too cold or the hot side is too hot and the fan is already running at full, pump less heat.
  ELSE IF (SkinTemp<MinSkinTemp) OR (HotSideTemp>=HotSideMaxTemp AND F_Current>=F_Current_Max AND P_Current>0))
    P_Current--
  ELSE     'Just a reminder that there are cases left out
  END IF   'End Peltier control logic

  'For a more intelligent algorithm, add an ambient sensor and make the fan start temperature and hot side fan full temperature variables to be references to ambient ie: 5 degrees above ambient and 10 degrees above ambient.
  IF (HotSideTemp<HotSideFanStart) THEN
    F_Current=0%
  ELSE IF (HotSideTemp>HotSideFanStart AND HotSideTemp<=HotSideFanFull)
    F_Current=(HotSideTemp-HotSideFanStart)/(HotSideFanFull-HotSideFanStart)*F_CurrentMax
    'Fan current has linear increase to maximum over this range.
  ELSE
    F_Current=F_CurrentMax
  END IF           'End of fan control logic.

  Set Output DACs/PWM drivers to P_Current and F_Current
  If another output is available use it to drive a red LED when Error=-1
END LOOP
A bit of experimentation will yield the best values for fan start and fan full temps, but generally fan losses will be recouped in peltier efficiency, so it's worth setting these values quite aggressively, IE at 1-2 and 2-4 degrees above ambient, and adding and ambient sensor at the fan intake would be a great addition, allowing you to simply have the fan turn on at ambient temp and range up from there.
In your actual code it may be wise to implement long integers representative of the percentage variables to get faster math, and this is why increment and decrement operators are used. If you were to store the percentages as Single precision it would be wise to set the amount of increment to a tiny amount as the loop is short enough to run many times per second and thermal apparatus are slow to respond. Once you test it, you'll know whether it will be wise to add hysteresis or slow down the loop a bit (decreasing microcontroller power consumption in the process) based on how much the output current oscillates around the set point.
The code will cause the peltier to cool down quickly and stabilize at only the current necessary to hold the set point, ensuring it operates as efficiently as possible once at operating temperature.


