Consider the diode circuits in Figure. V1 = 5 V, V2 = 0, and VCC = 6 V. Assuming ideal diode model, determine V0.
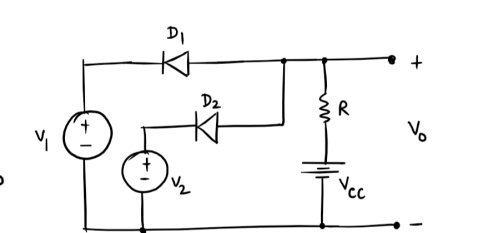 I assumed both d1 and d2 to be ON but how to calculate further? I have no idea please help.
-
1\$\begingroup\$ What does ideal diode model mean to you? And based on that model, what made you assume both diodes are on? \$\endgroup\$– JustmeCommented Dec 19, 2021 at 10:16
-
\$\begingroup\$ D2 is ON only. Then you get just single-loop. \$\endgroup\$– user208862Commented Dec 19, 2021 at 10:23
-
\$\begingroup\$ @Justme it is taught to us in my lectures about ideal diode model, CVD model etc. and method of assuming diode to be forward bias i.e. ON and reverse bias i.e. OFF \$\endgroup\$– user1006899Commented Dec 19, 2021 at 10:26
-
\$\begingroup\$ @MichalPodmanický WHAT WILL BE the current in D2 because i have to confirm whether my assumption is correct or wrong \$\endgroup\$– user1006899Commented Dec 19, 2021 at 10:32
-
3\$\begingroup\$ You know, with homework questions such as this one, you really should be attempting them before you post them on this website. I'll give you a hint: revise Kirchoff's and Ohm's laws and come back to this question. (You would've learnt about them if you were assigned this) \$\endgroup\$– kene02Commented Dec 19, 2021 at 11:59
2 Answers
Preface to Redrawing the Schematic
The first thing I do before attempting to analyze a circuit is to redraw that circuit. The process of just doing it helps me think and gather up a few details that I may not notice so easily, just staring at someone's depiction. But I can often help the readability, too, which improves understanding and reduces chances for mistakes, later.
It takes lots of practice to accumulate a good sense about it. But that practice is well worth your time.
For more, see the Addendum at the end, below.
Redrawn Schematic
Well, here it is:
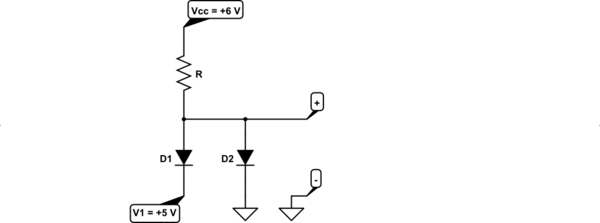
simulate this circuit – Schematic created using CircuitLab
It's not much, now. You should be able to work out your answer from this, I think. Just apply whatever your ideal diode model is, to the above, and you should be able to get an answer.
Redrawing Schematic Addendum
Rules to live by are:
- Arrange the schematic so that conventional current appears to flow from the top towards the bottom of the schematic sheet. I like to imagine this as a kind of curtain (if you prefer a more static concept) or waterfall (if you prefer a more dynamic concept) of charges moving from the top edge down to the bottom edge. This is a kind of flow of energy that doesn't do any useful work by itself, but provides the environment for useful work to get done.
- Arrange the schematic so that signals of interest flow from the left side of the schematic to the right side. Inputs will then generally be on the left, outputs generally will be on the right.
- Do not "bus" power around. In short, if a lead of a component goes to ground or some other voltage rail, do not use a wire to connect it to other component leads that also go to the same rail/ground. Instead, simply show a node name like "Vcc" and stop. Busing power around on a schematic is almost guaranteed to make the schematic less understandable, not more. (There are times when professionals need to communicate something unique about a voltage rail bus to other professionals. So there are exceptions at times to this rule. But when trying to understand a confusing schematic, the situation isn't that one and such an argument "by professionals, to professionals" still fails here. So just don't do it.) This one takes a moment to grasp fully. There is a strong tendency to want to show all of the wires that are involved in soldering up a circuit. Resist that tendency. The idea here is that wires needed to make a circuit can be distracting. And while they may be needed to make the circuit work, they do NOT help you understand the circuit. In fact, they do the exact opposite. So remove such wires and just show connections to the rails and stop.
- Try to organize the schematic around cohesion. It is almost always possible to "tease apart" a schematic so that there are knots of components that are tightly connected, each to another, separated then by only a few wires going to other knots. If you can find these, emphasize them by isolating the knots and focusing on drawing each one in some meaningful way, first. Don't even think about the whole schematic. Just focus on getting each cohesive section "looking right" by itself. Then add in the spare wiring or few components separating these "natural divisions" in the schematic. This will often tend to almost magically find distinct functions that are easier to understand, which then "communicate" with each other via relatively easier to understand connections between them.
- You get to choose exactly one node and call it "ground." If the purpose of redrawing the schematic is for understanding it, then choose a node that helps achieve that. When signals are single-ended, they share a common node and you should select this common node as "ground." If the purpose is for analysis, then you can select this for the purpose of reducing the equation complexity. Often, this will mean the node that is "busiest" (has the most terminals attached to it.) Either way, make this choice wisely and it will help a great deal.
The above rules aren't hard and fast. But if you struggle to follow them, you'll find that it does help a lot.
You can read a snippet of my own education by those schematic draftsmen at Tektronix who trained me by reading here.
-
\$\begingroup\$ DOES THIS ARROW MEAN GROUND \$\endgroup\$ Commented Dec 19, 2021 at 10:28
-
\$\begingroup\$ is my assumption correct or not \$\endgroup\$ Commented Dec 19, 2021 at 10:30
-
-
1\$\begingroup\$ @user1006899 My apologies, then. I'm off to bed. Perhaps someone else will be able to provide a more helpful response. If I can think of something tomorrow, I may add it then. \$\endgroup\$– jonkCommented Dec 19, 2021 at 11:17
-
1\$\begingroup\$ Your English is fine but shouting is considered bad form. \$\endgroup\$– winnyCommented Dec 19, 2021 at 15:39
I further developed jonk's idea of a "geometric drawing" of the circuit diagram that would help find the answer...
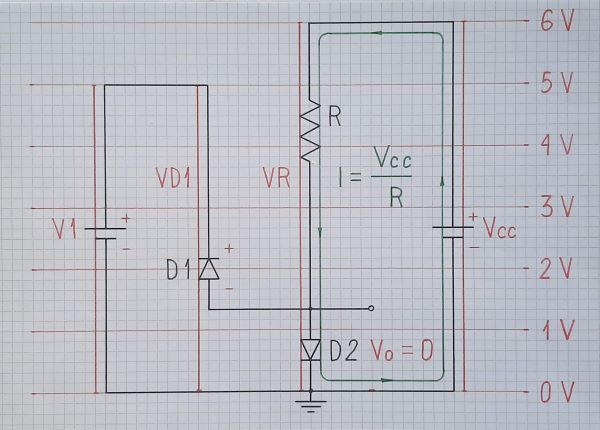
Step 1. The idea of this representation - Fig. 1, comes from the geometric notion of voltage, which is based on the analogy called "water tower". According to this idea, we represent the positive voltages and the parts of the circuit with such voltages above the zero reference level (ground) and the negative ones - below it. We can go even further by drawing diagrams in proportion to voltages using a certain scale factor V/unit.
Fig. 1. A circuit with real diodes
For this purpose, I accompany these "geometric-driven circuit diagrams" with a more stylized representation of voltages through vertical sections with proportional height, which I call voltage bars (see my Codidact paper about this visualization technique).
Sometimes I mark voltage levels with thin red lines (as in Fig. 1); usually, it is sufficient to show only some typical voltage levels. In addition to voltages, it is very important for understanding circuits to see where currents flow. For this purpose, they must be drawn with complete closed paths (current loops) and this requires the voltage sources (power supplies, input sources) be drawn. See another of my Codidact papers about this visualization technique.
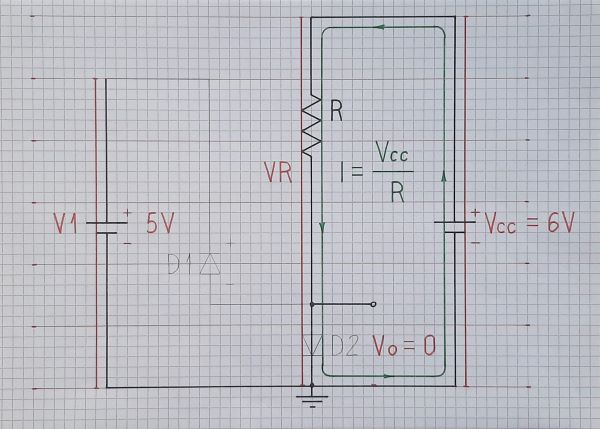
Step 2. For the sake of understanding, schematics should be as simple as possible. More complex semiconductor devices should be replaced by simpler equivalent electrical devices. In our case, if saying "ideal diode" OP means a diode with zero (negligible) forward voltage, we replace the diodes with "piece of wire" (short circuit) or "nothing" (open circuit). In order to show the connection between the original and modified circuit, we can hint at the semiconductor devices by drawing them in pale gray - Fig. 2.
Fig. 2. A circuit with hinted diodes
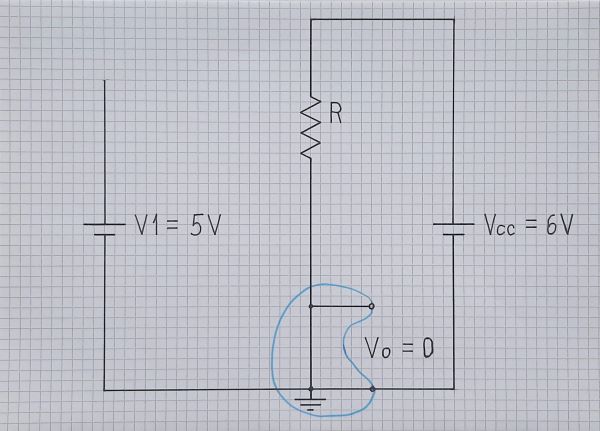
Step 3. Towards the end of the explanation, we can begin to "clean" the schematic from "unnecessary" voltage bars, current loops, etc...
Fig. 3. A circuit without diodes
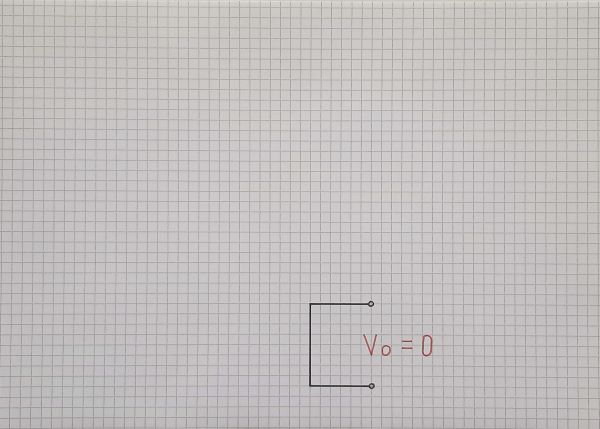
Step 4. So we can come to a very interesting final conclusion. In the specific OP circuit, it turns out that, seen from the side of the load, it is actually... a "piece of wire".
Fig. 4. What actually the circuit is
-
1\$\begingroup\$ Glad to see a different perspective. You and I differ in some ways, in this regard. But I enjoy the fact, very much, that there isn't only one way to see things. And your perspectives are often widely different from mine. Which means I sometimes learn new ways of thinking from what you write. Anyway, that flexibility is important! +1 \$\endgroup\$– jonkCommented Dec 21, 2021 at 13:24
-
\$\begingroup\$ @jonk, Thanks for your rating; it means a lot to me because you are a unique phenomenon in circuitry (I have said it many times). I can't compare myself professionally with you, but there is something we are very similar in - enthusiasm. We both love circuits and do our best when we explain them... \$\endgroup\$ Commented Dec 21, 2021 at 14:49

