10
\$\begingroup\$

I am building an arduino controlled RGB LED driver by using WS2803 constant current LED driver, TLP250 MOSFET drivers and IRF540N MOSFETs. This is how it looks like:
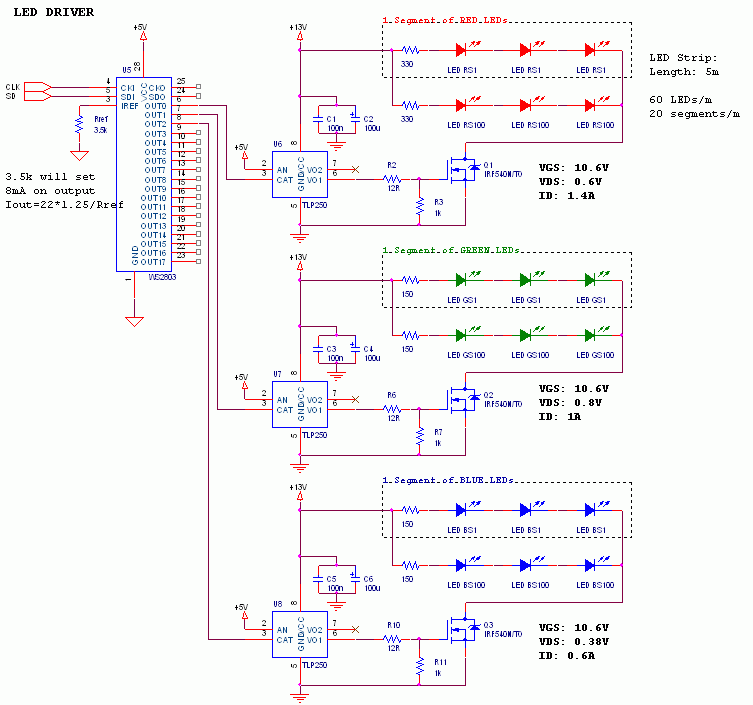
LED Driver

The picture got scaled down so it is harder to see, R3, R7 and R11 are 1k resistors.

This circuit is driving 5m RGB LED strip (100 segments) and should consume max 2A/channel. So each MOSFET should need to handle 2A at 13V max. IRF540N is rated at 100V/33A. RDSon should be 44mOhm. Thus I thought there would be no need for a heatsink.

I obviously want to PWM this things (WS2803 PWMs at 2.5kHz) but let's focus on full ON state. The problem I have is that the MOSFETS are seriously overheating in full ON state (no switching going on). You can see the values I measured in full ON state on the picture.

TLP250 seems to drive the MOSFETs correctly (VGS=10.6V) but I do not understand why I get so high VDS (like 0.6V on red LEDs). Those MOSFETs should have RDSon 44mOhm so when 1.4A is flowing through it, it should create a voltage drop of less than 0.1V.

The things I tried:

  • removed TLP250 and applied 13V straight on to gate - was thinking that the MOSFET are not fully open but it did not help at all, VDS was still at 0.6V
  • removed LED strip and used a car bulb 12V/55W on red channel. There was 3.5A flowing, VDS was at 2V and rising as the MOSFET was heating up

So my questions are:

  1. why is VDS so high and why is MOSFET overheating?
  2. even with VDS at 0.6V and ID at 1.4A the power is 0.84W which I assume should be fine without a heatsink?
  3. would I be better off with a less powerful MOSFET, something like 20V/5A? Or use logic level MOSFETs and drive it directly from WS2803 (though I like the optical isolation of TLP250).

Few notes:

  • I have this circuit only on a breadboard at the moment and the wires that connect MOSFET's source to GND get really hot too. I know that this is normal as there is a relatively high current flowing through them but I thought I just mention it
  • I bought the MOSFETs in bulk from China, can it be that those are not really IRF540Ns and have quite lower specs?

EDIT: One more thing. I have created this controller based on the MOSFET driver from here. The guy is using separate power sources for TLP250 and for the load (Vsupply, VMOS). I used the same source for both. Not sure if that matters. And my power supply is 12V 10A regulated so I do not think that the power supply is the problem.

Thanks.

\$\endgroup\$
13
  • \$\begingroup\$ Could you explain exactly how you have got (say) all the red LEDs connected - is there one 330R per series lump of three LEDs and therefore one lump of three takes about 20mA. Then there are 20 lots in parallel meaning 60 leds in total with a supposed total current of 400mA. Please explain how the LEDs are configured - I can't see how you get 1.4A for the red LEDs let alone why it's lower for the green LEDs when the series resistance is lower. \$\endgroup\$
    – Andy aka
    Commented Sep 21, 2013 at 16:01
  • \$\begingroup\$ I have put the LEDs in the schematic just as a representation of a LED strip. It is a regular 5m RGB LED strip with common anode like this one RGB LED Strip. Btw. the RGB controller (the white box) that was supplied with the strip is outputting similar but smaller currents for R,G and B. In theory these are 72W strips (12V, 6A) but you will never get. Something like 50W is more realistic. \$\endgroup\$
    – Marek
    Commented Sep 21, 2013 at 16:43
  • \$\begingroup\$ And your calculations are correct, 400mA per 1m of 60 leds. So 2A per 5m but you will never achieve that because the common anode "wire" in the strip can hardly push 6A without significant losses. So that is why I get 1.4A instead of 2A. \$\endgroup\$
    – Marek
    Commented Sep 21, 2013 at 16:48
  • \$\begingroup\$ Marek, by what mechanism will the wire "never achieve that"? What are you attributing "significant losses" to specifically? \$\endgroup\$
    – darron
    Commented Sep 21, 2013 at 17:12
  • 1
    \$\begingroup\$ Is it possible that the resistance of the lead-breadboard connections are actually the major source of heat (and resistance)? Can you measure the voltage drop on the FET package pins directly? \$\endgroup\$ Commented Sep 22, 2013 at 9:53

3 Answers 3

9
\$\begingroup\$

After receiving IRF540N from a reputable seller I can definitely confirm that the ones I was originally using are counterfeits.

After replacing fake one with a genuine one I got Vds=85mV on the red channel. What I was not expecting though is that the genuine FET got hot after a minute or so. And then I realized that those FETs are not generating much heat themselves but rather get heated up (and quite a lot) from the breadboard and the wires (Connor Wolf mentioned it). Short wires connecting FET's source to GND are screaming hot when this is in full ON state. Moving FETs off the breadboard confirmed that the source of the heat was the breadboard/wires. Fake one was getting hot but I could actually cool it down just by touching it. Genuine one was somewhere between the room temperature and luke warm. Btw. measuring Vds directly on FET pins vs measuring it 1cm away on the breadboard made around 200mV difference (85mV on pins, 300mV on breadboard).

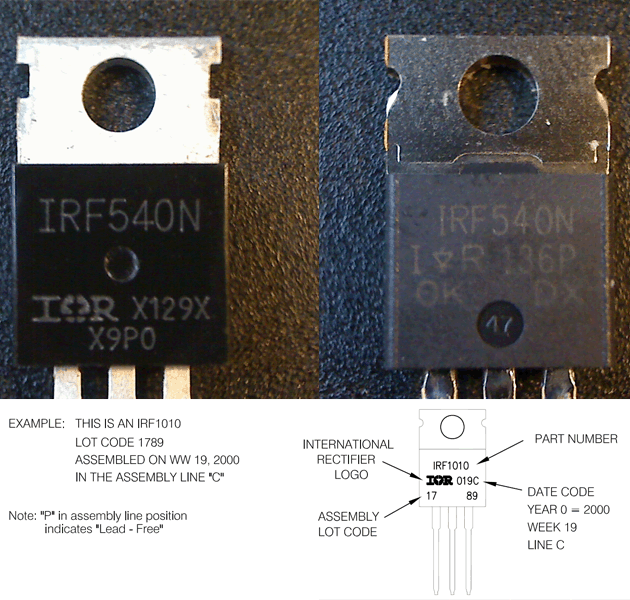
Here are some pictures, fake on the left, genuine on the right and manufacturer's part marking on the bottom:

IRF540 fake vs genuine

Although there are more IRF package markings possible as shown in this document I could not find any similar to the fake one (which only supports that this is a counterfeit). Also the cutouts on the top of the back plate are rectangular vs round on the genuine and in the spec.

Thank you guys for all your comments! The circuit now works as expected (PWM included).

\$\endgroup\$
7
  • 3
    \$\begingroup\$ Hmmm I prefer the styling of the fake and the IR logo is nicer LOL \$\endgroup\$
    – Andy aka
    Commented Sep 24, 2013 at 19:29
  • 1
    \$\begingroup\$ Yeah, when I looked at the logo on the genuine one I actually thought that I got another counterfeit :) \$\endgroup\$
    – Marek
    Commented Sep 24, 2013 at 19:32
  • 1
    \$\begingroup\$ A lesson to be learned - spend more and buy from the reputable source (even if they still look a little suspicious). Glad ya found it dude. Every time I came back to look at the progress on this post I got that sinking feeling on your behalf - maybe you should name and shame the supplier? \$\endgroup\$
    – Andy aka
    Commented Sep 24, 2013 at 19:38
  • 1
    \$\begingroup\$ Great feedback. Much better than just "the transistor was fake, thanks". Brings some information for us too. +1 \$\endgroup\$
    – Vasiliy
    Commented Sep 24, 2013 at 19:44
  • \$\begingroup\$ @Andyaka The thing I am working on is more of a proof of concept than a final product so I don't mind using lower spec'd parts at the moment but I did not think that I will end up in situation like this (when spec does not even remotely match reality). Well at least I learned something new.And it was one of the MANY sellers on AliExpress and there are probably dozens more like him so I guess no much point to name him.If I have found that these are counterfeits before I rated the seller with 5 stars I would probably get a full refund because they are quite afraid of 1 star rating on AliExpress. \$\endgroup\$
    – Marek
    Commented Sep 24, 2013 at 20:46
1
\$\begingroup\$

According to your measurements, the topmost transistor's on resistance is:

$$R_{ON}=\frac{V_{DS}}{I_{D}}=428m\Omega$$

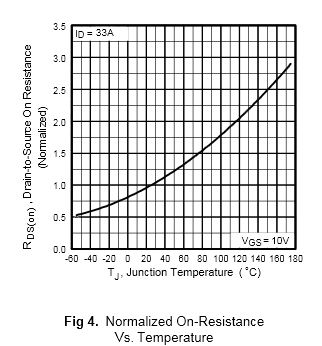
From transistor's datasheet (normalized to \$44m\Omega\$):

enter image description here

Although the above graph was obtained at \$I_D=33A\$, my guess is that this high on resistances as you see should not be observed in this transistor at all. Even taking leads' and contacts' resistance into account.

Also, as Madmanguruman stated in his answer, taking into account the worst case scenario of Junction-to-Ambient thermal resistance, you should observe a reasonable increase in transistor's temperature.

Conclusion: the data you provided is not consistent.

Possible sources for the error:

  • The transistors you're using are not IRF540N
  • Your measurement equipment is not accurate
  • You don't take the measurements correctly. Your comments show that you do take them properly though.
  • I'm mistaken

The first two are the most probable sources of the error in my opinion.

As for the second part of your question, you can surely be better off with some lower voltage transistor. Low on resistance requires as short channels as possible, while high breakdown voltage is difficult to achieve with short channels. In this case, where you do not expect to see this high drain-to-source voltages, you can "trade" some voltage rating for lower on resistance.

\$\endgroup\$
1
  • \$\begingroup\$ +1 for pointing out that the numbers did not add up. \$\endgroup\$
    – user16497
    Commented Sep 24, 2013 at 20:58
0
\$\begingroup\$

I think "overheating" is a bit of an exaggeration. Hot, yes, but overheating, no.

The non-heatsink junction-to-ambient thermal resistance for the IR part is:

\$R_{\Theta_{JA}} = 62°C/W \$

At 0.84W, that's at 52°C temperature rise over ambient, which will make the device too hot to touch. The part is rated for 175°C operation but it's rarely a good idea to have parts on there that can burn an operator.

You'd be best off choosing a lower \$R_{DS(on)}\$ part. You don't need 100V for this application, and will find much better performing parts in the 40V to 60V range - for example, Infineon OptiMOS parts can be as good as \$1.5m\Omega\$ at 40V and are available in TO-220 (just swap them in).

\$\endgroup\$
3
  • \$\begingroup\$ My ambient is 20°C so that would result in 72°C. But my FET's are melting plastic (multimeter probes, breadboard). Not sure what kind of plastic it is but I assume that the temperature is more than 72°C. And thanks for the advice. I will order some FETs with lower VDS and lower RDS similar to the one you have suggested (together with IRF540N just to find out whether I have counterfeits). \$\endgroup\$
    – Marek
    Commented Sep 21, 2013 at 22:17
  • \$\begingroup\$ The increase of \$52^{\circ}C\$ is in junction's temperature. The increase in case's temperature will be even lower, which makes the data provided even more inconsistent. \$\endgroup\$
    – Vasiliy
    Commented Sep 22, 2013 at 18:12
  • \$\begingroup\$ The junction-to-case thermal resistance only applies to a hypothetical 'infinite heatsink' situation. My experience leads me to believe that with no heatsink and still air, the case will be very hot at nearly 1W dissipation unless lots of heat is being sucked into the PCB. \$\endgroup\$ Commented Sep 22, 2013 at 23:22

Your Answer

By clicking “Post Your Answer”, you agree to our terms of service and acknowledge you have read our privacy policy.

Not the answer you're looking for? Browse other questions tagged or ask your own question.