3
\$\begingroup\$

I'm doing the usual DIY PCB process. Lately I got some of the chinese UV solder mask (similar to the one used in this video). I can work with it just fine - it sets under my UV lamp perfectly, within 5-10 minutes.

Unfortunately, it sticks to the wrong part, i.e. the plastic sheet instead of the PCB. When I peel it the plastic off after the initial curing of the mask, the mask is perfect, but comes off with the plastic and the PCB is completely clean.

I scrub the PCB both mechanically as well as with alcohol before, so I guess it's more the fault of the transparent film I use to cover it. I tried several durations for the curing process, no matter.

Did someone of you have this problem, and did you solve it somehow?

EDIT: Some pictures...

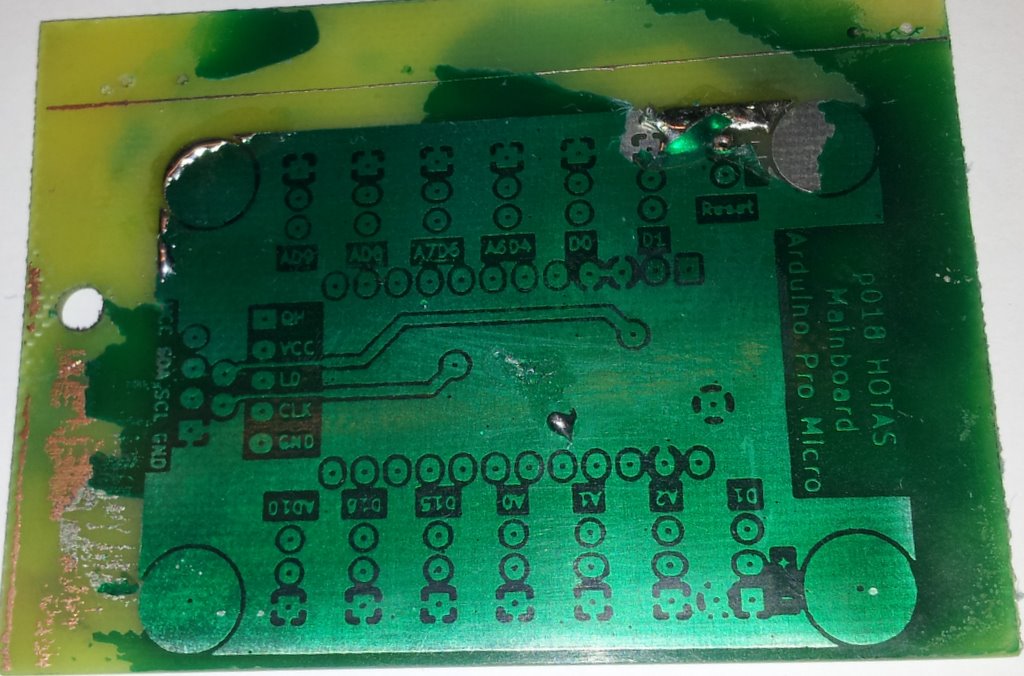
First, you see an attempt with 5 minutes of curing with a junk PCB. The stuff is set quite solidly (see the film to the right), but on the film instead of the board. The board here has not been cleared afterwards, it came off pristine like this. Before, the PCB had been scrubbed vigorously to expose uncorroded copper, and cleaned with alcohol. Note that the bits on the plastic seem cured through, i.e., it is not like the "PCB side" of the green layer is still wet or something like that. Film on the left is another try with 50% success...

enter image description here

Another attempt with 60 minutes of curing. Sticks to the PCB better, but not perfect. Interestingly, when I applied the large blobs of solder (way more + way longer heat input than you'd usually use) the mask also came off at the right upper hand part, but that's nothing to worry about - for normal soldering time it should be fine, that was excessive.

enter image description here

\$\endgroup\$
8
  • 1
    \$\begingroup\$ Try a different plastic film, maybe? \$\endgroup\$
    – Sachin
    Commented Jun 16, 2017 at 8:50
  • 1
    \$\begingroup\$ Just curious, what else are you trying? \$\endgroup\$
    – Sachin
    Commented Jun 16, 2017 at 8:54
  • \$\begingroup\$ Or may I suggest trying the sun to bake your PCB this time? That is if you haven't tried it yet. \$\endgroup\$
    – Sachin
    Commented Jun 16, 2017 at 9:15
  • 1
    \$\begingroup\$ Let us continue this discussion in chat. \$\endgroup\$
    – Sachin
    Commented Jun 16, 2017 at 9:35
  • \$\begingroup\$ Why are you covering the entire board with solder mask? Then I don't get what the plastic sheet is for if you're going to cover the whole board anyway. There are parts of this process you're not telling us about. In any case, getting boards made professionally is cheap these days, and you get plated vias. You're paying yourself pennies/hour at best by doing it yourself, probably actually losing money. Think of the boards you could have gotten perfectly made just for the time wasted already. \$\endgroup\$ Commented Jun 16, 2017 at 10:46

6 Answers 6

9
\$\begingroup\$

Happy times, problem solved:

The issue was not, as helpfully suggested by @Sachin in the comments, the UV (lamp vs sun), age of material (> 1 year), duration of initial curing, but, also put forth by him, the type of plastic cover used in the process.

The final material I tried was simple household (kitchen) cellophane wrap - the very flimsy type that you use to wrap food in. Aside from the obvious tendency to wrinkle up, it came off trivially without damage, and the result is perfectly fine now. The mask that was not cured was easily brushed off with some ethanol.

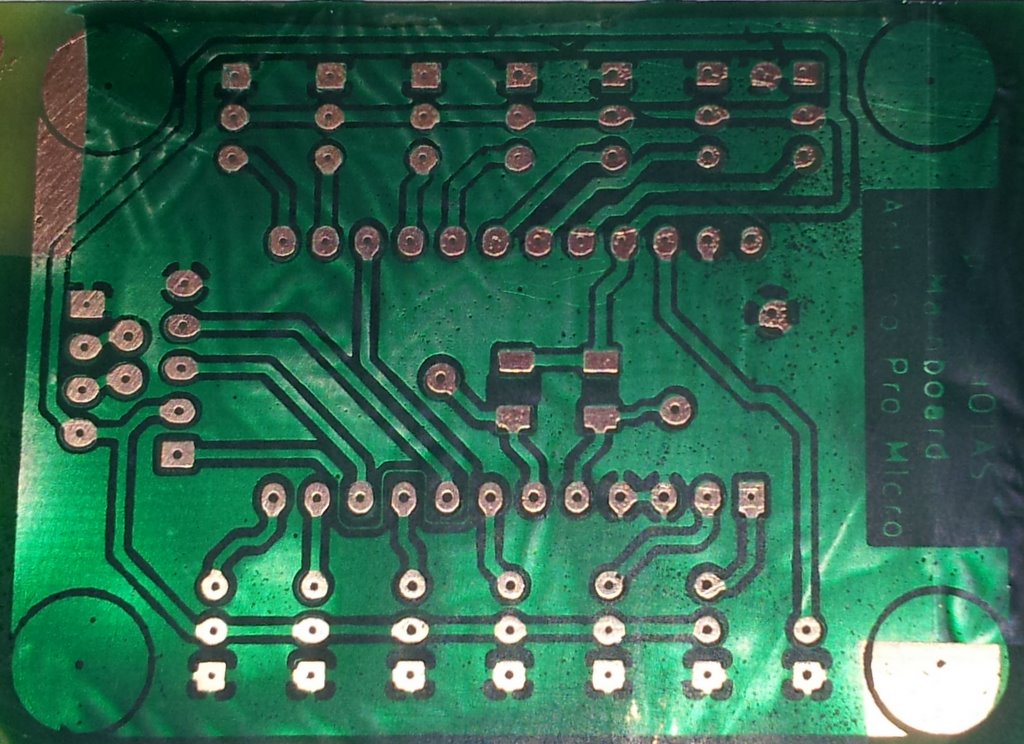
Here, the result: ignore all that is wrong with this picture (the borked test PCB, scratched from many tries; the wrinkles in the green material caused by the cellophane; the uneven spread; the fact that the clean bits are a bit misaligned and such). The rectangular areas are from tape used to fixate the printed mask cover. All of which can easily be remedied, now that the culprit is known.

enter image description here

As the process itself does not seem to be as wildly known as I assumed, here it is in my final form:

  • Clean the etched PCB as usual from any residue of the previous steps, including fingerprints etc.
  • Apply a small blob of the solder mask material ("10ml PCB UV Curable Solder Mask Repairing Paint Green") in the center.
  • Cover that with a very flexible plastic sheet - in my case cellophane, which is too flexible as it results in unsightly ripples in the final surface. Should not matter for the function. I will keep looking around for a little more stiff, but not too stiff, product. Avoid laser printer "transparent film / overhead" sheets as they are too stiff.
  • Use a credit card or whatever you have lying around to smooth out the initial blob of fluid across the whole surface.
  • Perform the usual UV development process that you already have in place for preparing the etch resistant photosensitive layer:
    • Lay your sheet of printed "solder mask mask" on top of it and fixate it with tape.
    • Weigh down with a sheet of glass.
    • Expose to UV for 5 minutes, depending on which lamp you use.
  • Very carefully, and pulling sideways instead of up, remove the plastic sheet covering the mask.
  • Wipe off the uncured bits with ethanol and a soft brush.
  • Put back under UV for an hour or so to completely cure and harden the material.
\$\endgroup\$
3
  • 1
    \$\begingroup\$ You can accept your own answer. You found the solution, and documented it for others to use, so go ahead and click accept. \$\endgroup\$
    – JRE
    Commented Jun 17, 2017 at 12:12
  • 1
    \$\begingroup\$ Kitchen film is more likely to be transparent PVC if it is cling film rather than cellophane. \$\endgroup\$
    – Transistor
    Commented Apr 2, 2018 at 19:50
  • \$\begingroup\$ I can suggest one more thing to try. Use acetone instead of alcohol to clean PCB, and let it dry for at least 10 minutes before applying solder mask. \$\endgroup\$
    – Maple
    Commented Sep 17, 2018 at 19:54
2
\$\begingroup\$

▪️ I was experiencing the same issue that "AnoE" have with same result many times, until I figured out what was our mistake and it worked well for me by using the Laser Printer "transparent film"!

It's so easy actually I have made it in one of my random trials and I was successful.

I have green solder mask that come in a 100g Jar size, 10x15cm PCB board, a laminator with ON/OFF heater switch, 2 x UV lamp 7watts, a sheet of glass 30x30cm and A4 sheets of laser printer "transparent film". The transparent film will be better for glossy finish.

UPDATE

" I been used the UV light LEDs nowadays and I have found it the best choice than the normal UV lamps and resulting the most and quickest solution for curing Solder-Mask adhesive just in 7 minutes max ! "

▪️ I have washed my PCB by using cold water and cheap carpet soap that doesn't have a conditioner in it, since it's more alkaline than dish soap that clean very well and leaves no residue. Of course I used a kitchen sponge scrubber to remove all the oxide layer from PCB copper.

▪️ Then, I applied the solder mask by a wooden stick all over the width edge about 5mm at its beginning and covered it with two A4 sheets of the transparent film on top and bottom since I will use my laminator rolling without heat to spread it.

▪️ Then, I put it in the laminator and the heater at off position, then I pass it like two times from both edges to spread it well.

I used the laminator rolling method to spread the solder mask uniformly on the PCB and to uniform curing solder mask under UV ray.

▪️ After that, I put it 5cm above my 2 UV lamps using glass for about 15 mins (or depend on your solder mask instructions), then I let it rest for 5 mins.

♦️ And here is the important part, "peeling the transparent sheet from the PCB", please be sure to peel it by bending the sheet end as possible like: -160 degree angle- (not a sharp bend of course to keep moving) and peel carefully until the last part

I use this method because the solder mask after curing will become so soft and glossy same as the transparent paper, so that will leave no air in between both sides and it will make them stick partially to each other, so we should peel and push the bended sheet part to let the air come in and pressing the solder mask layer to make it not leaving the copper as I was thinking.

And VOILÀÀÀ!!! your PCB is peeled and shiny :) Now you can clean the excess solder mask by a thinner and a paper towel, then leave it on UV lamp another 15mins to fully cure the solder mask layer.

And that's it :)

Hope you found my explanation easy and solving the issue with a great glossy result.

Thank you:)

\$\endgroup\$
0
1
\$\begingroup\$

I'd suggest trying a different film for a different result.

Also, I read somewhere that these solder masks have a shelf life (1-2 years). So, we can check the manufacturing date for expiry.

Or alternately, you can try baking the PCB in the sun. Although I'd suggest using this as a last resort only since baking times can vary based on whether its sunny or cloudy or even how much the temp is. This can trigger a chain of multiple trials and errors.

\$\endgroup\$
1
\$\begingroup\$

I lately discovered a perfect solution: I use piece of 0.2mm thick transparent silicone sheet from Ali. With a small roller I distribute the ink evenly underneath. Silicone doesn't adhere at all.

And it even gets better: it is heat resistant. So prior to inking I lay aout the sheet on the board, attach a vinyl auto-adhesive on it and laser cut the pads (7W laser diode on 30%, modest speed). Vinyl gets cut neatly, silicone sheet is not affected. Peeling of the excessive vinyl leaves a very acurate mask for the non-curing areas.

It took me a year to figure this out!

\$\endgroup\$
2
  • 2
    \$\begingroup\$ Silicon, or silicone? They're two very different things. \$\endgroup\$
    – Hearth
    Commented Jun 4, 2020 at 22:42
  • \$\begingroup\$ Thanks for pointing out; I was unaware of the huge difference. Fixed it the post! \$\endgroup\$
    – Mark SdS
    Commented Jun 6, 2020 at 16:52
0
\$\begingroup\$

Whatever you are using for the release liner or artwork it has to have a very low COF (coefficient of friction) on the side against the solder mask. This allows for an easy release from the masking material. If you apply a piece of tape to the side used against the mask the tape should come off very easily.You can spray it down with something like pledge and wipe it off and this will facilitate better release. Hope this helps.

\$\endgroup\$
0
\$\begingroup\$

Before putting a film/negative on solder mask, be sure to pre-dry the mask first. Put it in an oven, dry it for 5-7 minutes, set the temperature to about 80 degrees Celsius. This will prevent the transparent film from sticking to the solder mask.

Then you can develop the mask using UV light.

Finally, to remove the extra mask, put the PCB in sodium carbonate and water solution, brush gently to remove the extra solder mask, and reveal the exposed copper. The final stage should be baking the PCB at 160 degrees Celsius for 30 minutes. Optionally you can also cure the mask with UV for 30 minutes.

\$\endgroup\$

Your Answer

By clicking “Post Your Answer”, you agree to our terms of service and acknowledge you have read our privacy policy.

Not the answer you're looking for? Browse other questions tagged or ask your own question.