3
\$\begingroup\$

I am building an LED Cube with my kids and a launchpad. I built a prototype with perf board and its seemed to work pretty well, except the LEDs were dim. They were pretty cheap LEDs, I didn't give it much thought. Well, I decided to have some boards made from seeedstudio for them. Also I bought very bright LEDs. That's the backstory, here's my problem:

I can't seem to get the LEDs to brighten enough.

  • Hooking the LED up without the transistors it works as expected on a breadboard.

    Hooking up one transistor works switching with the LED behind the transistor.

    Hooking up one transistor is dim switching with the LED before the transistor (transistor switching to ground)

On breadboard:

  • 3.3V -> resistor -> emitter -> collector -> LED -> GND - OK!
  • 3.3V -> resistor -> LED -> emitter -> collector -> GND - DIM!

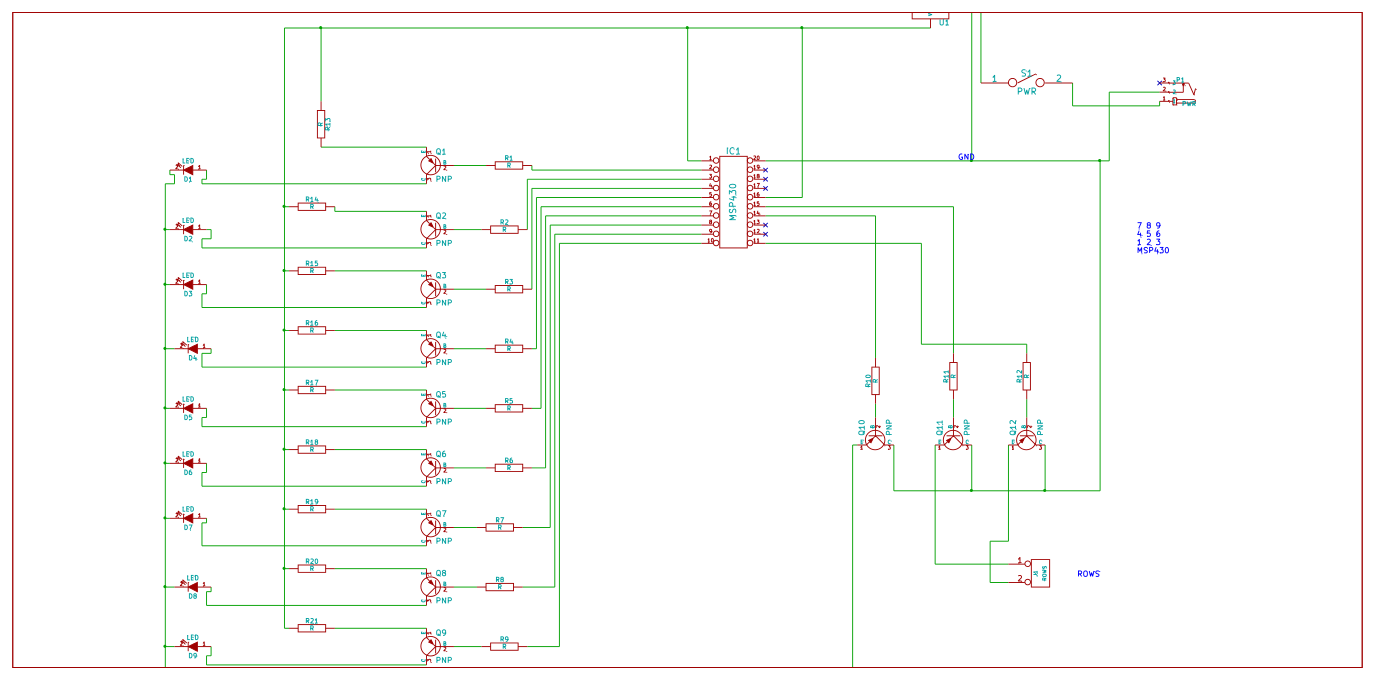
Here's the schematic:

schematic

Sorry, this probably isn't well worded. I hope the schematic can help explain.

\$\endgroup\$

2 Answers 2

2
\$\begingroup\$

You don't show any resistor values or mention what type of LEDs you are using (what colour/Vf?) but if you put the LED on the emitter side you have to include the ~0.6V drop across it and the resistor, which means it will see a maximum of roughly 3.3V - 0.6V - (I_LED * R_LED). Let's say you are using a 100Ω resistor, and the LED has a VF of ~2V, then you will have (3.3V - 0.6V - 2V) = ~0.7V across the resistor, which means you will only get around 0.7V / 100Ω = 7mA through the LED.

This may be better shown with a couple of examples, first we'll look at the emitter side:
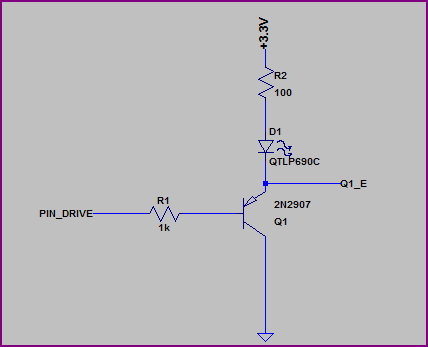
PNP Emitter

Simulation:

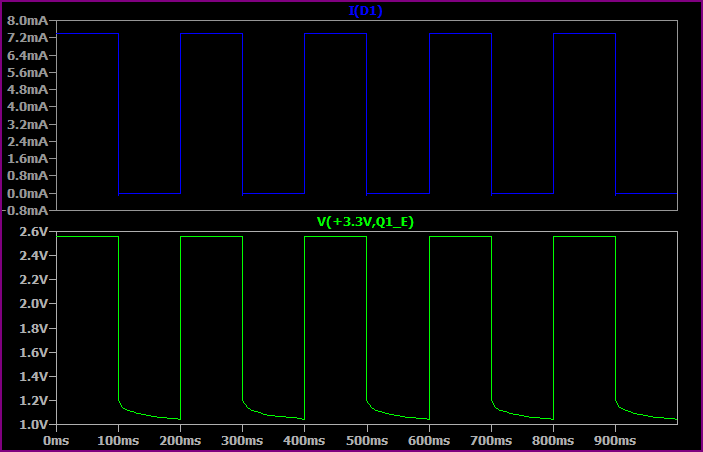
PNP Emitter Sim

This shows the base switching from 0 to 3.3V every 100ms.
As you can see, the highest voltage seen at the top of the LED + resistor is only ~2.5V, so allowing for ~1.8V drop across the LED we only have ~0.7V left for the resistor. So we get a maximum of 0.7V / 100Ω = ~7mA.

Now let's look at the collector side:
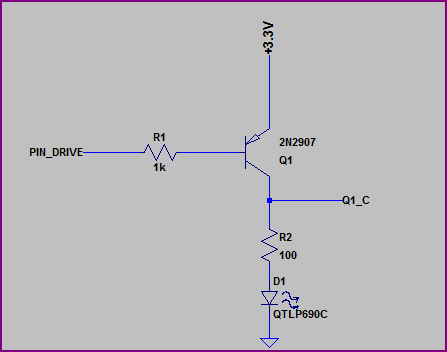
PNP collector

Simulation:

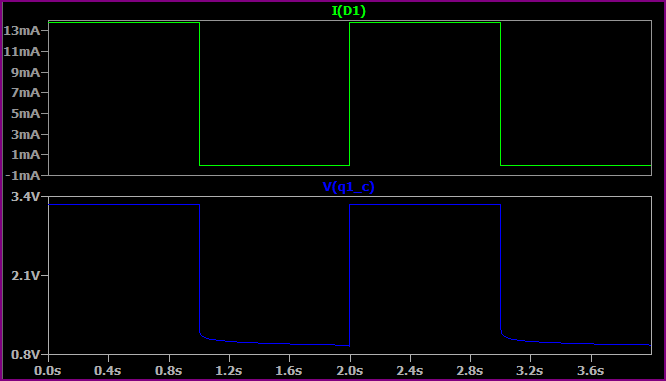
PNP Collector Sim

Here we are switching the base from 0V to +3.3V every second (no reason for the time difference, just set up that way)
Now we have almost the full 3.3V across the LED + resistor (minus a few 10's of mV for the transistor saturation voltage) so we get a higher current. If we assume 1.9V for the LED (the Vf will rise a bit for a higher current, then we have (3.3 - 1.9) / 10 = ~14mA, which is what we are seeing.

So, remember that the emitter voltage will always be around 0.6V - 0.7V above the base voltage (when base emitter is forward biased) So for example, if the base is at 0V then the emitter is at ~0.6V. If the base was at 1V them the emitter would be at ~1.6V.

EDIT - now we know the LEDs are 3.2Vf nominal, a 3.3V supply makes things a little awkward, ideally you would have a bit more headroom.
However if you study the datasheet (not given) then it should have a IV curve so you should be able to calculate things from this. The 3.2Vf value will probably be given for something like 20mA, for say 10mA it may be 3V, so you can work out the resistor value to give you roughly your desired current.

\$\endgroup\$
5
  • \$\begingroup\$ Hi, thanks for the info. They are 3.2Vf LEDs. I found the problem (apparently), in answer \$\endgroup\$ Commented Mar 16, 2013 at 7:11
  • \$\begingroup\$ With 3.2Vf LEDs (white?) then as well as putting them on the collector side you also really need a higher supply voltage. Ideally at least a volt above the Vf so it makes the resistor selection a bit easier. \$\endgroup\$
    – Oli Glaser
    Commented Mar 16, 2013 at 7:13
  • \$\begingroup\$ I will have to do that in version 2, I got the LEDs to appear bright enough for me. Details in the answer i posted. Thank you very much for your time \$\endgroup\$ Commented Mar 16, 2013 at 7:15
  • \$\begingroup\$ Using 3.3 Ohm resistors should probably do too to give you maybe 10mA or so, if they are bright enough for you like this then that's fine. I added a bit in my answer, check the datasheet for the IV curve and do a few calculations to give you an idea of what current you are heading for. Remember the Vf will vary between LEDs and with temperature, so it's best to try and at least get some rough figures. \$\endgroup\$
    – Oli Glaser
    Commented Mar 16, 2013 at 7:24
  • \$\begingroup\$ Thank you, I will do that. I hope I understand enough to teach my kiddos. Thanks again Oli! \$\endgroup\$ Commented Mar 16, 2013 at 7:29
1
\$\begingroup\$

Well they're working now. Here's what I did:

I switched out the Transistors switching the cathodes to NPN transistors (the transistors switching anodes are PNP)

Apparently I need to learn more about transistors

I forgot to give Resistor values too, I apologize. If it helps anyone with my problem I am using 3.3Ohm Resistors, 3.3V power, with 3.2Vf LEDs, with 470Ohm resistors on the base All columns are PNP and now all rows are NPN transistors

\$\endgroup\$

Not the answer you're looking for? Browse other questions tagged or ask your own question.