1
\$\begingroup\$

I have programmed my ESP32 to (supposedly) output a 12 MHz clock signal, to use as a substitute for a broken clock crystal on another microcontroller. The code I used is adapted from this esp32 forums post.

However, it appears that the target microcontroller is not responding to the clock signal. To at least make sure it's getting a signal at all (and the problem is with the target microcontroller, not the esp32), I want to detect that the esp32 is outputting the signal out of the intended pin.

I do not have access to an oscilloscope. How do I do this?

EDIT: I also do not have access to a frequency counter, logic analyzer, etc. And the target uC must be run at 12MHz or it will not work (it has internal DRAM, not SRAM).

Also, the esp32 is outputting the signal using the "ledc" peripheral, which is basically a PWM counter. It is not bit banged in any way.

\$\endgroup\$
6
  • 1
    \$\begingroup\$ "megahertz-range", can you be more specific? How are you driving this signal? (bitbang vs timer peripheral) Do you have a multimeter with a frequency measurement mode? Do you have an oscilloscope? What frequencies can you inspect / measure? (line in on a PC sound card can do ~15kHz no problem, often much higher) Can you run the target slower? (in your visible range) \$\endgroup\$
    – Attie
    Commented Apr 1 at 13:00
  • \$\begingroup\$ This question may not provide helpful answers. There are multiple ways to detect presence and frequency of the signal, but whether you have the tools or equipment to implement any of them is unknown. What do you have then? A frequency counter? Logic analyzer? Another ESP32 or other MCU you can program to measure the signal? Also how do you know the other microcontroller can accept 3.3V square wave on crystal pin from ESP32 without damage, or that you are using the correct pin to input it? \$\endgroup\$
    – Justme
    Commented Apr 1 at 13:11
  • 1
    \$\begingroup\$ dragon, what's the expected frequency? I used to use an AM radio set nearby and tuned it around a bit. Worked just fine. \$\endgroup\$ Commented Apr 1 at 13:24
  • 1
    \$\begingroup\$ Can you feed the 12 MHz output back to some ESP32 input pin that can measure it? \$\endgroup\$
    – Justme
    Commented Apr 1 at 13:32
  • 1
    \$\begingroup\$ @dragoncoder047 obviously, then don't restrict yourself to what Arduino exposes.All the hardware is still there, even if arduino doesn't offer convenience functionality around it. \$\endgroup\$ Commented Apr 1 at 14:50

6 Answers 6

6
\$\begingroup\$

With a multimeter measuring voltage:

  • Assuming the esp32 signal source has 50%/50% duty cycle, measure the DC voltage at the output pin...it should be about half of esp32's Vdd. Otherwise, you'll likely measure near-zero or near-Vdd voltage.

However, this won't tell you the frequency.
Attach a short wire to esp32 I/O pin, and bring it near a FM broadcast radio. You're listening for harmonics.
For example, for 12 MHz at the output pin, the 9th harmonic should produce a carrier at 108 MHz.

\$\endgroup\$
5
  • \$\begingroup\$ The frequency is not changing, so there is no "FM" modulation. What should I be listening for on the fm radio? (BTW, your guess of 12MHz was exact.) \$\endgroup\$ Commented Apr 1 at 13:29
  • \$\begingroup\$ @dragoncoder047 As there is no modulation, there is only a carrier which the radio should detect and say there is a signal. The audio is just silence. \$\endgroup\$
    – Justme
    Commented Apr 1 at 13:35
  • \$\begingroup\$ Yes, an unmodulated carrier produces no audio. Many FM receivers include a squelch circuit that acts like a "mute" between stations, so it can be difficult to tell if you have no audio due to a bare carrier, or the receiver is muted due to squelch. Quickly attaching/detaching the antenna should cause an audio disturbance in the receiver. Or moving the two apart far enough will cause noise, or de-activated squelch. \$\endgroup\$
    – glen_geek
    Commented Apr 1 at 13:40
  • 1
    \$\begingroup\$ Or get a cheap shortwave radio and tune to 12 MHz. \$\endgroup\$
    – John Doty
    Commented Apr 1 at 15:09
  • 2
    \$\begingroup\$ I got an FM radio and tuned it to a "silent" station, and then unplugged the wire. Instant static. Plugged it back in the static went away. Looks like the signal is OK :) \$\endgroup\$ Commented Apr 1 at 15:12
3
\$\begingroup\$

I want to detect that the esp32 is outputting the signal out of the intended pin.

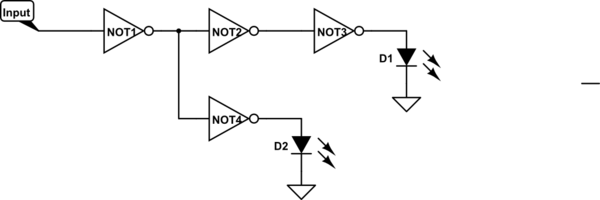
The following circuit will light up both LEDs if its input has both high and low signals. It can be implemented using any one of a number of IC chips with multiple inverters capable of driving LEDs.

schematic

simulate this circuit – Schematic created using CircuitLab

There are many variations that can be made to this circuit.

Depending on the logic family, it may be implemented with only two inverters. The example I show uses four because a) there are many IC chips that have multiple inverters and the cost of using an extra inverter is small and b) there may be concern that the LEDs will load the output of the inverter preventing it from properly triggering a following stage, so LEDs are only connected to "final" stages.

In some cases, one may want to place a current limiting resistor in series with the LEDs. I have used a circuit such as this using LSTTL logic, and never bothered with resistors. It worked fine. But if the LEDs are particularly power hungry, or if the logic family has "weak" outputs, you may want to use resistors.

Also, in some cases, it may be preferable to connect the LEDs to Vcc and have the inverters sink current, rather than source it. It all depends on what kind of inverters you have available.

Another useful circuit is to have a few parallel out counters, such as 74xx590's or 74HC4040's driving LED bar displays. Each LED bar will toggle on and off, but as one moves through the frequency dividers, the frequency gets lower, and eventually one reaches a point where the toggling is visible. This can give an indication of the frequency of the digital signal.

\$\endgroup\$
1
  • 1
    \$\begingroup\$ Tried with a CD4069, both LEDs light up :) Now just need to verify the frequency. \$\endgroup\$ Commented Apr 1 at 15:09
3
\$\begingroup\$

Your ESP32 has a "pulse counter" peripheral, which you can program to raise an interrupt every 216 rising input edges. Nice! Route your output pin back to another pin on your ESP32, and attach a "Pulse Count Controller" input signal to that pin (Chapter 17, p. 492, in the ESP32 technical reference manual), and configure the counter to count up, and the comparator to compare to 216-1 (=0xFFFF).

In that interrupt service routine, toggle another output pin; toggling the pin ever 216 input rising edges divides the clock by 216·2, so you end up with 12·106 Hz / 217 = 91.55… Hz. You could simply attach (with a voltage divider and a capacitor) that to a line in on your PC or smartphone sound card and use any audio analysis software to get a spectrum; you should get a dominant peak at 91.55 Hz. Useful software here is Audacity on the PC, or Phyfox on a phone.

The question really is whether this is worth the effort. You can buy complete, guaranteed-to-work 12 MHz oscillators with the output level you need (whatever that might be, you didn't tell us!) for cheap; example 1, example 2

\$\endgroup\$
2
\$\begingroup\$

You can achieve "envelope detection" with a single diode, slightly better with two, plus a small capacitor and a resistor.
The diode needs to work at the frequency of interest - "MHz" in your case. If this is of interest I can comment further on components.

Either feed the signal directly to the diode input, or via a capacitor.
In your case the signal is "captive" BUT you can do this via RF coupling.

If you want to determine if the ESPxx is working you can detect it's RF signal. You could turn it on and off under program control every say 2 seconds so you can easily detect the signal.

Connect the input to the coax output from a quarter wave antenna (ideally a dipole with either a sleeve 1/4 wave on the coax or a ground plane). At full power an ESPxx may deliver 10's of milliwatts into its transmit antenna. An analog meter on the diode detector output set to mV or ideally microvolt range (eg 2.0 mV range on some meters gives you 2000 uV full scale. An analog meter may be better than a digital one. Then move receive aerial VERY near transmit aerial and try turning transmitter on and off. Move it away to see distance effect.

Test on a cellphone to confirm that it works - you may need a different length aerial BUT at almost touching range it may not matter enough.

More input available if of interest.

NBNBNB: Get an oscilloscope! - Even an old terrible one or an AliExpress cheapo will transform your experimenting.


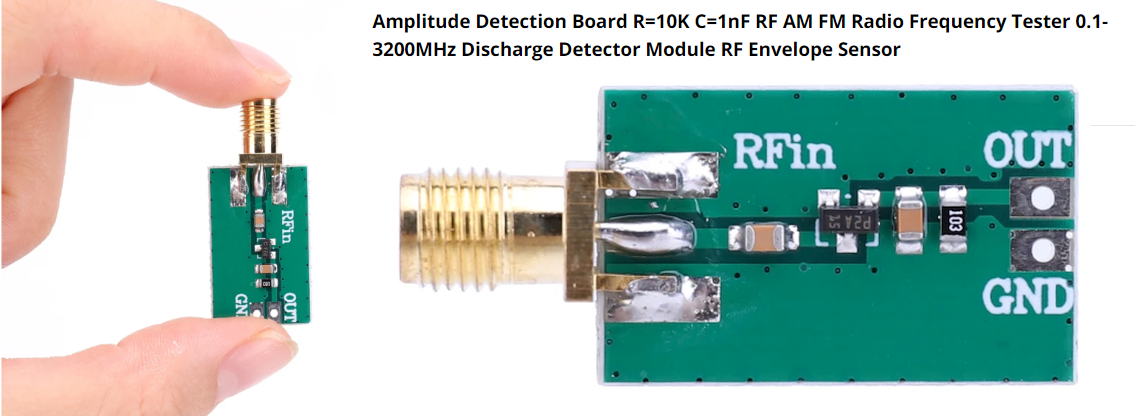
This is a prettier way of doing the same thing.
I've got one of these coming from China - due today (it's 2am here now :-) ). This cost me about $US4 with free shipping and about 10 day delivery time. YMMV. Mine is from here BUT that's NOT a recommendation - it may or may not work (diode may be flaky, but shouldn't be) and there are other sellers.

The P2A is a double diode - one connects input to ground, and the other of opposite polarity connects input to filtered output.
The pink component after the diode is a capacitor to ground and the black 103 is a 10k resistor load to ground.

enter image description here

\$\endgroup\$
2
  • 1
    \$\begingroup\$ Hmm, I thought the question was about getting an ESP32 to output clock signal to substitute a broken clock crystal on another microcontroller. The code example referenced in the question is to generate 20MHz square wave at 50% duty on GPIO18.. Whereas isn't this answer is about detecting the 2.4 GHz WLAN WIFI output from the ESP32 transmit antenna? \$\endgroup\$ Commented Apr 1 at 13:18
  • 1
    \$\begingroup\$ @ChesterGillon Yes :-) . Thanks. I realised my error as soon as I posted the answer and have now edited it to make it more general - it addresses the question as asked AND also suggests another approach. I saw your helpful comment after I'd finished editing. \$\endgroup\$
    – Russell McMahon
    Commented Apr 1 at 13:24
1
\$\begingroup\$

Detect presence of 12MHz squarewave without oscilloscope

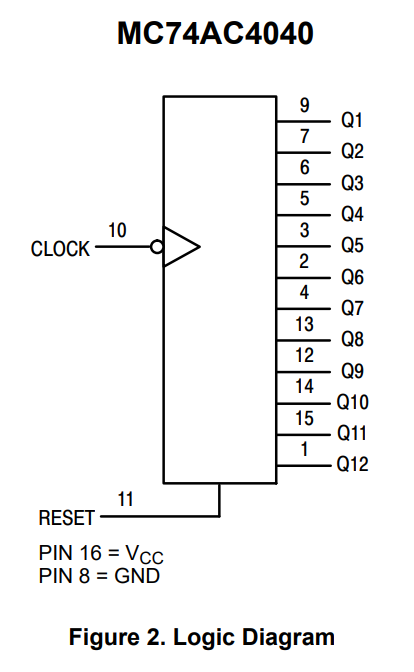
Maybe, if you have a 74AC4040 12-stage binary ripple counter handy, you can reduce the 12 MHz to 2930 Hz. You should then be able to "listen" to this signal on a speaker fed via a decoupling capacitor and a 470 Ω resistor. Data sheet: -

enter image description here

You could then compare the pitch produced with this on-line tool. I think you could get within 2% of the divided signal frequency using an untrained ear and, this can establish what the output frequency is.

If you had two 4040s you could cascade them and get a signal that is around 1 Hz and drive an LED with it. Easy enough to see it flashing on and off at 1 Hz.

\$\endgroup\$
2
  • \$\begingroup\$ I thought of something like this but I don't have any kind of counter chips, so I can't do this... \$\endgroup\$ Commented Apr 1 at 14:35
  • \$\begingroup\$ @dragoncoder047 these are really inexpensive chips so why not buy one. \$\endgroup\$
    – Andy aka
    Commented Apr 1 at 14:42
1
\$\begingroup\$

You can fashion a logic detect from CMOS gates or such. Bear in mind that you have four things to detect:

  • high-Z (undriven)
  • static low
  • static high
  • changing signal

There's plenty of examples of handmade 'logic probes' that can do some or all of these things. I'll leave that up to you and your favorite search engine.

Fortunately, pre-made logic probes are widely available at reasonable cost ($10 - $30). These pen-like probes are powered by your board and indicate all four conditions: high-Z, fixed high, fixed low, and pulsing. I've used them, and in my experience they're a handy item to have for board-level troubleshooting. More here: https://www.electronics-notes.com/articles/test-methods/logic-probes/what-is-a-logic-probe.php

Moving up the food chain, you can also get USB-based logic analyzers for your PC. More about those here: https://hackaday.com/2017/07/29/everything-you-need-to-know-about-logic-probes (note: they're calling the thing a 'logic probe', but it's really a logic analyzer.) These are far less expensive than a 'scope and for some work (like I2C, SPI and other protocols) much more useful. Here's an analyzer for less than $20.

If you have a bit more budget, consider a USB-based scope. Then you can look for some basic signal issues if that's a concern (might be for 12MHz.)

Finally, how about a combo 'scope, logic analyzer, pattern generator, and power supply: https://digilent.com/shop/analog-discovery-3/

\$\endgroup\$

Your Answer

By clicking “Post Your Answer”, you agree to our terms of service and acknowledge you have read our privacy policy.

Not the answer you're looking for? Browse other questions tagged or ask your own question.