6
\$\begingroup\$

I am controlling a standard 5-volt servo with an Arduino with PWM.

My objective is to rotate the servo until it physically gets stalled (feels resistance) and then stop. Then I want the Arduino to store the degree at which the servo stopped at.

To do this, I have this idea in my mind...

  1. A variable (servoPos) is declared.
  2. Arduino increments servoPos one degree at a time and writes it to the servo.
  3. Arduino simultaneously reads the current drawn from the servo.
  4. IF the Arduino sees a current spike, then it stops the servo.
  5. The Arduino stores the servo position in a new variable.

I am doing this for a project that emphasizes on low-cost. Therefore, I want to refrain from using motor encoders, op-amps, or any proprietary component.

Please show me how I can detect servo stall with an Arduino by reading the current. If you have a better/cost-effective idea, that would be appreciated too!

Thanks in advance!

\$\endgroup\$
4
  • 3
    \$\begingroup\$ You're going to find this very, very difficult to do without some sort of amp. I recommend you revise that requirement. \$\endgroup\$ Commented Dec 19, 2014 at 7:09
  • 1
    \$\begingroup\$ Put a small resistor between the servo ground and true ground, measure the analog voltage over this resistor. If the value gets too high you have a stall. \$\endgroup\$
    – s3c
    Commented Dec 19, 2014 at 8:03
  • \$\begingroup\$ Alternatively, drive the servo at low power for a period of time that you know will be long enough to hit the stop position from any starting position. You need to limit servo power so it's enough to move freely but will hit the stop gently & not burn out. \$\endgroup\$
    – John U
    Commented Dec 19, 2014 at 13:55
  • \$\begingroup\$ IMHO you are going in the wrong direction. The current will be too low for you to sense it reliably. Just use an encoder or a potentiometer on the shaft to sense the position. A potentiometer costs much less than any amplifier, and you can find it easily. If you don't want to add it, just open the servo motor and solder a wire on the internal potentiometer it uses to sense the position, then read its voltage (preferably adding a buffer) . move it until the value changes, then you found the maximum. \$\endgroup\$
    – frarugi87
    Commented Dec 1, 2015 at 17:37

1 Answer 1

8
\$\begingroup\$

The cheapest dodgiest thing you can do is use a low-side current-sense resistor (0.1ohm will do) and use the Arduino's ADC input with a 1-10K series resistor, over-voltage clamp, and ensure the servo is clamped too.

Let me make some assumptions/recommendations first:

Power your Arduino and the rest of your system from a rechargable Lipo/NiMH battery pack over 7V volts (which means a 2 cell Lipo or ~4 cell NiMH). The battery can power the Arduino Uno as it has an onboard regulator for it's own 5V needs, but I suggest you put the servo on it's own 7805 or better/newer technology linear regulator in order to separate it from the Arduino's supply a little bit, and also in general to have more reliable and safer results from the servo. Most hobby servos are 5-6V recommended input anyway.

The general premise is to use a low-side current shunt resistor, of a low value as to not be too limiting to the system you are measuring, but enough that you can sense the current stress from the stall condition reliably enough with the 5V 10-bit ADC on the Arduino.
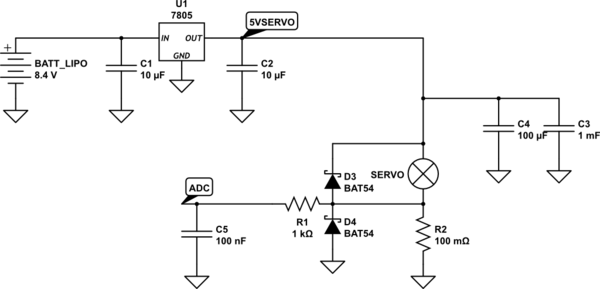
schematic

simulate this circuit – Schematic created using CircuitLab

I have shown in the schematic above a 2-cell fully charged (8.4V, 4.2V per cell, with 2 in series) Lithium Ion battery, going to a 7805 (or if you can find a better one, please do. LDO style would give better long-term results as the batteries drain into the drop-out region of older models like the 7805) with appropriate input and output capacitors, and then off to the servo. The servo has "close by" a 100uF and 1000uF (1mF) capacitors so that large amounts of current can be provided without tanking the 7805 or the battery too much for short periods of time. Obviously a continuous short/stall it will still affect the system "up stream".

There is a clamping/flyback schottky diode D3, parallel across the servo + and - connections. Not shown is the servo's signal/control input, but you should know how that works. By the way, I suggest you use Arduino's Servo library, not "standard" PWM as the frequencies are too high.

The clamping diode D4 is to protect the Arduino's ADC pin from negative voltages. The series resistor R1 is input current limiting combined with filter cap C5 to form a little bit of low-pass passive filtering, helping avoid false positives for current spikes during the normal operation of the servo.

As current through the servo increases, the voltage across our sense resistor R2 will increase. I set the resistor to 100mOhm, which will allow us to use Ohm's law to see what voltage will be across it during an arbitrary current.

I actually looked at it from the Arduino and code viewpoint, thinking the ADC is 10-bit, meaning 1024 steps. The reference is usually 5V, so 5000mV/1024 is 4.88mV per "unit" of the ADC in the code. Lets say to avoid detecting something small, lets aim for an ADC reading of 20+ to trip the stall current detection code.

Lets say for a value of 25 read on the ADC, 25 Units * 4.88mv/Unit is 122mV on the ADC input in the real world. The required current through the sense resistor to get 122mV across it follows Ohm's law. V = IR, so 0.122V = I * 0.1, which is 1.22 Amps.

I believe that 1.22 Amps is reasonable enough for a stall current on a hobbyist servo, and it may be more than this, but certainly normal movement will not be anywhere near this.

The last thing to note is, if you find the ADC values with 0.1Ohm are not good/high enough, you can easily just double the resistor to 0.2Ohms. Remember that you do not want to limit the servo from normal operation though, but 5V/0.2Ohm is still allowing a short circuit of the servo of a hefty 25 Amps so we are not anywhere near affecting it's operation yet.

The ADC reading code should have some kind of timer/time-out period where if the ADC values are consistently above 20->25 or whatever you choose as your limit (you can tune it later), perhaps for 5 samples in a row, taken at 5ms intervals gives you a response time of just over 25 milliseconds to a legitimate stall condition. That should be plenty! Remember every time a servo starts up, or changes direction, it WILL draw this amount of current for short periods. Try to avoid tripping the "stall" condition too fast.

\$\endgroup\$
9
  • \$\begingroup\$ Do servos have flyback or EMF to worry about? I've searched up and down and I can only find info on that related to regular motors. No one seems to bother protecting their circuits from servos...leaving me to believe that the internals of a servo take care of that..? Also, wouldn't R2 be destroyed in your above circuit due to a large power value? \$\endgroup\$
    – Bort
    Commented Feb 16, 2016 at 16:04
  • \$\begingroup\$ @Bort First of all, R2 is a current shunt resistor and 100mOhms is not too bad, but honestly 10mOhm would be ideal. You might need a simple op-amp set to x5 gain between the R1 node and the microcontroller's ADC, to make it back to a useful voltage for current sensing. \$\endgroup\$
    – KyranF
    Commented Feb 16, 2016 at 21:37
  • \$\begingroup\$ @Bort servos (especially cheap hobby ones) are just DC motors with special built-in control circuitry to allow them to act as a position controlled rotating actuator with a simple interface. The motor's inductive and noisy nature is still present, and can still cause havoc on nearby circuitry. If you begin putting sensitive circuits on the same connections as the servo, I suggest doing the flyback clamping diodes as shown as D3 and D4 in my diagram. D3 is the main flyback diode, and goes from Servo + to - connections. D4 is less important but can help protect the microcontroller and ADC. \$\endgroup\$
    – KyranF
    Commented Feb 16, 2016 at 21:40
  • 1
    \$\begingroup\$ @MattWilliamson hi matt. i'm glad this answer helped you. 12 bit ADC and 3.3V is fine. It's basically impossible for you to get 3.3V across the sense resistor of 100mOhm unless you somehow do 33 Amps through it. However, if your range of current sensing is only around 100 and 200mA you might want some gain on the sense voltage, or use a 1 Ohm resistor. Yes, more heat is generated with a larger resistor, but if it is indeed only 200mA that's no issue. your calculations seem correct for the values you'd get from the ADC. only using 12-24 of 4096 is silly though. use op-amp with gain or higher R. \$\endgroup\$
    – KyranF
    Commented Feb 19, 2017 at 5:40
  • 1
    \$\begingroup\$ @MattWilliamson the 1-10k resistor for the ADC is both to protect it from spurious over-voltage and static, but also to help match impedance on the ADC inputs. ADCs are often tuned for certain source impedances. Usually lower resistance is better, things get bad (inaccurate values) when the source resistance is too high, because the sampling capacitors inside the ADC don't fully charge before the sample is taken (you end up with lower-than-real values) \$\endgroup\$
    – KyranF
    Commented Feb 19, 2017 at 5:51

Your Answer

By clicking “Post Your Answer”, you agree to our terms of service and acknowledge you have read our privacy policy.

Not the answer you're looking for? Browse other questions tagged or ask your own question.