0
\$\begingroup\$

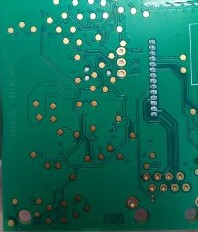
I want to desolder an element from a PCB, I can see all the solder joints that are holding it on to the board and I can reach all of them easily.
I am not very experienced in working with a soldering iron, tbh this is the first time I am working with one but I informed myself how to do it correctly and I also got myself a desoldering pump to remove the melted solder joints.

The only thing that is giving me headaches is the fact that I read it can be difficult to desolder solder joints that are close or on a ground plane because the ground plane absorbs heat.
I took a look at my board and this may be the case for 3 or 4 of them.

My question is do I have to take special care of those solder joints, do I need a specific tool to remove those or can I remove them just like the others?

enter image description here

\$\endgroup\$
1
  • \$\begingroup\$ Use care not to heat the pad for an excessive amount of time. This sometimes causes the whole pad to detach from the board surface, (more often on low cost PCB's). This can happen more frequently when using an over size tip or with a higher power soldering iron. Always wear eye protection when soldering, especially when unsoldering as you are likely looking much closer to the board surface. \$\endgroup\$
    – Nedd
    Commented Nov 20, 2019 at 14:03

5 Answers 5

4
\$\begingroup\$

Whenever you have to desolder something the first question you need to ask yourself is: do I need the component intact?

Because if you removing damaged component then often the easiest way is to separate its pins first. For most but the smallest SMD components this can be done with wire cutter. The plastic connector shroud can be broken or melted away etc. Once you've done that removing pins one-by-one becomes trivial.

If you do need the component, see if you can distribute heat to all pins simultaneously. For 2-5 pins this usually can be done by adding solder to the pads, making a blob of molten solder. For more pins you can cut a piece of heavy gauge copper wire and put it along the pads, then cover everything in solder and keep heating until all pins got loose. Here is very good video demonstrating this technique.

Pump and/or wick can be used afterwards to clean the pads.

In either case having an iron suitable for the job is most important. Big chisel or screwdriver type tips work best for this.

\$\endgroup\$
1
  • \$\begingroup\$ yes this is also a good way. \$\endgroup\$
    – danmcb
    Commented Nov 22, 2019 at 14:07
2
\$\begingroup\$

Tricky, especially if you are not experienced. It's a connector?

What I would try is first go along the pads with a solder sucker, suck out solder, and check that each pin is physically free with the tip of a small screwdriver or similar. Also use solder wick to draw solder out. Sometimes you have to refill the hole with solder and repeat before you can get enough solder out. Even so it depends a bit on how big the hole is compared to the pin going through. If the fit is too tight this won't work.

The other option is to try to heat all pads at once and then prise the component out. A hot air gun (the type for surface mount soldering) is good, but you have to be careful not to overheat the board and the component.

It's not really a beginners job, to be honest. Needs a bit of experience, the right tools, and some patience.

\$\endgroup\$
7
  • \$\begingroup\$ Yes it is a connector where 14 tiny male pins fit in. I guess I will have to try out the first option that you mentioned. I don't have a hot air gun to heat all pads at once. I will still try it tomorrow or so if I fail to remove the element I will just ask someone for help but at least I am going to try. ^^" \$\endgroup\$
    – Ramazuri
    Commented Nov 20, 2019 at 12:36
  • \$\begingroup\$ What I would try is first go along the pads with a solder sucker True, although I would first add new solder before using the solder sucker or something else. In my experience it's way easier to desolder something when first adding new solder. \$\endgroup\$
    – Swedgin
    Commented Nov 20, 2019 at 13:21
  • 2
    \$\begingroup\$ @Swedgin yes agree - didn't write that but I would do the same. "If you want to get something off put something on." \$\endgroup\$
    – danmcb
    Commented Nov 20, 2019 at 13:52
  • \$\begingroup\$ This turned out to be way more difficult then I have expected. I tried to apply solder first and even so I couldn't remove a single pad. \$\endgroup\$
    – Ramazuri
    Commented Nov 22, 2019 at 8:33
  • 1
    \$\begingroup\$ @danmcb Ok the problem is way more complex then I thought. The main Problem is, this is one of two connectors that is attached to a module. I asked an experienced person for help and he tried to heat all pins with a tweezer, the problem is we only have one tweezer, so we can't heat up both connectors at once. On the other hand the module is very short and unflexible, so you can't really bend it and it doesn't move a bit by only heaten up one connector. We will simply remove it now with a Dremel. Thank you a lot for helping. \$\endgroup\$
    – Ramazuri
    Commented Nov 25, 2019 at 8:43
1
\$\begingroup\$

Depending on the geometry of the pads and how they are connected to the ground plane, they will require longer heating to let you remove the solder.

A tip is to use a bigger solder tip, which has more thermal mass. It will help delivering enough heat before it is drawn away by the ground plane.

\$\endgroup\$
2
  • \$\begingroup\$ Ok that is good to know I have two different solder tips. One is very thin (I was planing to use that one I may just use the other instead then) and an other that is a little bit bigger. \$\endgroup\$
    – Ramazuri
    Commented Nov 20, 2019 at 12:15
  • \$\begingroup\$ Also putting an extra drop of solder on the solder tip will help the heat conduction. \$\endgroup\$ Commented Nov 20, 2019 at 13:43
1
\$\begingroup\$
  • Decide if you want to keep the board or the component intact. Keeping both intact is a hairy problem even for experts.

  • Desoldering lead-free solder joints is tedious. It's actually easier if you first generously add leaded solder (SnPb38Cu2 or SnPb38Ag2, not SnPb40!). Connect all the pins with solder. Solder in a thick copper wire bridge as a helper.

  • Heat the whole thing up at once.

  • Pull the component. Congrats, you are almost done.

  • Remove the wire bridge.

  • Use solder wick to remove the solder from the vias. Don't use a pump, they tend to reap the copper eyelets from the board.

\$\endgroup\$
0
\$\begingroup\$

This can take a while. Desolder pumps are nice, but desoldering wick can also be useful.

Where it's not contraindicated, the easiest way is to cut the piece, and take out the pins one at a time.

\$\endgroup\$

Your Answer

By clicking “Post Your Answer”, you agree to our terms of service and acknowledge you have read our privacy policy.

Not the answer you're looking for? Browse other questions tagged or ask your own question.